Showing posts with label Beach themed nails. Show all posts

Saturday, June 14, 2025

At The Beach- Ocean and Beach Nail Design

Hello everyone! Today on the blog we will be creating a beautiful ocean/ beach design. It's that time of year again when we all enjoy going to the beach and going swimming. At the beginning of the year I created a blue gradient nail design that I thought would make a pretty beach nail design, so that's what I did I took that same gradient that I did and made it into a beach/ ocean design. 

Ocean and Beach Nail Design

Here is the nail polishes and nail art tools used to create this beautiful ocean/ beach nail design: 


Base and top coat- CND Super Shiney Top Coat and CND Stickey Base Coat.

Polishes- KB Shimmer- Plant One On Me Collection- Lilac It Or Not, Zoya- Twinkling Collection- Jen, Holo Taco- Toppers- Flakie, Holo Taco- Toppers- Scattered, and Holo Taco-Vacation collection-Beach Please. 

Acrylic paint- white.

Nail art brushes- thin striper brush and liner brush.

Other- makeup sponge for gradients, Holo Taco's liquid latex, and water to clean off your nail art brushes.

Ocean and Beach Nail Design

Ocean and Beach Nail Design

Apply a top coat to clean dry nails, and let that dry.

Polish- 

For your base color for the gradient apply a light color first, a light shimmery/ holographic blue,KB Shimmer- Lilac It Or Not. 

Let that dry. 

Ocean and Beach Nail Design

Ocean and Beach Nail Design

Ocean Gradient: 

Before we start the gradient part of this design, as long as you are not allergic to latex, you can apply a liquid latex barrier around all of your nails, and let that dry. This helps to make the clean up much more easier. 

Then for creating a gradient from lightest on the tip of the nails to darkest near the cuticle, first take make up sponge and polish your lightest blue polish (I used KB Shimmer- Lilac It Or Not) then polish your darkest blue color (I used Zoya Jen). Then with your lightest color on the tip of the nails, dab the sponge on the nails to make a gradient. 

You will need to do this step few time so your gradient will be opaque. I went over each nail twice. 

For an added holo touch, take a Flakie Holo topper and polish on the darkest part of your gradient and then a Scattered Holo topper right under that, but not all the way down the nail on the lightest part just a little on the lightest part. (you will be able to see this better on the other colors I did on my right hand.)

Ocean and Beach Nail Design

Ocean and Beach Nail Design

Sand on the Beach: 

To make this design look more like the ocean, we will need to add sand and waves in the water. First take a clean makeup sponge and a sand looking polish on a sponge (Holo Taco- Beach Please). Then dab that on just the tips of the nails, you will need to do they two time to be opaque, I also polishes on a layer a well to make sure it was opaque enough. 

Ocean and Beach Nail Design

Ocean and Beach Nail Design

Ocean and Beach Nail Design

Ocean Waves: 

For the ocean waves, take a thin striper brush with watered down white paint on it and make a few wavy line on the nails, do this one at a time While the line is still wet take a clean dry liner brush and brush the line upward to make a wavy. If the line you made dried you can all ways go over the line again to make the wave. 

Ocean and Beach Nail Design

Ocean and Beach Nail Design

Once your beach nails are all ready apply a top coat to add a shine and to help them to last though your ocean/ beach vacation. 

Here is the practice version.

Hope all of you enjoyed this ocean/ beach nail design!

See you next time for more nail fun! 

Saturday, July 22, 2023

Wish You Were Here- Beach Nail Design

Hello everyone! Today day on the blog we will be creating a fun beach themed nail design that is inspired by the Holo Taco vacation collection box. Also just recently my hubby and I went to Florida for our anniversary trip, it was very hot like most of the USA has been this summer and all we really wanted to do was be in the water. I personal love to be in the water especially if it is very hot outside and being in the ocean is the best, the ocean water in Florida was so nice and warm. To kind of relive our trip I decided to create this beach themed design, to say wish you/ we were still there.

Beach Nail Design

Here are the polishes and nail art tools to create this beach fun nail design:

Base and top coat- CND Stickey Base Coat and CND Super Shiney Top Coat.

Polishes- Holo Taco- Purple Slushie, Holo Taco- Hot - Wire Pink, Holo Taco- Beach Please, Holo Taco- Never Tide Down, Holo Taco- Private Villa, Holo Taco- Private Villa, and Holo Taco- Lemon Sucker.

Acrylic paint- White, red, yellow and brown. 

Nail art brushes- Thin stripper and detail brusher and flat brush.

Other- Makeup sponge and water to clean off your nail art brushes.

Beach Nail Design

Apply a base coat to clean dry nails.

Let that dry.

Polish- 

Thumb- Purple holographic polish (Holo Taco- Purple Slushie)

Index, middles and ring finger nails- Sand colored polish, this is your base color for the gradient (Holo Taco- Beach Please)

Pinky finger nail- Pink holographic polish (Holo Taco- Hot - Wire Pink)

Let that dry.

Beach Nail Design

Beach Nail Design

Gradient for the Ocean and the Sunset:

First we will start off with the gradient for the ocean and the sunset on the index, middle and ring finger nails. Take a makeup sponge with a sand colored polish (the same as your base color), then over lapping that color with a ocean blue, a pink and then a purple. 

Then dab the sponge on to all of the nails, you will need to repeat this step for each nails, two to three times. 

Once you have your gradient, take a flat brush with a very small amount of white paint on it and where the sand and ocean meet, dab the brush along the nail for a small wave.

Beach Nail Design

Beach Nail Design

Sunset on the Middle and Ring Finger Nail: 

For the sunset, first we will make the outline for the sun, take a detail brush with white paint on it and make a half oval on the middle and ring finger nail and try to get them to almost line up with the nails are next to each other. Then to make the refection in the water just smudge some white paint under the sun. I did make my refection a little to opaque, I think it would be better to thin the refection out more with water. 

Then let that dry.

Then go over the oval shapes for the sun with a yellow holographic polish. 

Beach Nail Design

Umbrella on the Index Nail: 

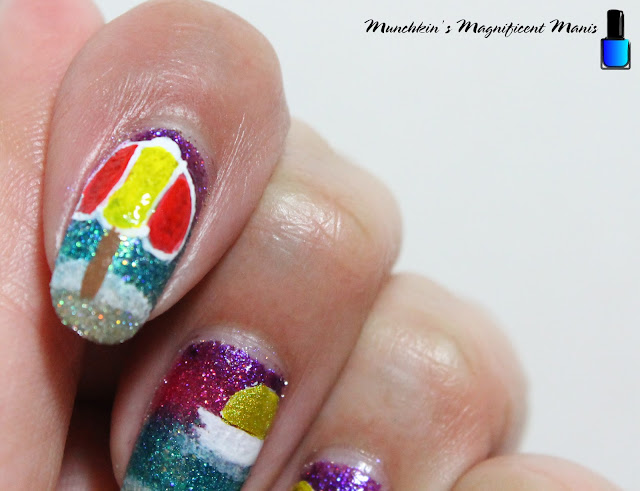
Lastly we will make an umbrella that is in the sand. Take a thin stripper brush with white paint on it, near the cuticle make a large curve shape like a upside down U, then at the bottom of that U make three small curves, then inside the umbrella the shape should look like tear drops. 

Then the center part of the umbrella fill that in with white. For the side parts mix red and white, with more red in if for the two sides of the umbrella, then the center part that we painted white now go over that with yellow. 

Once your umbrella top is done, make a brown line that is kind of thick for stand of the umbrella that goes in then sand. 

Beach Nail Design

Once your nails are beach ready apply a top coat to seal in your design and to help it to last though your beach vacation.

Practice version of the beach design.


Hope all of you enjoyed this beach nail design and are having a good summer and trying to stay cool if you live somewhere where it has been super hot!

See you next time for more nail fun! 

Tuesday, September 6, 2022

No Socks and Flops- Beach Nail Design

Hello everyone! Today we will be creating a flip flop/ beach nail design, I know I am a little behind on this design, seeing how we are at the end of summer, or according to stores and the media we are already in fall/ Halloween season. But oh well, I still want to create a beach and tropical designs, after this one I do have one more tropical design already done, I just have to do a post on it. This summer we have been doing kind of a lot and I have not had much time on the weekend/ during the week for nail art.

Beach Nail Design

Here are the polishes and nail art tools used to create this beach and flip flop nail design:


Top and base coat- CND Stickey Base Coat and CND Super Shiney Top Coat.

Polishes- Sally Hansen- Insta Dri- Peeps Blue and Glam Polish- Sandy toes anything goes- Beauty and the beach. 

Acrylic paint- Blue, white, red, yellow, greens, peach and brown.

Nail art brushes- Thin stripper and detail brush, and a flat brush.

Other- Water to clean off your nail art brushes.

Beach Nail Design

Apply a base to clean dry nails.

Let that dry.

Polish- 

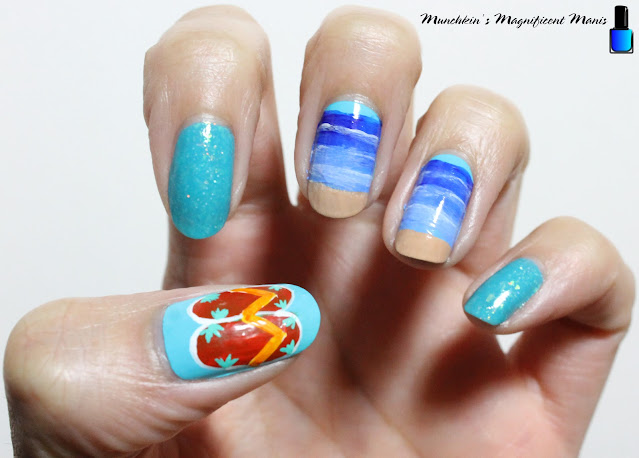
Thumb, middle, and ring- light blue (Sally Hansen- Insta Dri- Peeps Blue) 

*This is your base color for the ocean/ beach design no the middle and ring finger nail, your water is all done with acrylic paint, but you still need nail polish as a base for the paint to stick to.*

Index and pinky nail- ocean blue with iridescent flakes (Glam Polish- Sandy toes anything goes)

Let that dry. 

Beach Nail Design

Beach Nail Design

Beach/ Ocean Design on the Middle and Index Nails:

For your beach you will need two shades of blue, a dark and a light blue. For the light blue, I just mixed the dark blue and white to make the light blue that I wanted.

Starting near the cuticle, leaving a small bit o space, take your flat brush with the dark blue paint and swim to across the nail, do the same with the light blue. You will need to do this a few time to be opaque, also make sure to blend the two colors together when you paint the nails.

For the sand just mix a peach with a very small amount of brown to make your sand.

For the final touch in the water, take a thin detail brush with a very small amount of white paint on it make a few random lines in the blue, then before it dries smudge the lines to make waves.

Beach/ Flip Flops Nail Design

Flip Flops on the Thumb Nail:

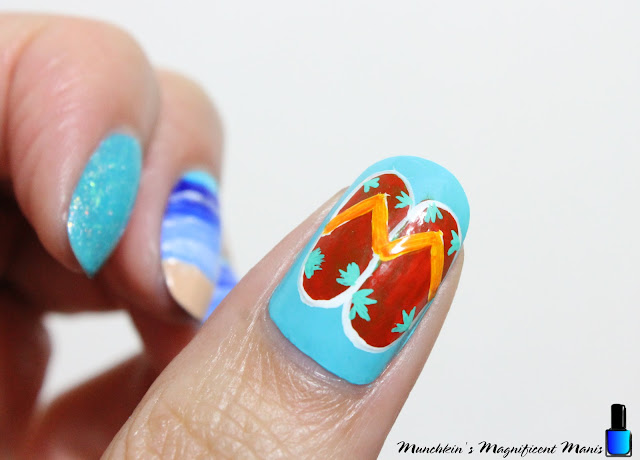
For the flip flop on the thumb I mixed red and orange to make a reddish orange for the flops. For the green plants on the flops I mixed green and white for a lighter green. 

For the flip flop shape, you first will start with the base of the flip flop where your heel of the foot goes, by making a long oval shape, then for the area where the toes go make a circle, these two shapes connect to make your flop.

Repeat this step for your next flip flop, you can make them right next to each other like I did, or you can leave some space in-between them. 

For the part the flop that goes in between your toes make a thick V shape with white, then go over the white with orange, that way the orange will show.

Lastly for the final touches you can outline the flop with white and also add some green plants/ flowers to your flip flops. 

Beach Nail Design
Beach Nail Design

Once your nails are beach ready, apply a top coat to seal in your design and to help it last though your last minute beach trips, unless you are lucky to leave somewhere where you can go to the beach year round.

Hope all of you enjoyed this beach nail design and that everyone is having/ had a nice summer.

As stated above I have one more tropical sunset nails design as summer is winding down. 

See you next time for more nail fun!

Friday, August 8, 2014

Life's a Beach- Tropical Design


Hello everyone! Hope everyone is having a good summer, enjoying all the BBQ, swimming at the water park and the beach, and just enjoying the warm weather. For today's design I will be sticking with a similar theme like the Lilo nail design I recently did. A fun summer/ tropical  themed nail design.

This design will be based on my favorite thing to do in the summer, go to the beach and go swimming. 


As always here are the polishes and tools I used (You can always change the colors of the polish for a different look):

Polish- Revlon Extra Life No Chip top coat, 
(Optional polishes used: Color Club- Daisy Does it, and Del Sol- Starry Night)
Cover Girl- glosstinis Bahama Mama, Cover Girl- glosstinis Blue Hawaiian, Revlon- Gold Coin, Sinful Color- Midnight blue, NYC- Midtown Mimosa, NYC- big apple red creme, Sally Hansen- hard as nails- White on.

Tools- Glass jar with nail polish remover in it (for cleaning nail art brush), dotting tool, 
small nail art brush. 


The Skill level for this beach design is:

Beginner

Due to only 3 of the nails having a simple design on each of the nails and the other 2 nails just having a solid color on it, I gave this a beginner rating.   


1. Start off painting all of your nails (except the ring finger) with Bahama Mama. 


2. Next, paint your ring finger nail half way with Gold Coin (this will be the sand on the beach), leaving the top part of the nail blank for now.


3. Paint the top part above the gold with Blue Hawaiian (for the water), paint this as if you where doing a french manicure. 

4. Also on the middle finger paint the bottom half of the nail with Gold Coin (this will also be the sand on the beach). 


 5. Along with step 4, paint your thumb nail the same way, with Gold Coin on the bottom half (for the sand).


6. Next we will be make flip flops (or sandals) on the sand.On your ring finger take your dotting tool with Midnight Blue and create a dot, then drag your dotting tool down to create the bottom part of the sandal. I did this 2 times to create a pair of sandals. 


 7. After the blue polish has dried take your nail art pen and draw 2 upside down V's on the sandals for the straps. 


8. On the middle finger nail we will be creating a sunrise. Above the gold sand, take your dotting tool with Midtown Mimosa (yellow) and create a small oval for the sun. 
For an optional step you can add a glitter yellow over the solid yellow to give it a sparkly look (I used Daisy Does it.) Also, you can add glitter over the sand as well (I used Starry Night to give a subtle shine.)


 9. For the final design we will be make surfboards in the sand. Take your small nail art brush and White On polish start at the top or bottom, create a point on the top and bottom, and move the brush down on each side (make sure each side is curved.) I did this 2 time to create 2 surfboards. 


10. After the white polish has dried we will be adding a small bit of detail to the surfboards by adding 2 lines. Take your small nail art brush and big apple red creme polish and draw 1 vertical line on the surfboard on the left, then draw 1 horizontal line near the bottom of the surfboard on the right.  
Also, for another optional step, you can once again add a glitter polish to the sand ( I once again added Starry Night to give a subtle shine.)


Once your design has dried add a top coat. You now have a fun a simple beach design that you can wear on your next beach adventure. 


Another photo of the beach design, so you can see the way the design should be viewed.
(This is my right hand)


Photo of my right hand, on my thumb I deiced to put just 1 surfboard on my thumb nail.


Hope everyone enjoyed this summer beach themed nail design and enjoy the rest of this summer. 
See you next time for my next design tutorial!