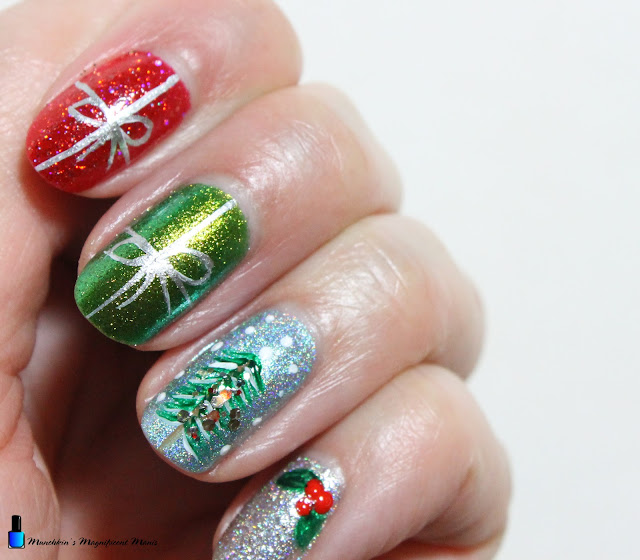
Hello everyone! Merry Christmas and Happy Holidays! Today on the blog we will be creating a Christmas themed nail design; with a gingerbread man, two gifts, a Christmas tree and mistletoe or holly. For this nail design we will be using some polish from the Holo Taco Birthstone collection.
Polishes- Holo Taco- Birthstone- March- Happily Ever Aqua, Holo Taco- Birthstone- July- Ruby,Madly,Deeply, Holo Taco- Birthstone-August- Peridon't Bother Me, Holo Taco- Birthstone- April- Ride Or Diamond, Holo Taco- Chorme Collection- World's First, and Snowman Rainbow Glitter polish.
Acrylic paint- White, black, red, green, and brown.
Nail art tools- Small dotting tool, thin stripper and detail brushes.
Other- Water and acetone to clean off nail art brushes.
Polish-
Thumb and ring finger nail- a light blue holographic polish (Holo Taco- Happily Ever Aqua)
Index- a red glitter polish (Holo Taco- Ruby,Madly,Deeply)
Middle- a green glitter/ shimmer polish (Holo Taco- Peridon't Bother Me)
Pinky- a sliver glitter polish (Holo Taco- Ride Or Diamond)
Let that dry.
First we will start off with the gingerbread man on the thumb nail. Take your detail brush with brown paint on it. Make a small circle near the tip of the nail, then two arms, a tummy and then two legs, then fill in your gingerbread man with brown paint, you may need to go over your gingerbread man a few times to be opaque.
Once your gingerbread man has dried take a dotting tool with black paint on it and make two eyes, then wipe that black paint off an take some red paint and make two dots on his tummy for the buttons.
For his frosting take a thin stripper brush with white paint on it and make some squiggly lines on his arms and legs. On his head take a detail brush with white paint on it and make a curved shape on his head and then make some thicker smaller lines for some dripped of frosting.
Lastly that same detail brush with black paint on it and make a smile for your gingerbread man. Although my gingerbread don't look to happy he looks a little sad that he might get eaten.
On the index and middle finger nails we will be making a red and green gift. On both nails I started with an outline using white paint. First take a thin stripper brush with white paint on it and make a cross on the nail, then make two loops on both sides of the center part of your cross, lastly make two lines come down from the loops you made. If you would like you can stop here or you can take a sliver polish (Holo Taco- World's First) and go over the white bows you just made with silver.
On the ring finger nail we will make a Christmas tree with snow. First take a thin stripper brush with brown paint on it and make a thin line starting in the center of the nail and going to the tip of the nail, this is for your tree stump. With that same stripper brush with green paint on it, make thin lines that are kind of curved all the way down the tree stump on both sides as you go down the tree start to make each line just a little longer. Also add a few line of white to the tree for snow.
For a last touch to your tree add a little bit of glitter to the tree, I used a glitter that a different colors in it with a little bit larger glitters.
Then you can add snow to the sky by taking a dotting tool with white paint on it make random dots to the sky.
Mistletoe/ Holly on the Pinky Finger Nails:
On the pinky finger nail we will make mistletoe or holly. Near the cuticle take your detail brush with green paint on it and make two leaves on both sides of the nail. Then take your dotting tool with red paint on it and make tree red dots.
When you are happy with how your Christmas design turned out, apply a top coat to seal in your design and to help it to last all Christmas long.
Hope all of you enjoyed this Christmas nail design!
Also if you are wondering what is on my other hand, my right hand, polishes from the Holo Taco Birthstone collection. April, July, and August birthstone polishes. This makes a great Christmas color combo.
Have a Merry Christmas and Happy Holidays!
See you next time for more nail fun!!


No comments:
Post a Comment