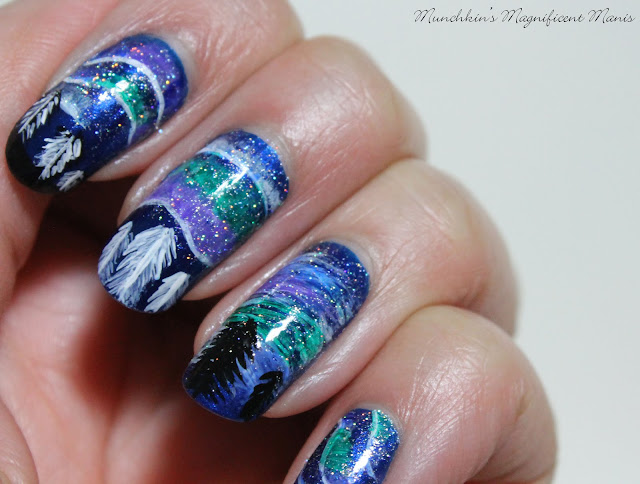
Northern Lights Nail Design
Here are the polishes and nail art tools to create this natural wonder!
Base coat and top coat- CND Stickey Base Coat and Revlon Extra Life No Chip top coat.
Polishes- Sinful Colors- Midnight blue and Revlon- Holographic Pearls- Transforming Effects.
Acrylic paint- White, black, blue, green, and purple.
Nail art brushes- thin stripper brush, and thin detail brush.
Northern Lights Nail Design
As always start off with clean nails, that are free of old polish and apply a thin layer of base coat to all of your nails.
Let that dry.
Once your base coat has dried polish all of your nails with a dark blue polish.
Then let that dry as well.
Now on to the Northern Lights design. This design is very abstract with a lot of random lines and colors in the sky. For each nail I tried to make them each look different.
Northern Lights Nail Design
With a thin stripper brush with white paint it, on each nail you first start off with some solid white lines that are curved, then with a flat brush and the smallest amount of watered down white paint, take your flat brush on the line and push up on the line to create a kind of white light, that goes all the way down the line.
Then take a watered down purple, blue and green and place it on different parts/ small sections of the white that you just made. This should not be opaque it looks better kind of sheer, but I still had to go over this part as lest two times.
After that you may need to go back over the white line that you made because it will get covered up by what you just did.
Under your Northern Lights design/ the sky you can add some trees and mountains. On most of my nails I just added a few trees at the bottom, that where simple. With your stripping brush first make a long line for the tree trunk and then make small lines from the top, for the branches for your little trees.
Northern Lights Nail Design
On the thumb nail I did add three little mountains, which where just simple little triangles that I first made the outline with black and then added white on the inside.
After the Northern Lights Design was finished, it seem like it was still missing something, so I tried applying a holographic top coat and it made this design so much better, the holo top coat give it a star like look to it, and just made this design look so much better and complete.
Northern Lights Nail Design
Once you have your Northern Lights design the way you like, apply a top coat to seal in your design and make it look even more shinny like the night sky.
Hope all of you enjoyed this Northern Lights nail design, and are staying warm this winter. All of a sudden the area I live in had a deep freeze, which was disappointing I was enjoying the mild winter we where having.
See you next time for more nail fun!


No comments:
Post a Comment