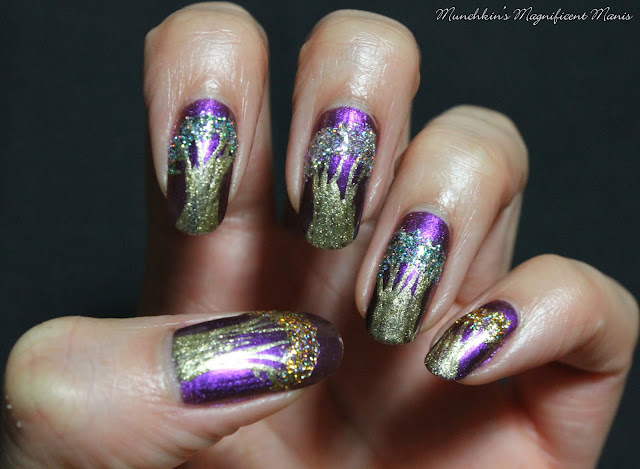
Fall Tree Nail Design
Here are the polishes and nail art tools used to make this glittery fall nail design:
Base and top coat- CND Stickey Base Coat and Revlon Extra Life No Chip top coat.
Polishes- Julep- Hazel- Boho glam, Revlon- Gold Coin, Fun Lacquer- Million Dollar Dream, Color Club- Mini- Silver Glitter, Color Club- Mini- Green glitter, and Cover Girl- Boundless color- Disco dazzle.
Nail art tools- thin detail brush and a thin stripper brush.
Small glass jar with acetone in it to clean off nail art brushes.
Start off with a thin layer of base coat to protect your nails and to help your design to last, then let that dry.
Then polish all of you nails with a shimmery purple polish, once again let that dry.
Fall Tree Nail Design
Now on to the design, for this design you can put the trees on all of your nails or just a few of the nails, for the photos above I put the tree design on all of the nails.
First we will start off with the tree trunk, take a thin stripper brush with gold polish on it and make two curved lines on each side of the nail to make the shape of the tree trunk, then in the middle of those lines start to make some random lines going different directions for the branches, also on the tree trunk make sure to fill that in with gold polish as well.
Once you have finished that part take a few different glitter polishes (I used a gold, sliver and green) and kind of blob them on to the nail on the tree branches. I used a nail art brush to blob the leaves on, you can also just use the brush that is in the bottle.
Fall Tree Nail Design, on the thumb
Fall Tree Nail Design
Then once you have your fall glittery trees the way you like apply a top coat to seal in your nail design and to help it to last.
Fall Tree Nail Design
Want an even simpler design? You can just put the tree designs on a few nails, on my other hand I only did the design on my thumb and ring finger and then the other nails I used a purple holographic glitter from Zoya called Finley.
Hope all of you enjoyed this very simple fall to winter nail design and I hope all of you enjoyed the fall and have a nice winter and try to stay warm as well, unless you are luck and live a warm place.
See you next time for more nail fun!


No comments:
Post a Comment