Mickey Mouse Nail Design
Here are the polishes and nail art tools use for this design:
Base and top coat - CND Stickey Base Coat and Revlon Extra Life No Chip top coat
Polishes- Sally Hansen- xtreme wear-Celeb city, Zoya- Renee, Color Club- Daisy Does it, NYC- Broadway Burgundy Frost, OPI Hawaii- Do you take Lei away, and Sally Hansen- Hard as Nails- Black Heart.
Acrylic paint- black and white.
Nail art brushes- large dotting tool, thin detail and liner brush, and a very small detail brush.
Small cup or jar with water in it to clean off your nail art brushes.
I don't know about all of you but Mickey looks pretty good for 90 years old! Let's celebrate his big day with this Mickey Mouse nail design!
Mickey Mouse Nail Design
Start off with a thin layer of base coat, then let that dry.
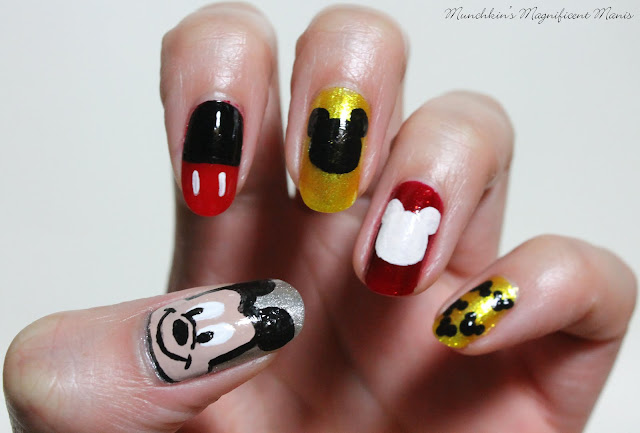
Once that has dried we will polish our base colors. Polish your thumb nail with a silver polish, your index with a red creme polish, the middle and pinky finger nail with a glittery yellow, and then your ring finger nail with a glittery red polish.
Then let that dry.
Mickey Mouse Nail Design
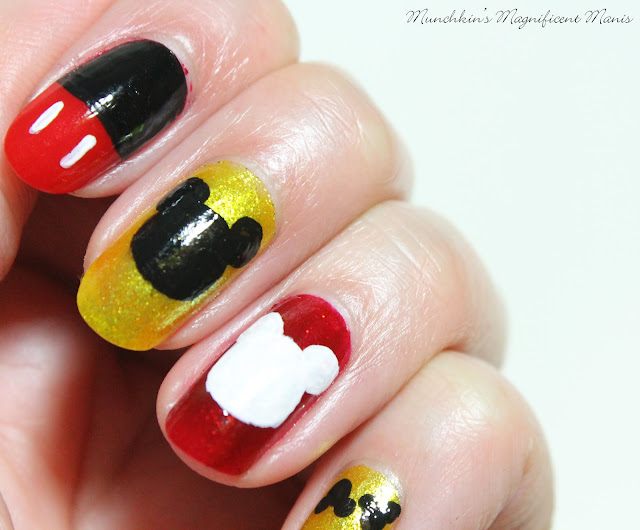
Now we will make Mickey's body on the index nail. First take a black polish and polish near the top part of the nail near the cuticle, going to about the middle of the nail, making sure that the other half is red for his pants.
Then make two thin lines on the red part for his two buttons on his pants.
Mickey Mouse Nail Design
Next we will be creating the Mickey shape on the middle and the ring finger nail. On the middle finger nail use a black paint and on the ring finger nail use a white paint. First make a large circle for his head and then make to smaller ones on top of the larger circle, for his ears.
Mickey Mouse Nail Design
Now on to the pinky finger nail with a lot of Mickey Mouse shapes on it. Take your large doting tool with black paint or polish, dot one dot for his head and then two smaller dots on the top of that dot for his ears, you can repeat this step as may times as you would like.
Mickey Mouse Nail Design
Last but far from least is the star of this design Mickey Mouse himself. For Mickey I first put down a very thin layer of white paint to just get the outline of Mickey. First make kind of a heart shape at the top for his head and then make to half circles on the sides for his checks. Then once the white outline is dry go over that with a peach/tan colored polish a few time to be opaque.
Then on to his ears and the side of his face. For the side of his face just follow the outline of the top of his head, but just make this part very thick. Then make to circles on top of this head for his ears.
Lastly is Mickey's face. We will first make his eyes, take a thin detail brush with white paint on it and make two long ovals right next to each other, then fill them in with the white. Once that is dry make two smaller black ovals in the white oval for his pupils.
For his nose, first make a large arch right under his eyes, then under that arch make a oval for his nose and fill that in with black.
Now to complete Mickey we need to make his smile, take your very small detail brush with black paint on it make a large curved line, then two small curved lines at the end of each of the larger curved line.
Mickey Mouse Nail Design
Once you have your Mickey Mouse design the way you like apply a top coat to seal in your design and to help it last.
Mickey Mouse Nail Design
Here is the other design that I did on my right hand a more simple version, with just the Mickey shapes on the thumb and ring finger nail, this is the same design that I did on my pinky finger nail.
Mickey Mouse has always been my favorite ever since I was little, so it is always fun to make any Disney themed nail design.
Hope all of you enjoyed this Mickey Mouse nail design!
Also Happy Birthday Mickey Mouse!
See you next time for more nail fun!


No comments:
Post a Comment