Friday, May 19, 2017

Unicorn Frap- Water Marble Nail Design

Hello everyone! This week on the M.M.M blog we will be creating a unicorn frap nail design, I am a little late on the whole unicorn frap craze that was around because of a certain coffee company. But I had been seeing some people creating a cool looking nail design inspired by this popular drink, so I figured why not give it a try anyways (I didn't get a chance to try the drink when it was out though.)

Unicorn Frap, Water Marble Nail Design 
 Unicorn Frap, Water Marble Nail Design

This nail design has been done a few different ways, but the best way that it seem to work out for me is by water marbling. 

Here are the nail polishes and nail art tool used to create this mythical nail design.


Base and Top coat - CND Stickey Base Coat and Revlon Extra Life No Chip top coat.

Nail polishes- Glam Polish Experiment 626- Stitch to the Rescue, OPI- La Paz-itively Hot, OPI- Hello Kitty- My Pal Joey, Julep- Hazel- Boho glam, Essie- Coconut Cove, and Color Club- Mini- Blue Purple glitter.  

Nail art tools- a stylus or tool for marbling and a makeup sponge.

Other (Not show in the photo above)- two plastic cups with room temp water in it ( I recommend two cups just in case your water starts to get to messy), toothpicks (if you don't have the stylus, even if you do I recommend toothpicks!), tape to tape around your fingers, or Liquid Latex, and some paper tower this design is Messy!

Let's start this mythical unicorn water marble nail design!  

Unicorn Frap, Water Marble Nail Design  
 Unicorn Frap, Water Marble Nail Design
 Unicorn Frap, Water Marble Nail Design

First off start off with a thin layer of base coat to protect your nails and too help your polish last a little longer. 

Then once your base coat has dried, polish your thumb, middle, and ring finger with a bright hot pink polish. We will only be doing the water marbling on those fingers, you can always do this design on all the nails, I just wanted to do the water marble on three finger nails. 

If you want to only do the water marble on the three nails, you can polish your index and pinky with a bright blue with white, bright pink and holo glitter in it, I found that the polish from the Glam Polish Experiment 626 collection Stitch to the Rescue, went perfect with this design. 

Once the bright pink polish has dried on your thumb, middle and ring finger nails we will start the water marbling. This process is messy so it is best to put tape around your finger, near the cuticles and the sides of the nail, or even better you can use liquid latex to put  around your finger for an easier cleanup. I still don't have any liquid latex, so I used tape.  

Then take your bright pink polish (the same one you used for your base color), a purple and a blue polish and open all of the bottles, so you have them ready to go, you do need to work kind of fast for this design.    

Take the bright pink and make sure the polish brush is loaded with polish, so you can drip the polish into the water. Do the same with the purple and blue, in the end you should have a bulls-eye design in your cup. 

Then with your stylus or toothpick start to drag the toothpick in the water to create a marble design. Then quickly dip your finger into the part of the water that you like design.

Then take another toothpick and remove the rest of the polish around your finger. Then take your finger out of the water. Then remove the tape or liquid latex around your fingers, as you go on each finger that you are going to marble.

Once your marble design has dried we will add some whip cream on top or on the tip of the nails. Take a small piece of makeup sponge and polish some white polish on it, then dab the sponge onto the tip of the nail, kind of like a french manicure but it does not need to be perfect.

Then once that has dried we will add the sprinkles or sugar (not sure what is on top of the drink?) Just take a blue and purple glitter polish and polish that over the white polish.   
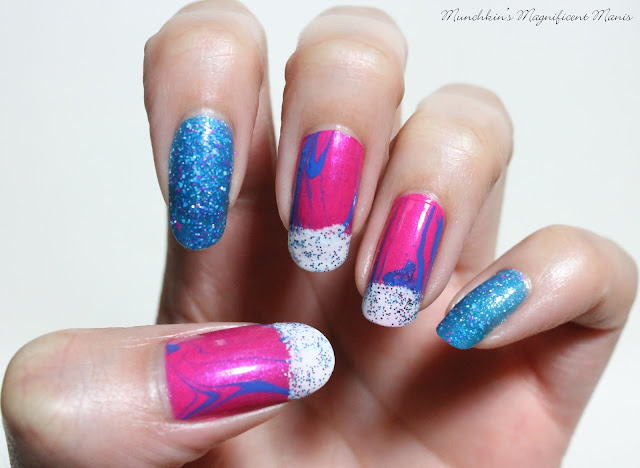
Unicorn Frap, Water Marble Nail Design 
Unicorn Frap, Water Marble Nail Design

Once your unicorn frap water marble nail design has dried apply a top coat to seal in your nail design. 

Water marbling can be both easy and hard, the concept seem easy but some times your water marble still does not come out the way you want, it just takes practice, the right temperature for your water and the right nail polishes. Also here is a link to the first water marble that I did back in 2015 Lets try water marbling, where I show step by step photos. I definitely feel like this time around that the water marble turned out much better. Also their are a lot of YouTube videos out their on how to do water marbling as well.

Hope all of you enjoyed this unicorn frap, water marble nail design, even if you did or didn't care for the drink, I still think this design turned out pretty cool!

See you next time for more nail fun! 

Friday, May 5, 2017

Spring Fling- Butterfly & Swirls Nail Design

Hello everyone! Today on the M.M.M blog we will be keeping it simple with a butterfly and swirls nail design. This design only requires one polish, black acrylic paint, one brush and a dotting tool.

Butterfly and Swirls Nail Design  
Butterfly and Swirls Nail Design

Here are the polishes and nail art tools used for this design:


Base and Top Coat - CND Stickey Base Coat and Revlon Extra Life No Chip top coat.

Polish- Pretty& Polished- Sea Spray.

Acrylic paint- Black

Nail Art tools- a small dotting tool and a thin liner brush.

Other- a glass or cup of water to clean your nail art brushes with.

Let's start this butterfly swirl nail design!

Butterfly and Swirls Nail Design  
Butterfly and Swirls Nail Design 
Butterfly and Swirls Nail Design

As always start off with a thin layer of base coat so your polish will stick to your nails, along with protecting them. 

Once your base coat has dried polish all of your nails with a blue holographic or glitter polish, or you can use any color polish that you would like.    

Then once our base color has dried we will start to create our design, the fun part about this design is you can be very random with it because this design really just has a lot of swirls with dots on it. 

For all of the nails we will just be using a thin liner brush with black acrylic paint on it. For the design that I did near the cuticles I made swirls that are connected to each other, then a few random one swirls in other spots on the nail. You can fill up the nail as much as you would like with swirls, just make sure to leave some blank space as well.

Also once you have the swirls, you can add some small dots along side of the swirls or one dot near the swirl.

Butterfly and Swirls Nail Design 
 Butterfly and Swirls Nail Design

For something a little bit extra I decided to create a butterfly a long with some swirls on just the thumb and ring finger nail.

For the butterfly start off with a long curved line, with two small swirls near the bottom, then on top of the line make two wing shapes, under that make two smaller wing shapes, for the butterfly shape.

On top of the two larger wings make two curved lines for the butterfly's antenna.

On the butterfly you can add a few small dots on the wings as well. Then on the long curved line you can add some more small dots going up the curved line. 

 
Practice version

Above is the practice version that I created, for the most part I tried to do the final design like this, the butterfly was just a little different for the practice and the final version.    

Butterfly and Swirls Nail Design
 Butterfly and Swirls Nail Design

Once your pretty butterfly and swirls nail design has dried apply a top coat to seal in your design. 

Hope all of you enjoyed this some what simple nail design. With this design you can always change the colors, you could even do this design with white paint or whatever color you would like. 

See you next time for more nail fun!   

Friday, April 28, 2017

Spring Is In The Air- Spring Flower Nail Design

Hello everyone! Hope everyone is enjoying this nice weather! If you live in an area that is just now getting warm, then it feel nice to finally have some nice weather. For today we will be celebrating spring with a spring flower nail design. 

Spring flower nail design 
Spring flower nail design

Here are the polishes and tools used for this spring flower nail design:

 
Base and top coat- CND Stickey Base Coat and Revlon Extra Life No Chip top coat.

Nail polishes- Sally Hansen- Color Therapy- Mauve Mantra, Revlon- Scented parfume- Not so Blueberry, Sinful Color- Purple Diamond, Zoya Mini- Leslie, and Cover Girl- Boundless color- Disco dazzle (this is an older polish, but you should be able to find one just like it.) 

Nail art brushes- two thin liner brush, a thin detail brush. 

Other- a small jar with acetone in it to clean up nail art brushes, a cup of water to also clean up brushes, and a toothpick to pick up the glitter pieces.

Let's start this spring flower nail design!

Spring flower nail design 
Light purple flower on the thumb nail

Start off with a thin layer of base coat to protect your nails. 

Once that has dried polish all of your nails a light pink.

First we will start off with the thumb nail (the design that is on the middle finger nail is similar to this design just a different color.) for each of the flower I first did an outline with white acrylic paint then went back over that with polish. 

For the flower on the thumb (along with the middle finger nail), take a thin detail brush with white paint on it and make one pedal on top then, two on the sides, and two near the bottom, this flower will be near the tip of the nail.

For the second flower this one will go right above the first one,then just repeat the same steps as the first flower.

Once your white paint has dried you can go over that with polish, with a linear brush fill in the flower with a light glitter purple polish. 

One that has tried you can outline the flower pedals with a darker purple polish, this helps to make the pedals stand out, then on each pedal draw one line from the center. 

For an add touch you can take a large glitter polish and place a piece of the glitter, with a toothpick in the center of the flower. I also took that same glitter and polished it near the flowers.

Spring flower nail design     Spring flower nail design

For the nail on the middle finger this flower is similar to the one on the thumb nail, the only different is the color. I used two different shades of purple a glitter purple and a lighter purple, then outline the pedals with white paint. 

Spring flower nail design 
 Spring flower nail design

For the other flowers on the index, ring and pinky finger nail, they are also very similar. They are for the most part just a different color.

Also for the most part the flowers are very similar in shape as well, they are rounded at the top of the petal, except for the flower on the pinky finger nail, that one is more pointed.

Once again all of the flower I started off making the outline with white acrylic paint, the only flowers that is just paint are the flowers on the ring finger nail.  

For the white flowers on the ring finger nail, make sure to add a lot of water to the acrylic paint to make the white watery, it needs to be kind of sheer, then you can build up the white. For the outline make sure this paint is opaque, so it stands out more.

For the index finger nail you can use a darker purple polish to fill in the flower, and just leaving a little bit of white showing around the edges of the flowers.

On the pinky finger nail you can use a light purple to fill in the flower and a darker purple for some lines in the center.

For the green steams and leaves that are coming from flowers/ attach the flowers together. Take a thin liner brush with dark green paint on it and make different random lines, that content all the flower together on that one nail, you can also add some leaves as well.    

For all of the flower you can add a piece of glitter to the center, for a added touch.

Spring flower nail design 
 Spring flower nail design

Hopefully I explained this design clearly. For the most part this design can be simple, you just need to try and have a steady hand. Pretty much all the flowers are the same just different colors.  

Spring flower nail design 
 Spring flower nail design 

As always once your flower nail design has dried apply a top coat to protect your nails and to help them last though spring, or maybe just through the week.

Hope all of you enjoyed this spring flower nail design and the nice weather too!

See you next time for more nail fun!  

Friday, April 14, 2017

Hoppy Easter- Easter Nail Design

Hello Everyone! Happy Easter, well almost Easter! Today we will be creating a cute bunny, a chick and some grass with Easter eggs in it. As always the theme will be cute, that's just my style when it comes to nail art and art in general. 

  Easter Nail Design Happy Easter Nail Design

Here are the polish and tools that we will be using for this Easter nail design:

Base and Top Coat - CND Stickey Base Coat and Revlon Extra Life No Chip top coat.

Nail polishes- Colors by llarowe- Arturo, Essie- Coconut Cove, Zoya; Daisy, Eden, Leslie, Lillian, and Rayne. 

Acrylic paint- red,white, black, green, yellow.

Nail art tools- thin liner brush, detail brush, long thin liner brush, and a small detail brush. 
(you really don't need that many brushes, I just ended up using four brushes) and a medium size dotting tool.

Other- cup of water to clean off your brushes and a small glass jar with acetone to clean off the polish on your brushes as well.

Let's hop to it and start this Easter nail design!

Easter Nail Design     Chick in egg nail design

Start off with a thin layer of base coat.

Once your base coat has dried polish all of your nail with a light holographic polish, I used
Colors by llarowe- Arturo. Then polish your thumb with a shimmery or cream yellow polish, I used Zoya Daisy. 

Once your polish has dried we will start to paint the chick in the egg on the thumb nail. Take a thin liner brush with white paint and make a zig- zag line kind of in the middle of the nail, then fill in the top near the tip of the nail with white.

Then repeat that same step near the cuticle area, just make sure their is enough room for your little chick to peak out. 

Now for the eyes and beck, with a dotting tool dot two black dots for his eyes. Then for his beak make a side ways triangle.   

If you would like you can also go over the white shell part with an off white or white polish, that was what I did.

Once the shell is dry for an added touch I just dotted colorful dots on the shell.

Easter Nail Design  
 Grass an Easter eggs on index nail

Now onto the index nail where we will paint grass and Easter eggs. First we will make three different shades of green, the main green that you already have, a light green and a dark green. First take your main green paint and then make a dark green by add a small amount of black, and then a light green by adding a small amount of yellow.

With the main green paint make random blades of grass and then, switch the colors from dark green to light green. 

Once that has dried with white paint on a detail brush make two eggs on the grass. Once that has dried go over the eggs with whatever polish color you would like (a spring color) and then you can add dots or lines onto the eggs. 

Easter Nail Design    Grass and Easter eggs on pinky nail

For the pinky nail repeat the last steps again. 

Easter Nail Design
 Bunny and bunny butt nail design 

Now on to the cute bunny and the bunny butt, which I think turned out super cute! 

First we will start off with the bunny's face on the ring finger. With white paint on a thin liner  brush, make a circle and then fill that in.

Then on top of the head make two ears, you may need to go over the bunny a few times with the white paint to make it fully opaque.

Once that has dried, with a dotting tool and black paint dot to large eyes.

With a thin detail brush with pink paint on it make a upside down triangle for the nose.

Then with a thin liner brush with black paint on it make three lines on each side of his face for whiskers.

Just for an added touch you can add some colorful dots up top of the bunny, for the background.


Next we will make the bunny butt, take a thin detail brush with white paint on it and make a big circle and then fill that in with white paint. 

Then make two oval shapes on the sides of the body for the feet. At the top of the large circle make a small circle for his fluffy. 

For the paws make a large circle and the three small dots under that with pink paint.

For the fluffiness of the tall take a light gray, a dark gray, and a white paint and dab each color into the tall until the tall look fluffy. 

Once you have your bunny butt the way you like you can also outline the bunny with a light gray paint, or if this is a little to tricky you can always skip that part, I just think this step helps to make the bunny stand out more. 

Easter Nail Design  
 Easter Nail Design

Once you have your cute bunny and chick the way you like, apply a top coat to protect you nails and help them to last longer.

 Easter nail design
 Simple Easter Nail Design, on right hand

As usually here is a simple design that I did on my right hand. I just did the grass with eggs and some colorful dots. 

Practice Easter nail design  
 Practice version of Easter Nail Design
Also here is the practice version of the Easter design that I did as well. As always I do still need to practice my nail designs before doing the final design on my nails, practice makes perfect!  

Hope all of you enjoyed this cute Easter nail design and have a Happy Easter as well!

See you next time for more nail fun!