Friday, February 17, 2017

No More Caffeine For The Evil Genius- Experiment 626 Collection

Hello/ Aloha everyone! Hope everyone had a nice Valentine's day (if you celebrate it, if not that's okay to.) Anyways this week we will be back to reviewing the Glam Polish Experiment 626 collection. We have two polishes to review this week, then two more for next week and then my final thought on the whole collection.

Experiment 626 collection- No more Caffeine for You and Evil Genius   
  Experiment 626 collection- No more Caffeine for You and Evil Genius 

Experiment 626 collection- No more Caffeine for You  
No more Caffeine for You

First we have No more Caffeine for You, this is a very bight lime green or even a slime colored polish (that's how I would describe this color), with scattered holo glitter in it, along with some gold shimmer and glass flecks.

The formula of this polish was pretty good, it applied smooth. It took two coats of this polish to be opaque, once it did dry it was a little bit dull, but with top coat this fixed the problem of the polish looking dull. 

harlow and co- glam polish- no more caffeine for you  $11.47 USD

glampolish.com- no more caffeine for you $11.50 USD Directly from the Glam Polish website in Australia.

 Experiment 626 collection- No more Caffeine for You
 Experiment 626 collection- No more Caffeine for You
   No More Caffeine for You 

The name No More Caffeine for You is from the scene when Lilo brings Stitch home for the first time and shows him her room and where he will be sleeping. Lilo has a bottle filled with coffee, not knowing how Stitch will act she gives him the bottle. He then drink the coffee and starts to act crazy and begins to destroy her room. Lilo say to Stitch you should stop destroying things and make something, so then Stitch makes a model of San Francisco, California, then he acts like a monster going through the city and destroys it. Lilo then says no more caffeine for you. Lilo not knowing that Stitch was built to destroy and blames his actions on the coffee.  

Experiment 626 collection- Evil Genius          Evil Genius 

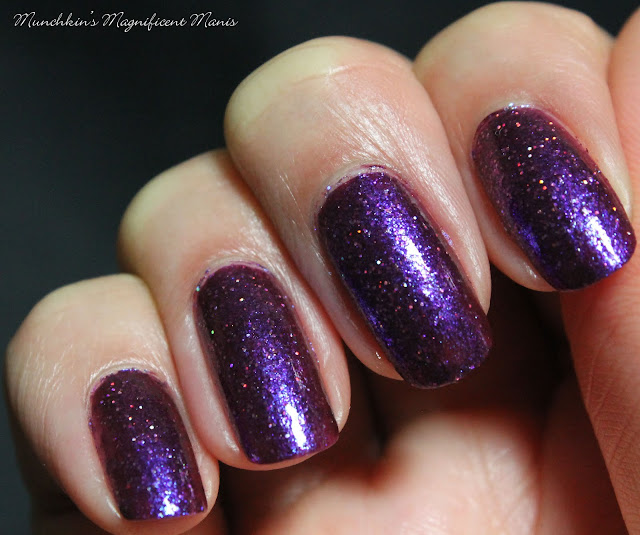
Next we have Evil Genius,this is a dark purple or plum scattered holo with red, violet, and blue shimmer, along with holo glitter in the polish.

The formula on this polish was pretty good as well. This polish applied smooth and was opaque for me in two coats. 

harlow and co- evil genius  $11.47 USD

glam polish.com- evil genius $11.50 USD Directly from the Glam Polish website in Australia.

Experiment 626 collection- Evil Genius    
Experiment 626 collection- Evil Genius     Evil Genius 

The name Evil Genius is from the scene when Jumba is telling the Galactic Federation and the Grand Councilwoman about Experiment 626 and that he was created to destroy. The Grand Councilwoman want's to know if Stitch has any good in him, he then says something in their alien language that is bad. Then they arrest Jumba and Captain Gantu calls him a idiot scientist, Jumba then says he prefers to be called an Evil Genius.  

Hope all of you have been enjoying this review, along with all of these pretty polishes!

If you missed the last three reviews don't forget to check them out as well.

Sorry I bit you and Hawaiian Rollercoaster Ride:  

Lilo be a Model Citizen: 

Experiment 626:

See you next week for more nail fun!   

Friday, February 10, 2017

Teddy Bear Hugs- Valentine's Day Nail Design

Hello everyone! Happy Valentine's Day! Well all most Valentine's Day. Today we will be taking a break from the Experiment 626 collection (more to come next week) and we will be creating a cute Valentine's Day design, called teddy bear hugs. This design will have a cute teddy bear on the thumb and a heart shape that will come together on the middle and ring finger nail.

Valentine's Day Nail Design
Happy Valentine's Day!

Here are the polishes and tools used for this Valentine's Day design:


Base and Top coat- CND Stickey Base Coat and Revlon Extra Life No Chip top coat.

Nail Polishes- OPI- Hello Kitty- Look at My Bow!, OPI- Hello Kitty- Charmmy& Sugar, OPI Hawaii- Do you take Lei away, and Glitter Daze- Let's have a Waikiki.

Acrylic paint- red, white, and black

Nail art tools- medium size dotting tool, small detail brush, and Artist's Loft brush 0 (new brush set that I purchase from Michaels art's and crafts store.) 

Other- small jar or cup with water in it to clean brushes.


Let's start this cute teddy bear Valentine's day nail design! 

Valentine's Day Nail Design 
 Valentine's Day heat design

As always start off with a thin layer of base coat, my favorite is CND Stickey Base coat.

Once your base coat has dried polish your thumbnail a tan color (for the bear), your index a light glitter pink, your middle and index nail with a cream pink polish, and your pinky with a silver tone glitter pink.  

After that has dried, we will start off with the heart that will be on two nails and when you put your two nails together they should look like a full heart. 

On both your middle and ring finger nail with a thin brush with red acrylic paint on it, draw the outline of the heart shape, just half of the heart shape on each finger, and try to make sure they line up when you put your finger together. Then fill your heart with the red paint once you have the shape you want.

Valentine's Day Nail Design, Teddy Bear  
  Teddy bear holding a heart on thumb nail

For the more detailed designs like the teddy bear, I like to do that design on the thumb nail rather then the ring finger because the thumb nail is bigger and their is more space to paint.

For the bear you can have the base or background be any color like brown, tan, white, whatever color you would like your bear to be. I choose a tan neutral colored polish, and you know how I feel about neutrals (blah) but if I incorporate them into a design with color I don't  mind it so much. 

Anyways for your bear take a thin brush with black paint on it, first paint the circle for the head. Before the head is completely dry on the lower left hand side of the head with a wet Q-tip wipe of just a little bit of his head, this is where his paw will be.

Then draw his paw on that side of his face, this paw will be up. His other paw will kind of be more toward the side, so you will need to paint the paw a little bit tilted.  

For his body you just add two small curved lines on each side.

Next I painted the heart that the bear will be holding. For the heart first paint the outline and then fill in the heart shape with red paint. 

Once you have your heart, we will go onto the ears. For the ears just make to half circles on top of his head.    

Now on to his cute face, first we will make the white part on his face by just making a oval shape with white paint.This part actully looks better if the white is a little bit sheer.

Then with medium size dotting tool with black paint on it make two eyes and a little nose.

I was going to make a smile and maybe some rosy checks, but I thought the bear looked cute as it. 

Valentine's Day Nail Design, Teddy Bear           Practice version of the teddy bears 

Here is the practice version of the teddy bears, where at first I decided to have a smile and rosy checks on one of the bears. But in the finally design I thought it looked cute as is. 

Valentine's Day Nail Design, Teddy Bear   
Teddy bear Valentine's Day design 

Once your cute Valentine's day design has dried apply a top coat to seal in your design and to protect your nails.

Valentine's Day Nail Design
 Valentine's Day Nail Design
 Valentine's Day design on the right hand

As usual or lately I have a simpler design that I created on my right hand. The bear was quite hard to make on my left hand, I am still trying to get better at draw more cleaner crisper lines which can be hard to do on a nail, but like with anything it takes time and practice. Also I am always on the search for small brushes that might help, which I recently found at Michaels in their paint area.  

For the right hand I decided to just paint a large heart on the thumb nail and the same heart that I did on my left hand. I did have some trouble lining up the two heart pieces, as you can tell.    

Hope all of you enjoyed this Valentine's day Teddy bear nail design!

See you next time for more nail fun!

Next week we will get back to reviewing the Experiment 626, Lilo and Stitch Collection from Glam Polish.

Saturday, February 4, 2017

Experiment 626- Glam Polish Experiment 626 Collection

Aloha everyone! Today we have another polish from the Glam Polish Experiment 626 collection. I hope all of you are enjoying this collection and the way they are being reviewed. I know it is taking a while to go over this collection, but as stated in the first blog post of this collection, I want to enjoy wearing all of these polishes and thought it would be kind of cool and different to review these polishes two at a time and then give my final thoughts at the end.

Glam Polish- Experiment 626 
 Glam Polish Experiment 626

Due to their being a odd number of polishes in the collection (their are 9 polishes) we will be reviewing just one today. Then we have four more to go, which means two more blog post on the polishes and then one more on my final thoughts of the collection, so three more post for this collection. 

Glam Polish- Experiment 626  
Glam Polish Experiment 626 

The first and only polish we will be going over in this post is Experiment 626, the polish that the whole collection is named after. Experiment 626 is a reddish pink, leaning more toward red, linear holographic with some very small blue glass flecks in it. The blue glass flecks are very small and you have to look very close at the nail to see them, in the bottle you can't see them at all. 

This polish did cover in one coat, but I found out the next day that I started to get a small amount of tip wear, so for this polish it would be best to apply two coats just for good measure or coverage. 

All of the polishes in this collection have some holographic in them, most are scattered holo with some holo glitter in it. This is the only polish in the collection that is a full linear holographic polish. 

Harlow and Co- Experiment 626 $11.45 USD

Glam Polish.com-Experiment 626 $11.50 USD, directly from Glam Polish in Australia  


Glam Polish- Experiment 626 
Glam Polish- Experiment 626
       Glam Polish- Experiment 626

The name of this polish Experiment 626 is Stitch's original alien name. The evil scientist Jumba, that made stitch named him Experiment 626. All of Jumba's experiment have different number and are called experiments. It wasn't until Experiment 626 came to earth and was adopted by Lilo that his name was changed to Stitch.  

Hope all of you enjoyed this short post/ review of the polish Experiment 626. I would say so far I am really am liking this collection and not only because it's a Lilo and Stitch collection, I do admit that was a big reason on why I wanted this collection, but the polish have been very pretty and good so far.

See you next week for more nail fun!

Next week we will be taking a break from the Experiment 626 collection to do a Valentines nail design, I have really enjoyed reviewing this collection but now I want to do some more nail art and Valentine's Day is coming.