

Here are the nail polishes and nail art tools used to create this spring design:
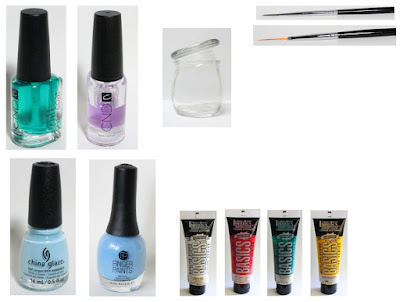
Polishes- China Glaze- Chalk Me Up! and Finger Paints- Heavenly Hues.
Acrylic paint- White, red, green, yellow, mix white and red to make pink, and mix yellow and green to make a light green.
Nail art brushes- Thin stripper brush and linear brush.
Other- Water to clean off your nail art brushes.


Apply a top coat to clean dry nails and let that dry.
Polish-
Thumb and pinky nails- Light blue cream polish (China Glaze- Chalk Me Up!)
Index, middle, and ring finger nails- Periwinkle blue cream polish ( Finger Paints- Heavenly Hues)
Let that dry.

First we will start with the thumb nail and make a pink flower, take a linear brush with pink paint on it near the side of the nail on the top make one petal shape, two on the sides and then one on the bottom, you may need to go over your flower petals a couple of times to be opaque.
For the yellow flower in the lower corner near the cuticle, do the same as the pink flower just make three petals.
Once you have your petals take the tip of your brush with yellow paint and make a small dot in the middle of your flowers.
Then for some small details on your petals, take a thin stripper brush with red paint on it and from the center of the petals make a small group of lines going up the petals. For some more details, if you would like take some white paint on a stripper brush and outline your flowers.
Leaf details, take a thin stripper brush with green on it and make a squiggly line from your yellow flower and then make a small leaf at the end.
On the pink flower make a large leaf from the top of the flower.
Lastly make a long green line on the side of the nail near the pink flower, with a few shorter lines from that. Then we will make very small white flowers, take your linear brush with white paint on it and make two small flowers with a small yellow dot in the middle.

On the middle finger nail we will be making a flower that looks like a plumeria. Take your linear brush with white paint on it, make a one large petal in the center of the nail, then two on the side and then tow more on the bottom. Let that dry and then take a thin stripper brush with yellow paint on it and make a group of thick lines in the center of the flower and going up the petals.
For the green vines coming from your flower, take a thin stripper brush with green paint on it and make some random lines from your flower.
Also only one petal of a pink flower is showing, make one petal showing from the top corner part of the nail.


Flowers on the Ring Finger Nail:
For this design follow the step that you did to create the pink flower on the thumb nail, minus the outlining in white. This flower goes in the upper left hand corner. For the plumeria flower in the lower right hand corner follow the same steps as we just did for the plumeria on the middle finger nail.
For the leaf details, take your stripper brush with green paint on it make a leaf shape on the tip of the nail, make a stem at the bottom and top of the plumeria, then make a stem from the pink flower with two leaves on the stem.


Here is the practice nail design
Hope all of you enjoyed this spring nail design!
See you next time for more nail fun!