Friday, October 9, 2015

Holo-rific- Harlow & Co review

Hello everyone! If you have been checking out the M.M.M blog for a while now then you know that we all love bight, vibrant nail polish colors! I just recently went on a website called Harlow and Co. and purchased some really cool holographic polishes that I have been very excited to show all of you. 

Harlow and Co. is a Canada based company that sales international and indie brand nail polishes. I have been interested in indie brand nail polish for a while, due to the brands having more unique polishes. The only thing is indie brand polishes can be expensive. If you don't know what indie brand nail polishes are they are hand mixed nail polishes usually sold by the creator and can be found online. Then their are mainstream brands such as OPI, Zoya, and drugstore brands like Revlon that are made by larger companies and can be found in stores and online. 

Here are the four indie brand nail polishes I purchased, I got all holographic polishes.

Just in case you didn't know, their are two types of holographic polish: linear and scattered. Linear has a strong rainbow effect that creates a strong holographic, the way I can tell if it's linear is when you move your nail in the light you will see a rainbow circle in your nails. As for scattered, this holographic has larger particles and is less dense, and the rainbow is less intense.     

KBShimmer, Cupcake Polish, and Colors by Llarowe
From Top left to right KBShimmer- Blue- d Lines and KBShimmer- Up and Cunning.
Bottom left to right- Cupcake Polish- Some Berry to Love and Colors by Llarowe- Arturo.

We will start with a review of the KBShimmer polishes.

KBShimmer- Blue- d Lines

KBShimmer is more of a well know indie brand nail polish company (that I know of), they are based out of Indiana.
Here is a link to KBShimmer's website if you would like more info. https://www.kbshimmer.com/

The first KBShimmer polish I purchased is called Blue- d Lines this is a aquamarine linear holographic polish, with intense holographic that really shows in the bright sunlight. 

I applied two thin coats for the photo above. This formula was great, it was opaque in two coats and went on very smooth. 

On Harlow & Co. website for USD for me this cost $7.23 US, but I think it might have gone up because now the price is listed as $8.36 US.

Here is a link for KBShimmer- Blue- d Lines

KBShimmer- Up and Cunning
 KBShimmer- Up and Cunning

Next we have Up and Cunning this is a deep teal linear holographic polish.

This polish was a little bit more sheer on the first coat, but was easily build-able on the second. This formula once again was really good, went on smooth in two coats.

Unfortunately on Harlow & Co. website this polish is sold out. I payed $7.23US for this polish. If you like this polish you can always be on the look out for it, they do restock.

Here is the link for KBShimmer Up & Cunning 
         
Now for the other two polishes.

Cupcake Polish- Some Berry to Love
 Cupcake Polish- Some Berry to Love

Cupcake polish is a company that is based out of Dallas,Texas. They hand mix all of their polishes in small batches.
Here is a link to Cupcake polishes website if you would like more info.

The Cupcake polish I purchased is Some Berry to Love, this is a bright pink, linear holographic polish that I actually thought was scattered when I saw it in the bottle. Once this is applied to the nail it does have a more noticeable linear holographic.

This polish also went on very smooth, almost a one coat wonder, but it is always best to apply two thin coats. 

On Harlow & Co website this cost $12.16 US

Here is the link for the Cupcake Polish- Some Berry to Love 


Colors by Llarowe- Arturo with out top coat.
  Colors by Llarowe- Arturo with out top coat.

Colors by Llarowe- Arturo with top coat.
Colors by Llarowe- Arturo with top coat. 
Don't know if you can really tell the differences in the photo, 
actually the one with top coat look more shinny then the one with out.  

Colors by Llarowe is another hand mixed nail polish. This polish is mixed in large batches and the polishes can be slightly different between each batch.

Here is a link to Colors by Llarowe website if you would like more info.

Arturo is a light blue, sublet scatter holographic polish, with out top coat this polish kind of has a matte finish to it. It is really hard to describe this polish looks matte with out a top coat, but is still shimmer due to the holographic elements. 

This polish also had a good formal, went on smooth in two coats.   

This polish I actually purchased for the name, Arturo. My brothers name is Arturo and I thought it was kind of cool that their is a polish out that named Arturo. 

On Harlow & Co. website this cost $12.16 US.

Here is the link for the Colors by Llarowe- Arturo

All of these polishes I loved, they had great formula and wore very well, except for one polish the cupcake polish, it started to chip a little on the second day. Also what I love about these polishes is the fact that they are holographic, which mades them awesome. 

As for Harlow & Co. themselves, I was very happy with their service my package arrived in a reasonable time of one week, and arrived in great condition in a envelope with each polish bubble wrapped. Also an added bonus their was a orange lollipop that came with the package, I ate the lollipop right a way, so I didn't get a chance to take a photo of that.    

As a final note if you order from Harlow & Co. as stated above they are a Canadian company, so all of their currency on the website is in the Canadian dollar. On the top right hand corner of their site they do have where you can change the currency to fit where you live from  CAD, USD, GBP, EUR, RUB, and AUD. Once you place a order it will say the Canadian currency, but don't worry it is still sit to your currency. That part did confuse me at first because the amount was higher then it first said. 

For the final cost of all four of these polishes with shipping, it did cost a lot more than I usually pay for polish. But do to the fact that I feel that they are unique enough, I am willing to spend a little more on these polishes, and do to the fact that these are indie brand polishes as well makes them cost more.

In the end with shipping (standard shipping) of $5.77 US, I ended up spending $43.36 US on four polishes, which is a lot, but worth it in the end!  

Hope all of you enjoyed this holographic polish/ Harlow & Co. review!  

See you next time for more nail polish fun!

Friday, October 2, 2015

Top 10 Nail Care Items

Hello Everyone! Today on the M.M.M blog, I kind of have an update for my nail care routine that I want to share with all of you. Last year I did two post called nail care and hand and cuticle care, I wanted to update all of you on that by doing a top 10 post. Some of the items that I have used in my last post have changed and their are some that have not, I just thought this would be a fun way to update all of you. 

Top 10 nail care items


Here are my top ten (with 2 extras) favorite nail care items, Let's start off with Moisturizers:

Yes to Carrots Super Rich Body ButterYes to Coconut Hand & Cuticle cream
Yes to Carrots Super Rich Body Butter $9.99 at Target  
Yes to Coconut Hand & Cuticle cream $5.99 at Target    

1. Yes to Carrots Body Butter. This is a body butter I have been using for years and have gone through many jars of this. This is a super thick body lotion that I like to us on my hands. It keeps your hands moisturized for a long time, it is a little bit greasy but absorbs in no time. It is a natural lotion with a natural smell.

Another lotion that I have been using lately is another product from the Yes to line (in case you didn't notice, I love the Yes to line), The Yes to Coconut hand & cuticle cream. I actually ran out of my favorite lotion the Yes to Carrots Body Butter, so I thought I would give this a try. So far I do like this lotion, it is also a little bit greasy by absorbs well. It does smell like coconut, but not the fake smelling coconut, this smell like a real or natural coconut.


Burt's Bees Lemon Butter Cuticle Cream
     Burt's Bees Lemon Butter Cuticle Cream $5.99 

2. Is another item to keep your cuticles moisturized, that is the Burt's Bees Lemon Butter Cuticle Cream. I rub this cuticle cream around my fingers and on the cuticles ever night, a long with my favorite lotion.  This is a nice cuticle cream that keeps your cuticles soft and moisturized and smells just like lemon.


Julep Mighty nail & cuticle serum
     Julep Mighty nail & cuticle serum $28.00 on Julep.com or $22.00 at Sephora.

3. This cuticle and nail serum is not a must, but I do still really like this. My fingers have the problem of on the sides being dry and then peeling. Since I got this in a Julep mystery box, this serum has helped the dry parts on the sides of my fingers, not 100 percent, but they are much better I just every so often will still get dry parts. The only thing about this product is the price, it costs a lot for the amount of product that you get.

Now on to other nail care items.

Beauty Secrets Nail Polish Remover in a jar Up & Up Acetone nail polish remover
      Beauty Secrets Nail Polish Remover in a jar 
from Sally Beauty $4.99 or $1.99 with Sally card.
Up & Up Acetone nail polish remover $0.97 at Target.

4. The Beauty secrets nail polish remover I actually got because I forgot to get my old favorite remover from Meijer. I then stopped by Sally's to get something else and then remembered that I need some remover. Let's just say I am glad I forgot that remover at Meijer, This remover works so much better, it actually will remove all of your polish when you dip your finger in the sponge.    

The Up & Up Acetone polish remover I use to clean my nail art brushes between designs and at the end. I also use this to clean up around my nails when I get polish on the sides of my fingers. This remover is also good for removing stubborn glitter. Do to this remover being acetone based it is very drying and I only use this for those purposes.   


nail clippers
 Way to many nail clippers!

5. Is nail clippers, I cut and file my nails once a month, I first use the big nail cutters and then the regular sized one to cut the sides of the nails. The third and fourth nail cutters in the photo I use if I get the dry peeling skin on the side of my fingers. You really do not need all of these nail clippers, just one or two would be fine. I really don't know why I use so many. 


 Sally Hansen crystal nail file
 Sally Hansen crystal nail file $8.99 at Ulta 


Kiss four way nail shaper
 Kiss four way nail shaper $2.00  

Trim buffing block
Trim buffing block, $1.87
four sides; 1.even out, 2.smooth nail, 3. buff nail, 4. shine nail

6. Once again I do use a lot of different files when filing my nails, which you don't really need, I just found that using all of these works for me. I first start off with a crystal file which is suppose to be less harsh on your nails. Then I use the Kiss nail shaper the light blue side, then the light or the darker pink (not both), I never use the dark blue side it is a little to harsh. Then filing I use the buffing block on my finger tips, this I think is actually suppose to be used your nail surface. I just use the even out, and smooth part, and some times the buff side. 

Now time for cuticle clean up.

Sally Hansen Instant cuticle remover
   Sally Hansen Instant cuticle remover $4.99

7. The Sally Hansen cuticle remover, I use once a month usually after I cut and file my nails.
This product is nice for helping to remove your cuticles and making your nails look nice.


360 beauty metal cuticle pusher
    360 beauty metal cuticle pusher from CVS $3.99

8. The metal cuticle pusher I use along with the cuticle remover. Their are many cuticle pushers from wooden ones or the orange sticks, plastic or rubber pushers, and metal ones. I do own all of them, but I found that the small metal one works the best for me.

The Base and top coats.

Nicole by OPI 3 in 1 base, top and strengthener
          Nicole by OPI 3 in 1 base, top and strengthener $7.00

9. For the longest time I never used a base coat, then I decided it would be a good idea to start. I had a lot of trouble finding one I liked, then I found this one. This is a three in one, I only use it as a base coat, I have not noticed any strengthening from this product. One thing I noticed with this base coat is with cream polishes they start to crack after a few days. So maybe after this base coat is done I will try the OPI natural nails base coat.

Revlon Extra life no chip top coat
Revlon Extra life no chip top coat $5.00

10. The Revlon Extra life no chip top coat has been by go to top coat for the longest time, after the Sally Hansen no chip acrylic top coat stop working as well, I tried this one and have liked it and have been using it since. 

Can't believe I almost forgot this one for
moisturizers!

Yes to Coconut Polishing Body scrub
 Yes to Coconut Polishing Body scrub $7.99 at target 

11. The Yes to Coconut body scrub is a great way to keep your hands nice and soft. I use this after removing my nail polish or whenever I feel that I need something a little extra.


Elf concealer brush
 Elf concealer brush $1.00

12. The Elf concealer brush I just recently bought and started to use to clean up the polish that gets on the sides of my fingers and on the cuticles. This brush is amazing for clean up, it makes it easy to really get into the sides of your fingers and to make it look like your are almost perfect a painting your nails. I use this brush with the Up &Up acetone remover. 

Hope all of your enjoyed this list and also found it helpful in your nail care routine!

See you next time for more nail fun!                

Friday, September 25, 2015

I Heart Oahu! Tropical Design


Hello everyone! As you all know lately I have really been doing a lot of tropical themed nail designs, seeing how I just went to Hawaii in July. Yes, yet again I have another tropical nail design to share with all of you. If you have been following M.M.M blog, then you know that I just recently got married in Hawaii on the island of Oahu, and the island will always hold a special place in my heart because my husband and I got married there. So I thought I would create an Oahu nail design to share with all of you!

Oahu, Hawaii nail design
Diamond Head in Honolulu, Hawaii on the island of Oahu. 


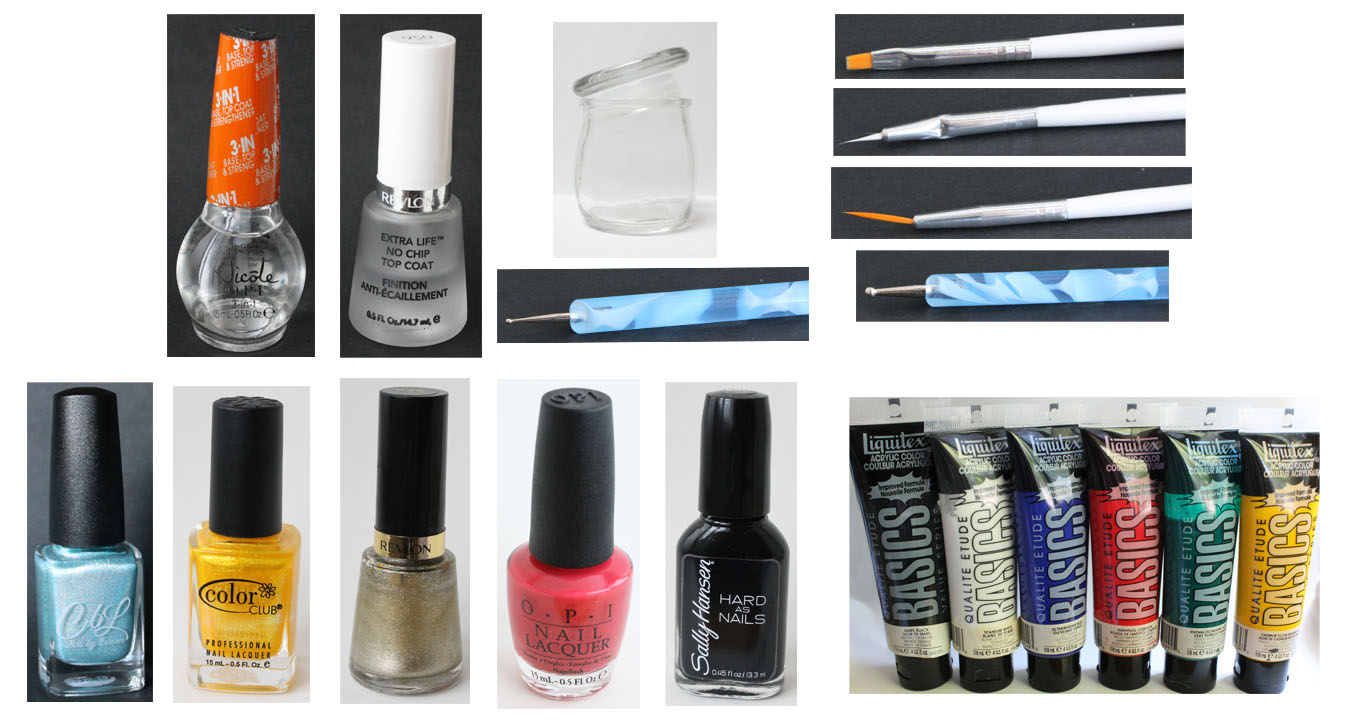
Here are the polishes and tools used for this Oahu nail design:


Base and Top coat- Nicole OPI-  3in1- base, top, & strengthener and Revlon Extra Life No Chip top coat.

Nail polishes- Colors by llarowe- Arturo, Color Club- Daisy Does it, Revlon- Gold Coin, OPI Hawaii- Go with the lava flow, and Sally Hansen- Hard as Nails- Black Heart.

Acrylic paint- black, white, blue, red, green, and yellow.

Nail tools- a glass jar with nail polish remover in it for cleaning your nail art brushes, a small and large dotting tool, small flat nail art brush, thin slanted brush, and a longer thin brush.


The skill level for this Oahu nail design is:

 Intermediate to Advanced 

This design can be difficult, due to the small details that are included in creating diamond head and the letter for Oahu and Aloha. The other parts of the design are a little bit easier, depending on your skill level.


Let's start this Oahu design!   

1. Start off with a base coat.

2. After your base coat is dried, apply a holographic polish that has more of a subtle holo. This polish might be part of a review that I will be doing about some new polishes that I just bought, I once again got too excited to wait.

3. We will first start off with a well known land mark on Oahu in the city of Honolulu, that is Diamond head, which is a crater that you can see as soon as you get close to Oahu. Also you can climb up Diamond head and see an amazing view of Honolulu.
On the thumb nail, we will start off with the water. First mix blue and black to make a dark blue, then mix blue and white to make a light blue. Paint a strip at the bottom of your nail for the water, starting from darkest blue to lightest. 

4. Now for Diamond head it's self, take your red, yellow, and blue acrylic paint and mix them together to make a brown. Also add just a little more blue to the color you just made to make a darker brown, this will be for some small details that we will put on Diamond head. As for the shape I really don't know how to explain it, other then to look at the photo above or the photo of the real Diamond head. For the small details we will add small lines to Diamond head. Take your darker brown and make small lines on Diamond head (you can refer to the final photo.)  

5. Next on the ring finger nail we will write Aloha. Aloha has a few means it means hello, goodbye, and love or compassion. As for letters, this can be a little bit tricky but I found that using acrylic paint made is much easier. For this take your thin nail art brush dipped into black paint and carefully write Aloha.

6. Right under Aloha we will make a heart.Take your large dotting tool dipped into a red or pinkish red (I used Go with the Lava flow because this was the color I wore on my nails on my wedding, and it is extra special to me.) and slowly drag the doting tool down. Do this on the other side as well to make a heart.

7. Next we will make a sea shell on the middle finger nail. Take your large dotting tool dipped into a gold polish and drag the dotting tool down, do this a as  many times as you would like to make a shell shape.

8. On the index finger nail we will make a cute pineapple. If you have ever been to Hawaii then you now that the pineapple there is so good, very fresh and juicy. For the pineapple shape take your small flat nail art brush dipped into yellow acrylic paint, fill in the bottom half of your nail and then make it curved at the top. You may need to go over this two or three times to be opaque enough.

9. As we let the pineapple shape dry we will make the leaves at the top. Take your thin nail art brush dipped into green paint and make four leaves at the top of the pineapple.

10. For a little bit more detail in the pineapple we will make intersecting lines. Take a yellow nail polish that is a little bit darker then the paint you used, then take your thin nail art brush dipped in the yellow polish and make three lines going up the pineapple, then two lines going down to make intersecting lines.  

11. To make your pineapple cute, we will make a happy face on the pineapple. Take your large dotting tool dipped into black nail polish (acrylic paint did not work well for this) and dot two eyes. 

12. An optional step for the sea shell is to add more detail is to outline the shell. Take your thin nail art brush dipped into black acrylic paint and carefully outline the shell, I thought this helped to make the shell stand out more.

13. For the last design on the pinky nail we will make a sunshine. Hawaii is know for there sunny warm weather, it does rain on and off there but really for only 10 to 20 minutes at a time, at lest when we were there. To make your sunshine take a shimmery yellow polish and the brush that comes with the polish, and make a curved line and fill in the bottom part of the nail all the way to the tip of the nail. You may need to apply two or three coats to make the yellow opaque enough.

Oahu, Hawaii nail design
 Final Oahu nail design

14. For the final touches, on the pineapple we will add a smile. Take your thin nail art brush dipped into black nail polish and make a curved line for the smile.

For the sun, take the small end of your dotting tool dipped into yellow polish and drag the dotting tool down to the sun shape to make the sun raises. 

Lastly for the thumb nail with Diamond Head, we will write Oahu and just add a green line for the grass. Take your thin nail brush dipped into black paint and slowly write Oahu over Diamond head. Then for the grass just take your thin nail art brush dipped into green paint, and just make a green line under Diamond Head.

After your Oahu design has dried apply a top coat to seal in your design.

Have another favorite Island in Hawaii that is your favorite or special to you? You can always change the thumb nail to fit the island that you love; with a landmark, the Island shape or anything that is special to that island.

Hope all of you enjoyed this Oahu nail design and I am glad that I could share my love for nails and the beautiful island of Oahu with all of you!  

See you next time for more fun and bright nail tutorials!           

Friday, September 18, 2015

Funky Fingers- Polish Review


Hello everyone! Today I have a review of three polishes called Funky Fingers. This brand can be found in the store known as Five Below. I think Five Below stores can only be found in the mid west/east coast, so unfortunately for all of you that live else where you might not have a Five Below to get these polishes, but maybe you can find this brand online.

For a while now I have been a little bit curious about Five Below, then one day I final went in the store. Five Below is a store where everything is five dollars or lower (hence the name.) They have an area where you can purchase beauty products and I saw in that area a lot of nail polish that looked very cool, so I decided to pick up a few.  

Here are the three polishes that I decided to purchase:


Funky Fingers #Boo2U, DIA DE Muertos, and As If
#Boo2U, DIA DE Muertos, and As If

As you can see the bottles, and even the polish it's self, I think looks cool and unique.

Funky Fingers #Boo2U, DIA DE Muertos
For the first polish I applied #Boo2U over a light blue polish. Then DIA DE Muertos I applied two coats on my ring finger as an accent nail.

#Boo2U is a light blue glitter topper that goes well over a light blue. I don't think this could be opaque on it's own.

DIA DE Muertos is a crelly poilsh which is a sheer less opaque polish, that can be layered to cover the nail line, but still sheer enough for glitter to show through. This polish is a sheer light blue with hot pink bar and hex glitters, and small blue hex and square glitters. 

Also by the way #Boo2U and DIA DE Muertos does something cool!

They glow in the dark!
I tried to capture the awesomeness of the glow in the dark polish, 
but it was a little bit difficult. 


Funky Fingers, As If
Next I applied As If over a light purple and pink, along with a holographic polish as an accent nail. The holographic polish is another polish I just recently purchased and was just to excited to wait to use this for the review I will be doing soon. 

As If is a glitter topper with a lot of glitter pieces in it. This polish has star glitters, black hex's, small black circle pieces, hot pink and purple hex glitter both big and small. 

Funky Fingers #Boo2U, DIA DE Muertos, and As If
The two polishes #Boo2U and DIA DE Muertos that glow in the dark, they do not contentiously glow. You first have to be in a bright room or put your nails up to a bight light, then go into a dark room then your nails will glow for a while.

Also DIA DE Muertos reminds me of many indie brand polishes that I have seen online, with the polish be a crelly. A lot of indie brand have crelly polishes and as far as I know their are none in main stream nail polishes. 

As for As If the color combination I choose made my nail look very teenage like, which was not a big deal. The star glitter pieces where the only thing that gave me problems, the points on the starts do not stick well to the nails and snag on things.  
  
My final thoughts on these polishes I really like them. They are unique to me with the polish it's self and the bottle shapes. All three of these polishes wore well like any other polish I have. 

Funky Fingers #Boo2U, DIA DE Muertos, and As If
Funky Finger nail polish are available at Five Below store for $3.00 each or two for $5.00.
For three polish I spent $8.48, which is a great price for three unique polishes.

Hope all of you enjoyed this review of Funky Finger polish!

See you next time for more fun nail tutorials!