Showing posts with label Snowman and Snowflake Nail Design. Show all posts

Monday, January 1, 2024

Let's Build A Snowman- Winter Snowman Nail Design

 Hello everyone! Happy New Year 2024! Hope everyone had a safe and happy new year's eve. We just did are usual celebration of ordering pizza and watching the ball drop at midnight. Anyways today we will be creating a winter snowman design, I did create this design be for Christmas and I didn't get a chance to post it, But I still think it is ok to share. 

Winter Snowman Nail Design

Here are the polish and nail art tools used to create this snowman nail design:


Base and top coat- CND Stickey Base Coat and CND Super Shiney Top Coat. 

Polishes- China Glaze- Chalk Me Up!, Sally Hansen- Hard as Nails- Hard to get, Snowman rainbow glitter- frosty, and Holo Taco- Scattered.

Acrylic paint- White, black, red, yellow, green and brown.

Brushes- Detail brush.

Other- Makeup sponge and water to clean off your nail art brushes.

Winter Snowman Nail Design

Apply a top coat to clean dry nails.

Polish all of the nails with a light blue creme polish. 

Let that dry.

Winter Snowman Nail Design

Snow on the tips of the Nails: 

On all five nails take a makeup sponge with white nail polish on it and dab it on the tips of all of the nail, it does not need to look perfect you can have some of the white polish not line up as you can see that I did in the photo above. 

On the middle and pinky finger nails you can leave as is for now. We will only be creating nail art on the index, ring and thumb nails.

Winter Snowman Nail Design

Winter Snowman Nail Design

Winter Snowman Nail Design


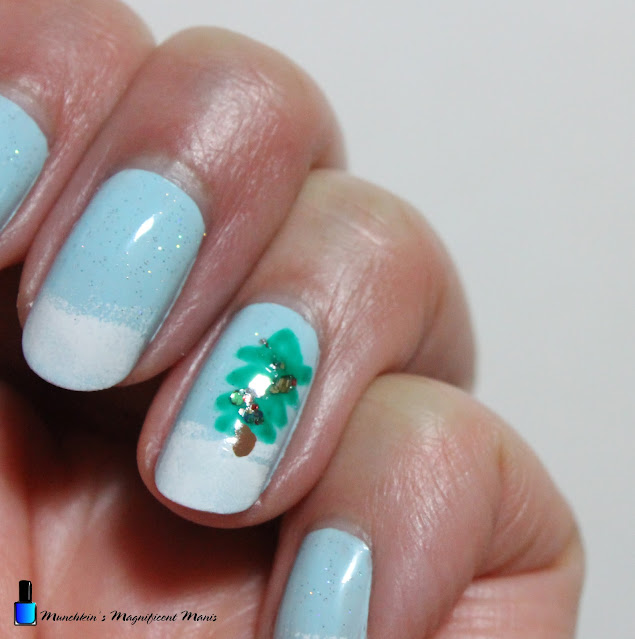
Trees on the Index and Ring Finger Nails: 

On the index nail we will make a tree on the left side of the nail, on the ring finger nail we will make a tree on the right side of the nail. 

This is a very simple tree, just take a detail brush with green paint on it and make a triangle a then four triangle shapes on each side to make a simple triangle shape. 

Then with brown paint make a small tree trunk. 

Also as I stated above I made this before Christmas so I did add some glitter in kind of a zig zag patten on the tree. If you don't want to make this design look Christmas like then you don't have to add this.
Winter Snowman Nail Design

Snowman on the Thumb Nail: 

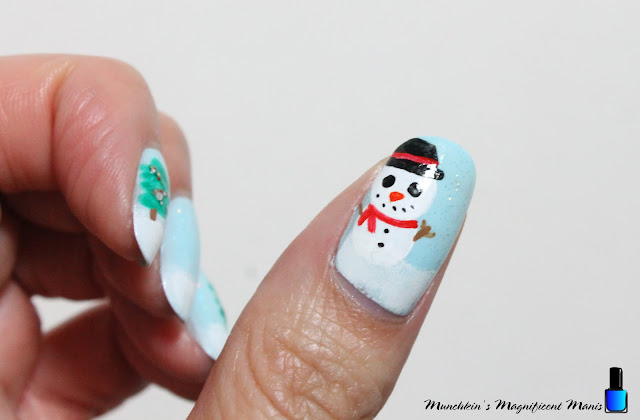
Lastly we will make the snowman on the left side of the nail, making sure to leave some room on the left side of the nail, make sure to make your snowman as close to the side of the nail.

Take a detail brush with white paint on it make two large circle, for your snowman body, that are stacked on top of each other, then fill them in. 

Next we will make his hat, take that same brush with black paint on it make a thick line on top of the head for the rim of his hat and then make a square shape for his hat. 

For the band on his hat, I first made a line with white and then went over that with red. 

Jumping to his scarf make a red line around his neck and then two lines come down to complete his scarf. 

Back to his face, You can use a dotting tool for this or just make two circle of the snowman's eyes. For his carrot nose I had to mix red and yellow to make an orange, then make a very small triangle for his nose. Then for his little smile make small dots in a curve shape to make his smile. Then on body make two small dots for buttons.

For our final touch on our snowman, take that same detail brush with brown paint on it and make one line on each side of the snowman with two small lines for his arms. 
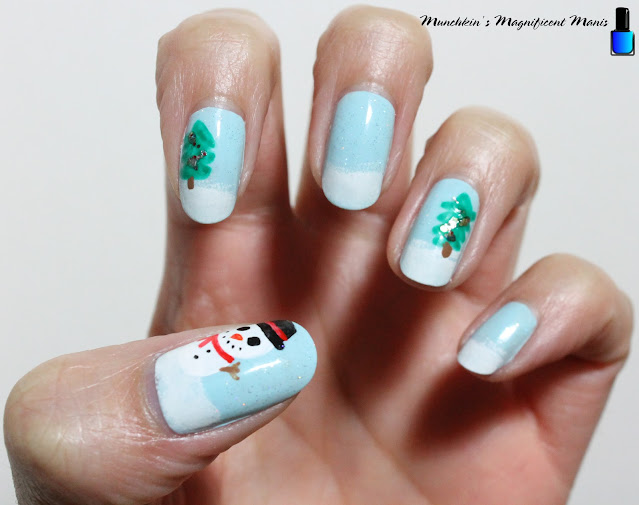
Winter Snowman Nail Design

For our last touch we will add a scattered holographic topper on the light blue part of our nails for a subtle snow fall look on the nails. Once your nails are ready to build a snowman apply a top coat to seal in your design and to help it to last. 

Here is the practice version that I create. 

Hope all of you have a safe and Happy New Year! Also have a nice winter, lucky where I live so far it has been kind of warm for winter, very little snow and it was in the 50's on Christmas when a lot of times it is in the 20's or teens. Which I am ok with that it has been mild this winter so far. 

See you next time for more nail fun! 


Friday, January 13, 2017

Let's Build a Snowman- Snowman Nail Design

Hello everyone! Today on the blog we are going to build a snowman! Not out of actually snow, we are going to paint a snowman and some snowflakes on our nails. This design may seem a little Christmas like, but I thought I could just make it a winter design and that seem to work out with then polish color that I picked out.

Snowman and Snowflake Nail design

Here are the polishes and nail art tools used for this snowman design:


Base and Top coat - CND Stickey Base Coat and Revlon Extra Life No Chip top coat.

Nail polishes- Zoya Enchanted- Saint, Zoya- Urban Grunge- Alicia, and Funky Fingers- glow in the dark- #Boo2U.

Acrylic paint- white, black, blue, red, yellow ( red and yellow to make orange.) 

Nail art tools- thin detail brush, striper brush, and a small dotting tool.

Other- a small glass jar or cup with water in it to clean up nail art brushes.

 Let's build a snowman!       

Snowman Nail design 
Snowman design on thumb nail

As always start off with a thin layer of base coat, to protect your nails and to help your winter design/ manicure last.

On all of you nails polish them with a periwinkle blue (I used Zoya's Saint).

*For this design we will be creating it on three of the nails; the thumb, middle and ring nail, the index and pinky will just have the periwinkle color on them. 

Once that has dried, on the thumb on the tip of the nail, polish that with a silver holographic polish (I used Zoya's Alicia) this will be the snow that the snowman will be sitting on. 

On your middle and ring finger nail you can polish that with one coat of a glitter polish, to kind of give a subtle snow look to the nails. (I used Funky Fingers- #Boo2U, which is a glow in the dark light blue glitter polish.)

As we wait for that to dry we can make our snowman on the thumb nail. I personally like to make the more detailed or a accent design on the thumb because their is more space then on the ring finger nail.  

Anyways with white acrylic paint make two snow balls, that are stacked on top of each other. Then make two small arms on the side of the snow man.

* For this next step you will need to mix at lest three different shades of blue, a dark (the original blue that you have), medium, and a light blue.  

Next with your dark blue make a scruff around your snowman's neck, you can go over this with the medium blue as well.

For the snowman I did jump around a bit, so the next step would be making two black buttons with a small dotting tool.

For his face with that same dotting tool and some black paint make two eyes. 
Then with some orange paint (if you don't have any mix red and yellow together) make a small carrot nose.

With your thin detail brush make a smile, to complete your cute snowman's face.

Next we need to make his warm, soft hat. With your thin detail brush and a stippling motion, paint the fuzzy part of his hat. For this I found that using a light blue and white without cleaning the brush made the hat look nice.    

After you have the fuzzy part, we will make the rest of the hat. With some darker blue make a curved shape for the rest of his hat, you can go over this part with different blues as well. Then after that just add a puff ball at the end of his hat. Now you have a cute snowman on your thumb nail. 

Snowflake Nail design          Snowflakes on the middle and ring finger nail, on left hand.

Snowflake Nail design 
       Snowflakes on the middle and ring finger nail, on right hand

Now on to our snowflakes. For this their is no set way of making your snowflakes because all snowflakes are suppose to be different. For all of the snowflakes that I made I stared off with a X and kind of a star shape, then I added random lines (like the photo above) some of the snowflakes I add some dots with the silver holo polish

For all of the snowflakes I used a thin striper brush with white acrylic paint.  

Snowflake Nail design        Snowflake design on right hand

Here is the snowflake design that I did on my other hand, this can also be another option if painting the snowman is a little to hard. As you can see I tried to make each snowflake some what different, some of then I felt where kind of similar

Snowman and Snowflake Nail design     Final Snowman and Snowflake design.

Once your cute snowman design has dried apply a top coat to help your nail design for melting or just chipping. Now your nails are ready for the remaining winter months ahead.

 Practice snowman nail design
 Practice snowman design.

Also here is the practice version that I did, I thought it turned out super cute and was worth sharing. 

Hope all of you enjoyed this snowman and snowflake nail design, even though it might have a slight Christmas feel to it, I felt like the polish colors I picked help it to be more of a winter design vs. a Christmas one.

See you next time for more nail fun!