Showing posts with label Snowflake Nail Design. Show all posts

Saturday, February 7, 2026

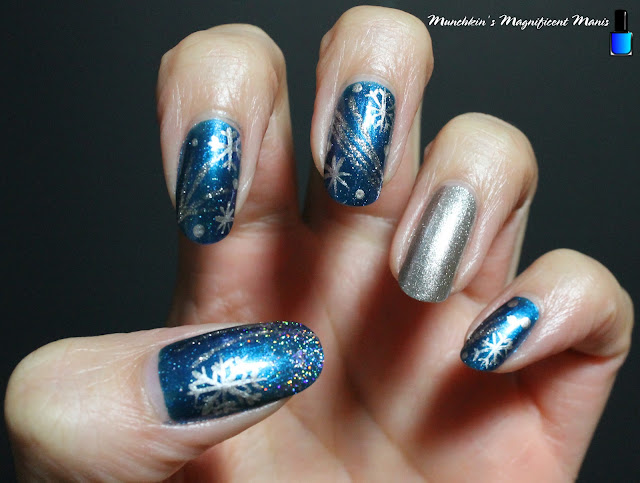
It's too cold outside- snowflake nail design

Hello everyone! Hope everyone is enjoying this super cold winter, just kidding! It has been way too cold this winter in the USA, even in the states that usually are not that cold, they are even having cold weather. I know where I live it has been way too cold and snowy and I am just ready for at least Spring time. Anyway we all may be tired of the winter weather, but why not have a pretty snowflake design on our nails, to somewhat enjoy the winter. 

snowflake nail design

Here are the polishes and nail art tools used to create this snowy nails design:


Base and top coat- CND Stickey Base Coat and CND Super Shiney Top Coat.

Polishes- Zoya- Estelle, Holo Taco- Toppers- Scattered, and Holo Taco- Electric Holo Collection- Circuit Breaker.

Acrylic paint- White.

Nail art tools- Thin striper brush, a small dotting tool, and a makeup sponge for glitter gradients. 

Other- Water to clean off your nail art brushes.

snowflake nail design

snowflake nail design

Apply a base coat to clean dry nails.

Let that dry.

Polish all of your nails with a shimmery blue (Zoya- Estelle.)

Let that dry.

Snowflake Nail Design

Glitter Gradient on all of the Nails: 

First we will start off with a glitter gradient on all of the nails. Take a scattered holographic polish and polish a little bit on the tips of the nails. Now take a makeup sponge with the same glitter polish that you just used and apply some to the sponge, dab the sponge on to the tips of the nails, I did this two times over all the nails to have enough glitter. Then I usually with the polish brush will apply anther thin layer over the tip of the nails, to smooth out what we just sponged on.

Snowflake Nail Design

Snowflake Nail Design

Snowflake Nail Design

Snowflakes:

For the Snowflake we will mainly be focusing near the tips of the nails. To make a snowflake take a thin striper brush with white paint on it and make a cross shape, then an X shape through that. On every line make two to three very small lines. Then to finish off your snowflake, make a very small dot on the very end of each line. 

For even more snow, take a dotting tool with a sliver holographic polish on it and dab the dotting tool on the random blank areas of the nail. 

On all of the nail you can do different amounts of snowflakes depending on your nail length. Some nails I did two snowflakes, some three and some just a half snowflake. 

Snowflake Nail Design

Snowflake Nail Design

Snowflake Nail Design

Once your nails match the outside, apply a top coat to seal in your design and to help it last thought all the winter weather.

Hope all of you have enjoyed this winter snowflake nail design!

See you next time for more nail fun! 

Saturday, February 1, 2025

Polar Bear and Penguin in the Snow Design

Hello everyone! Today on the blog we will be making a winter themed nail design, polar bear and penguin in the snow. It has kind of been a cold and snowy winter this year at least where I live and I know some other states have had a lot of snow, and even some states like Florida had snow which is crazy, anyways I thought to get rid of the winter blue we would create a cute polar bear and penguin nail design. 

Polar Bear and Penguin Nail Design

Here are the polish and tools used to create this cute polar bear and penguin nail design: 


Base and top coat- CND Stickey Base Coat and CND Super Shiney Top Coat.

Polish- Finger Paints- Heavenly Hues, Sally Hansen- Insta Dri- Hershey's Kiss- Sun& Air& Kisses, LA Colors- Diamond Crush- Cloud 9, China Glaze- Chalk Me Up!, Holo Taco- Linear Holo Taco.

Acrylic Paint- Black, white, red, and yellow. Also mix red and white to make pink, and mix red and yellow to make orange. 

Nail art tools- small dotting tool, thin stripper brush, and small detail brush. 

Other- water and acetone to clean off your nail art brushes. 

Polar Bear and Penguin Nail Design

Apply a base coat to clean dry nails, let that dry.

Polish- 
Thumb Nail- a periwinkle blue (Finger Paints- Heavenly Hues)

Index and Pinky Nails- shimmery blue (Sally Hansen- Insta Dri- Hershey's Kiss- Sun& Air& Kisses)

Middle Nail- blue glitter (LA Colors- Diamond Crush- Cloud 9)

Let that dry.

Polar Bear and Penguin Nail Design

Polar Bear in the Snow on the Thumb Nail-

We will first start off with the polar bear, take your thin detail brush with white paint on it make a circle near the tip of the nail and fill that in also make two small half circle for the ears on top of the head, then make a larger oval for the bears body fill that in as well, then make two small ovals for his feet. Lastly make to small circles near his face for his paws. You may need to go over this a few times to make sure everything is opaque. 

Let that dry, take your detail brush with black paint on it and make two black circles for the eyes, then a black oval for his noses.

For his mouth take a stripper brush make small line under his nose and then two curved lines under the small line to make a smile.

For his paws take your detail brush with your red and white paint to make pink, make a circle on the bears paws and then three dots above that. 

On his ears make to half circles with the pink paint.

Lastly make two small pink circles on his cheeks.

Polar Bear and Penguin Nail Design

Penguin on the Ring Finger Nail-

Next we will be creating a penguin on the ring finger nail, take your detail brush with white paint on it, to make his head make a heart shaped then a oval for his body make both of these shapes connected to each other, then fill that in a few times to be opaque. 

For his body take a clean detail brush with black paint on it and kind of outline the white shape that you just made, just make sure that you make a triangle point on his head. Also on the side of his body make two fins.

For his eyes make two black circles. Then for his beak take your yellow and red paint to make an orange and make a small oval shape under his eyes. For the last detail on his face make two small pink circles on his checks. 

Lastly we need to make two little feet, take your detail brush with orange paint on it and make two small ovals where his feet go.

Polar Bear and Penguin Nail Design

Polar Bear and Penguin Nail Design

Snowflakes on the Index, Middle and Pinky Nails- 

On the index, middle and pinky finger nails we will make some snowflakes. On the index and middle finger nails make one large snowflake by first making an X shape with one line down the center of the X and then one on the side. On all of the lines make small lines for more of a snowflake look. 

For the smaller snowflakes near the cuticle make a smaller version of the lager snowflake that we just made, just don't add the small lines, these look more like stars. 

For the final touch take a small dotting tool with white paint on it and make a few dots on the nails for some small snowflakes. 

On the pinky nails we will just keep it simple with the star shape snowflakes and a few dots. 

  
Polar Bear and Penguin Nail Design

A final touch for this design is to add a little sparkle to it with some holo, take a linear holo polish and polish over the whole nail on the index, middle and pink finger nails. On the nails that we created the polar bear and penguin just polish then linear holo on the background color.

Once your design is winter ready with your cute polar bear and penguin nail design apply a top coat to seal in your nails and to help them last.


Here is the practice version.


Hope all of you enjoyed this cute winter themed nail design.

See you next time for more nail fun! 

Saturday, January 27, 2024

Snowflakes- Snowflake Nail Design

Hello everyone! Today on the blog we will be creating a winter snowflake themed nail design. In the last posted where we created a snowman on our nails, I had said that the weather where I live has been kind of on the mild side/ kind of warm for winter. Well last week winter weather hit us and it was in the single digits and the teens with snow. Anyway that's why I thought it would be fitting to create a pretty snowflake nail design, plus I just felt like creating another snowflake design. 😀

Snowflake Nail Design

Here are the polishes and nail art tools used to create this pretty snowflake nail design:

Top and base coat- CND Stickey Base Coat and CND Super Shiney Top Coat. 

Polishes- Holo Taco- Twice in a Blue Moon- Magnetic Magic Collection, Sally Hansen- xtreme wear-Celeb city, Holo Taco- Flakie, Holo Taco- World's First- Chorme Collection, Kiss nail art striper- Silver. 

Nail art tools- Thin stripper brush, small dotting tool, and a makeup sponge. 

Other- Water to clean off your nail art brushes. 

Snowflake Nail Design

Apply a top coat, let that dry.

Polishes- 

Thumb, index, middle, and pinky finger nails- shimmery blue (Holo Taco- Twice in a Blue Moon)

Ring finger nail- Silver (Sally Hansen- xtreme wear-Celeb city)

Let that dry.

Snowflake Nail Design

We will first start off with the thumb nail. On the thumb we will first make a glitter gradient (this is done only on the thumb nail) take a glitter polish and first polish some mainly on the tip of the nail, then take a makeup sponge with that same glitter polish on it and dab that on the tip of the nail mainly focusing on the tip of the nail, making the glitter look like it is fading up the nail.

Let that dry. 

Take a nail art polish or a silver polish on a thin brush and make two curved lines on the side of the nail right next to each other. 

Lastly we will make a large snowflake on the lower right hand corner. Take a thin stripper brush with sliver metallic polish on it and make a cross shape then make two lines on each side of the cross shape, then make two very small lines on every large line to complete your snowflake.  

Snowflake Nail Design

Snowflake Nail Design

We will now go on to creating the next design part on the index and middle finger nails. Starting with the index nail take your silver nail art polish and make four line from the left side of the nail. 

Then make a more simple version of the snowflake that we just made on the thumb nail, on the upper right hand corner/ near the cuticle. Then near the tip of the nail make a star shape snowflake. 

For the final touch take a dotting tool with silver metallic polish on it and make a few dots in some of the empty space on the nail.

On to the middle finger nail, take your nail art polish and make a few lines across the nail. 

Then make two snowflakes one near the cuticle again and one near the tip of the nail that is a simple star shape snowflake. 

Then finish off the nail with a few silver dots.

Snowflake Nail Design

Lastly we will finish this nail design with the pinky nail. Once again take your nail art polish and make a few lines from the side of the nail.

On this nail because it is the smallest nail we will just make one snowflake near the tip of the nail.

Then once again make a few silver dots on the empty space around the nail. 

Snowflake Nail Design

Once your nails are ready for the snow, apply a top coat to seal in your nail and to help it to last. 


Here is the practice version of this snowflake design 

Hope all of you enjoyed creating this snowflake nail design, and try to keep warm this winter if you live some where it is cold. 

See you next time for more nail fun!

Saturday, February 6, 2021

Snow Day, Snowed In- Snowflake Nail Design

Hello everyone! Sorry that it has been a while since I posted anything. Today we will be creating a design that is fitting for the weather, at lest where I live very snowy and cold. You may have guessed we are creating a snowflake nail design, using the two of the polishes from the Holo taco Frosted Metals collection. 

Snowflake Nail Design

 Here are the polishes and nail art tools used to create this snowy nail design:

Base and top coat- CND Stickey Base Coat and CND Stickey Base Coat.

Polishes-  Holo Taco- Cold Shoulder- Metallic Foil Collection and Holo Taco- Gift Receipt- Metallic Foil Collection.

Acrylic paint- blue and white.

Nail art tools- small and medium dotting tools, and thin stripper brush.

Other- cup of water to clean off your nail art brush and dotting tools. Also not pictured a Q-tip/ cotton swab.

Snowflake Nail Design

Apply base coat, then let that dry

Polish- 

Thumb, middle, and pinky- a blue metallic polish (Holo Taco Cold Shoulder)

Index and ring finger- a silver metallic polish (Holo Taco Gift Receipt)

Let that dry as well.

Snowflake Nail Design       On the pinky nail make a white snowflake on the left side of the nail on the tip of the nail, and then some small dots with a dotting tool on the other side.    

On the ring finger nail make a large blue snowflake right in the middle of the nail, then make small dots near each point of the snowflake.                                                             

Snowflake Nail Design

Snowflake Nail DesignOn the middle finger nail make half of a white snowflake on the upper corner of the nail near the cuticle. Then with a dotting tool make a large blue dot in the middle of the snowflake,and then some small dots on the tips of the snowflake.

Snowflake Nail Design
Lastly on the thumb nail make a mitten shape and using a Q-tip/ cotton swab with white paint on it dab the cotton swab at the bottom of your mitten shape for the fluffy part of your mitten. Also you can add three more or less snowflakes around your mitten as well.

Snowflake Nail Design

Once you have your winter snow day nail design just the way you want apply a top coat to seal in your design and help it to last thought your snow day, or as lest a week, if polish last good on your nails.

Hope all of you enjoined this snow day/ winter nail design and for all of you that live in a cold place stay warm, and for all of you that live in a warm area you are lucky!

 See you next time for more nail fun! 

Saturday, December 19, 2020

Penguin March- Penguin Winter Nail Design

Hello everyone! Hope everyone is having a good winter/ almost Christmas (if you celebrate the Holiday.) Anyways today on the blog we will be creating a cute winter themed nail design, a penguin/ snowflake nail design. 

Penguin Winter Nail Design

 Here are the polishes and nail art tools used to create this cute design:


Base and top coat- CND Stickey Base Coat and Revlon Extra Life No Chip top coat.

Polishes- Colors by llarowe- Arturo and OPI Holiday 2017- Ornament to Be Together.

Acrylic paint- white, black, red, yellow (make orange and pink by mixing colors.)  

Nail art tools- thin detail brush, stripper brush, and medium dotting tool.  

Small cup of water to clean off your nail art brushes. 

Penguin Winter Nail Design

Apply your base coat. 

Let that dry.

Polishes- 

Thumb, index, middle, pinky- a light holo blue polish (I used Colors by llarowe- Arturo)

Ring finger- a silver polish with a little bit of holo in it. (I used OPI Ornament to Be Together)

Let that dry.

Penguin Winter Nail Design

First we will start off with the penguin, also for this post I will just be going over how to create the penguin not the snowflakes because I have done quite a few post on how to do snowflake designs, plus the snowflakes are on only one nail.

Penguin Design:

Take your thin detail brush with white paint on it, make a circle kind of near the tip of the nail, then fill that in. Then outline the head, making that outline thick. 

Then near the top of the penguin's head make two arches, then when you go down the middle of the two arches (the thick line in the middle of his face) make that line very thick. 

Also make three lines at the top of his head for his hair. 

For the penguin's body make kind of a half oval shape (not really sure what kind of shape to even call this?) then fill that in. Once again outline that with black. 

Then on each side make his flippers.

Now back to the penguin's face. Take your dotting tool with black paint on it and make two eyes, then two white dots once that is dry. 

Then for his beak make an oval shape with orange paint (I mixed yellow and red), then when that is dry make a line in between the oval.

For the final touch on your penguin's face make to pink circle's on his cheeks. (I mixed white and red to make a pink.)  

Then for the final touch on your penguin, I decided to put a surf around his neck. You can do this by taking your detail brush with red paint on it and make a thick red line around his neck and then two more lines coming down from that. 

Now your penguin is done.

Penguin Winter Nail Design

For this design I wanted the main focus to be the penguin, and I always like to do the main design on the thumb nail because their is more room on that nail. So for this design I only did the snowflakes on the ring finger nail.

For the snowflakes make a large snowflake near the tip of then nail on the left side. Then half a snowflake near the bottom of that snowflake. Then make small dots along the top of the two snowflakes.

For this design you can always add more snowflakes on the other nails or just keep the nails light blue, it is up to you.

Here are some extra photos of the snowflake part of this design, I liked how these turned out so I wanted to share them. 

Penguin Winter Nail Design
 
Penguin Winter Nail Design

Once you have your penguin design the way you like apply a top coat to seal in your nails and to help your design to last through this cold winter. 

Hope all of you enjoyed this Penguin Winter Nail Design!

See you next time for more nail fun! 

Also Happy Holiday's!