Showing posts with label Lilo and Stitch Design. Show all posts

Wednesday, May 21, 2025

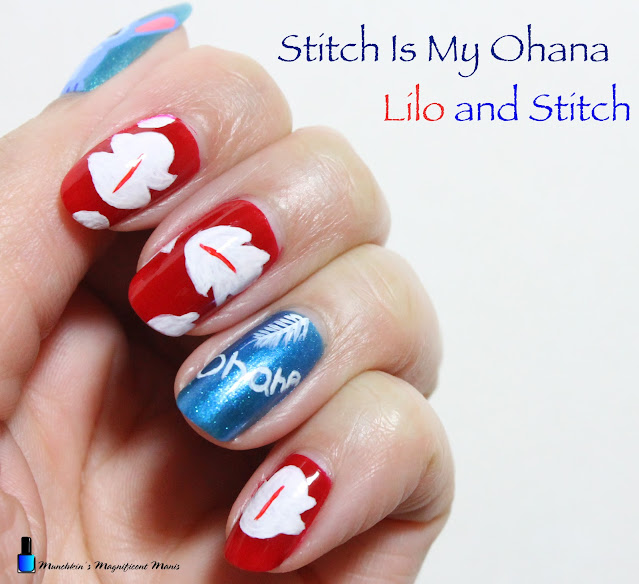
Stitch Is My Ohana- Lilo and Stitch Nail Design

Hello, Aloha! Today on the blog we will be creating a design for the new live action Lilo and Stitch movie that is coming to theaters May 23. The animated movie that came out back in 2002 is my all time favorite Disney movie, the story is great and the fact that it takes place in Hawaii is a plus too. I just hope that the live action is as good as the animated movie.  

Lilo and Stitch Nail Design

Here are the polishes and nail art tools used to create this Lilo and Stitch nail design:


Base and top coat- CND Stickey Base Coat and CND Super Shiney Top Coat.

Polishes- Zoya- Renee- Redbook trio, OPI Fiji- Do you Sea what I Sea, and China glaze- Shades of Paradise- Mer-Made For Bluer Waters.

Acrylic paint- White, blue, black, and red. 

Nail art tools- small dotting tool, thin striper, linear, detail brush.

Other- water to clean off your nail art brushes. 

* For this design I need to make a few colors so I just mixed a few paints to make the colors.
Mix red and white to make pink.
A lot of white and a little blue to make a light blue.
a little white and a more blue to make a medium blue.  

Lilo and Stitch Nail Design

Apply a top coat to clean dry nails, then let that dry.

Polishes- 

Thumb- a light shimmer blue (China Glaze- Mer-Made For Bluer Waters)

Index, middle, and pinky nails- a red cream polish (Zoya Renee)

Ring finger nail- a shimmery blue (OPI Do you Sea what I Sea)

Let that dry.

Lilo and Stitch Nail Design

Lilo and Stitch Nail Design

Lilo's Red Dress On The Index, Middle and Pinky Finger Nails: 

First we will start off with the leaves on Lilo dress that we will be making on the index, middle and pinky nails. Take a linear brush with white paint on it make a oval shape, then I took a wet cotton swab and wiped the sides of the oval, that way the top and bottom of the oval are still there, or you can just make two curved lines like you where going to make an oval shape (if that makes sense?) 

Then on each side make two point for the leaves, their should be a total of four point for the leaves, then fill in your leaf with white paint. On each nail I only made one large leaf and a small part of the leaf on the index and middle finger nails, the pinky nail is the only nail that I made one large leaf. 

One you have your leaves, take a thin striper brush with red paint on it and make a small thin line in the middle of your large leaves. 

Lilo and Stitch Nail Design

Lilo and Stitch Nail Design

Ohana Means Family, Ohana On The Ring Finger Nail:

Next we will be writing Ohana and making a small plan leaf on the ring finger nail. Take a thin detail brush with white paint on it and write the word Ohana on a slight curve on the nail, our you can just write it straight across.


Now we will make the small palm leaf near the cuticle. Take a thin striper brush with white paint make a thin line down the nail a make a small lines down that nail for your palm leaf. 

Lilo and Stitch Nail Design

Lilo and Stitch Nail Design

Stitch On The 
Thumb Nail: 

On the thumb nail we will make Stitch, take a linear brush with your medium blue on it and make a oval in the middle of the nail, fill that in then make two lines going down the head for the start of his body and then fill in that area with the medium blue. 

For his ears take the pink paint that you made on a thin striper brush and make an oval shape with a flat bottom near the head on both side, fill that in. Then make a thick outline with the medium blue for the outside of his ears. 

Also take that same medium blue on the striper brush and make a few little lines on the top of his head for a little bit of hair.

For his eyes take a thin linear brush with a light blue paint and make two ovals on the center of his face. 

With a dark blue make a small oval for his nose.

For his smile and tummy first take a thin striper brush with light blue paint and make a curved line under his nose for a smile, then off to the side make a long line on each side of the smile and then fill that in with the light blue for his tummy. 

For his paws make two half circles with the medium blue, near the cuticle then fill that in and make two small lines on his paws for his fingers.

Now back to the eyes, take your detail brush with black paint and make a smaller black oval in the large oval. For his pupils take a small dotting tool with white paint on and dot it on to the black oval.

Lilo and Stitch Nail Design

Once your nails are all ready to for the Lilo and Stitch movie apply a top coat to seal in your design and to help it to last.

Lilo and Stitch Nail Design
Here is the practice version 

Also back in 2016 I made a Lilo and Stitch design too, it is kind of similar with some changes, also make sure to check out that design too. 


Hope all of you enjoyed this Lilo and Stitch nail design along with the movie.

See you next time for more nail fun! 

Friday, July 1, 2016

Stitch 626- Lilo & Stitch Design

Hello everyone! Today we will be creating a Lilo and Stitch design, this is one of my favorite Disney movies and I figured why not create a cute Lilo and Stitch design, even thought this movie has been out for a long time now, it was actually released in 2002 (how time flies by.) 

When I first started this blog I did create a Lilo design for all of you based on some of her outfits, but Stitch was not included in that design. Now that I have discovered the wonders of using acrylic paint on the nails, I thought it would be cool to create another one. 

Lilo and Stitch Nail Design
 Stitch 626 Lilo and Stitch Nail Art Design


Just a reminder like the last nail art design I created for all of you, this will not be a step by step tutorial, but I will still explain how the designs was created.


Here are the nail polishes, paints and nail art tools used to create this nail design:


Base and Top coat - CND Stickey Base Coat and Revlon Extra Life No Chip top coat.

Polishes- OPI- Hello Kitty- My Pal Joey, Zoya- Renee- Redbook trio, Zoya- Estelle, and Maybelline- Color show veils- blue glaze.

Acrylic paint- white, black, red, blue. Some of these colors will be mixed together to create other colors. 

Nail art brushes- a thin linear and detail brush. 

Other- A glass jar with water in it too clean off your brushes. 
  

Remember to always start off by applying a base coat to all of your nails, then you apply your polish.

Stitch nail design  
  Stitch on the thumb nail.

Let's start off with Stitch on the thumb nail. Stitch can be a little bit tricky to create, but just try and keep your hand on the table and take it slow when painting him. For all of the details we will be using acrylic paint.
 
First make Stitch's belly with a light blue. Then to know where to place everything make a small dot for his nose, near the top center part of his face.

Next we will make his mouth, with a light pink make a mouth shape and fill that in. Then with a slightly darker pink make a tongue. 

After you have made his mouth, next make to large light blue ovals for where his eyes will be. Once that has dried make two small black circles in the middle of the large ovals, and then a small white circle in side of the black circles. Then add a small line in the corner of both of his eyes.

For outlining some of Stitch's features, add a line above the big ovals for his eye brows, add two curved lines above his nose, then outline his mouth, make sure to add a line on each side of this mouth, with a curved line on each side for his smile. Also don't forget his little hair near the cuticle.

For a small added detail just add a small light blue curved line under his mouth.    


Lilo's dress 
       Lilo's Dress

After we have created Stitch, we will be make Lilo's dress on the index, middle, and pinky finger nails. For the leaves we will use white acrylic paint.

For Lilo's dress she has white tropical leaves all over her dress. To make these leaves, starting from the bottom make a curved line then two more curved lines, then down the center make a straight line that is squared at the top. You can also make half of the leaves on the other parts of your nail in order to fill up your nail. 

Once your leaves have dried, just draw a red line down the middle of each leaf with the same red polish that you used for the base color.

Lilo and Stitch Nail Design
   Ohana means Family! 

Last but far from lest is the important part of the Hawaiian culture Ohana (Family). For this design I decided to include the word Ohana on the ring finger nail, because in the movie they explain the important of it and the true meaning of Family!

For this design for a optional added touch I put a small glitter blue and sliver polish over the blue base color. This is just optional because the blue is already shimmery to begin with. 

With white acrylic paint, starting with the O and write Ohana on the ring finger nail. For this carefully and slowly with you hand resting on the table write the letters.


  Practice version of Lilo and Stitch

   Close up of Stitch

Once again I decide to share the practice version of this design, just because I felt like I did a good job on the practice.

Lilo and Stitch Nail Design
Final Lilo and Stitch Nail Design   

Once your Lilo and Stitch nail design has dried apply a top coat to protect your nails and your design

Hope all of you enjoyed this Lilo and Stitch design  

Also for the next two week I am not sure if I will be doing a blog post, due to the fourth of July holiday and My Hubby and I will be celebrating our one year wedding anniversary, we are just going on a small trip in the state we live in, nothing big like our wedding, although I would love to go back to Hawaii this year, financial that is not do able.    

 See you next time for more nail fun!

 Also if you live in the USA have a safe and fun 4th of July!