Saturday, July 18, 2015

Big News!

Hello or Aloha everyone! You all maybe wonder where I have been in a few weeks, and wonder why I have not posted? Well I have big new! On July 7, 2015, I got married in Hawaii on the Island of Oahu, on the beautiful beach of Makapuu! My now husband and I have been together for ten years, and had a long engagement of five years, So it was long over due. 

We decided at the beginning of the year to go with a small wedding, and what better place then Hawaii. I had been looking online for a wedding service in Hawaii, and we ended up going with the amazing company Weddings of Hawaii. They went above and beyond to help to make our wedding perfect.

 Wedding photo courtesy Weddings of Hawaii 

Due to this being a nail blog I wanted to tell/ show all of you how I did my nails. At first I was just going to do a basic french manicure, then I thought that is boring and that everyone does that. So I decided to be literal with my nails, by painted them with "Go with the Lava Flow" from OPI's Hawaii collection. I just kept my nails simple with just the solid color and no nail design. 

 I also wanted to share one of our wedding photos with all of you. 

Many people think that having a destination wedding can be expensive, but if you keep it small it can actually be affordable. We kept it very small with just my mom and brother and my husbands parents. Also personal I think having a wedding in Hawaii on the beach is more memorable, and who would not want to get married in Hawaii.   
 
If anyone is looking to get married or vow renewal, Weddings of Hawaii is a great company to go with, and we highly recommend them. 

Aloha and see you all hopefully next week, I have been feeling very jet lagged after this trip (where we live there was a 6 hour time differences) and I just need to get back into the normal day to day thing.

Friday, June 26, 2015

Happy Birthday Herbie!

Hello everyone! When you look at the title, you may wonder what I am talking about? It's not the birthday of the Volkswagen Beetle/ Herbie. Actually this weeks nail design is to celebrate My Herbie's Birthday. As of June 30, I would have my 2005 Beetle for 10 years! Ever since they released the Beetle I fell in love with that car, and I have always wanted one. So when I started working, I saved up a lot of money for a good down payment and I purchased my dream car.

Volkswagen Beetle Nail Design
  Volkswagen Beetle Nail Design.

 My 2005 VW Beetle/ Herbie.


The nail polishes and tools used to create this Herbie nail design is: 


Base Coat and Top Coat- Nicole OPI-  3in1- base, top, & strengthener and Revlon Extra Life No Chip top coat.

Nail art polishes- Kiss nail art stripper- black and silver.

Nail polishes- Nicole by OPI- A Lit- Teal Bit of Love, Pop-arazzi- The Hue is Blue, Snowman rainbow glitter- frosty, Sinful Color-Let's Meet, Sally Hansen- Hard as Nails- Black Heart, Jane- Bolt from the blue, OPI Hawaii Collection- Suzi shops & island hops, That's Hula-rious, Lost my bikini in Molokini, and Aloha from OPI. 

Nail art tools- small thin brush, extra large and a large dotting tool.


The Skill level for this Herbie nail design is-

Beginner

This, for the most part, is a simple design. The VW logo is easy to create along with the flowers. The only part of the design that is little bit tricky is the Herbie on the thumb, just like any part of the design it really just requires a steady hand.

Let 's celebrate Herbie's Birthday, with this fun nail design!
1. Apply a thin layer of base coat.

2. Paint your pinky, middle,and thumb nail with a light blue polish. Then paint your ring and index finger with a shimmery blue.
3. We will start off with the Volkswagen logo, VW. We will start off by making a W, with your silver nail art stripper. To help yourself out with making the W, make a small dot in the middle of the nail and then draw two lines going down, this will look like an upside down V.
4. Then finish off your W by drawing one line on each side of the nail.
5. To finish the VW logo make a V right on top of the W. If needed you can go over your letters to make them thicker. 
6. Now for the flowers. To give this design a hippie feel to it, take your extra large dotting tool dipped in yellow polish, and place it anywhere on your nail. The more flowers you would like the more dots you can add. 
7. The last step in creating the colorful flowers is to make the petals. Take your large or a medium size dotting tool, dipped into a light pink polish and make five dots around the yellow circle to make a flower. Repeat this step for each color. 

8. Now for the part that brings the whole design together, Herbie. We will start off with Herbie's iconic shape. First, we will draw it horizontally instead of vertically. Take your thin nail art brush dipped in a navy blue, and draw a curved line in the middle of the nail, then to smaller curved lines on the sides. 
9. Next we will make the part where the wheels go. Once again take your thin nail art brush dipped in navy blue, and draw two arches side by side.
10. Then fill in your Herbie. If needed you can always thicken your outline, as you fill in your Herbie to make the shape look better. 
11. Now it's time for the wheels. Take your extra large dotting tool dipped into black and place the dotting tool in the two arch ways. If needed you can always dip your doting tool a few times to make the wheels bigger. 
12. To give the final touches to your Herbie, we will be adding windows. Take your black nail art stripper polish and follow the dome shape of the car, to make a outline for the windows, then draw a line down the center.

Volkswagen Beetle Nail Design
To finish off your Herbie take your dotting tool dipped in yellow and make a small head light. Then to fill in your windows, take your thin nail art brush, dipped in the same light blue as the background and fill the windows in. If need you may have to re-outline the windows.

If you would like you can add more details to Herbie, but I just wanted to keep the look of Herbie simple.

As for the index finger nail, I just kept it with no design and just the shimmery blue. The pinky nail, I put a small amount of rainbow glitter. 

As always, once your design has dried apply a top coat.
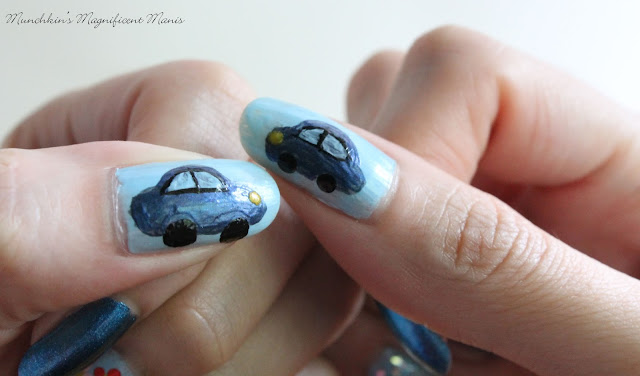
Volkswagen Beetle Nail DesignThe Herbie I did on my right hand turned out to be smaller, and actually looks kind of cuter!

If you have a Herbie of your own you can always change the color to match your Herbie. 

Hope all of you enjoyed this VW Beetle/ Herbie nail design!

For the next few weeks I will not be doing a post/ nail design, I will be going on vacation. After my vacation I will be back with more fun and bright nail design for all of you! 

Aloha and see you all soon! 

Friday, June 19, 2015

Let's Try Water Marbling!

Hello everyone! Many of you may have seen a cool looking design that is done on your nails that is created with water, this is called water marbling. You may wonder how this is done, or like me, you want to try this but it looks difficult or just way to messy. 

After a long time of wanting to try water marbling and having someone ask how is that done, I finally decided to give it a try. I will warn you, I did run into some problems myself, but I was able to create some kind of marble effect, so I can still do a tutorial.  

water marble
 First attempt at Water marbling, turned out okay for my first try?

Here are the nail polishes and tools needed for this water marble design:

Base Coat and top coat - Nicole OPI-  3in1- base, top, & strengthener and Revlon Extra Life No Chip top coat.

Nail polishes used- Revlon Gel envy- Sure thing, Sally Hansen- Hard as Nails - No hard feelings, and Milani- Quick Teal.

Tools used- Let two cups of water set over night or for a few hours to be room temp, tape, and toothpicks.

For clean up- a Q-tip with a precision tip, and acetone nail polish remover.


As for rating, as stated above I feel that I can't give a fair rating due to the fact that I ran into some issues myself. Water marbling I found requires a lot of trial and error! 


Let's give this water marbling a try! 

1. Like with any nail design or just painting your nails, apply a base coat. 


2. Paint all of your nails white. This helps the colors stick to your nails and to be opaque. 

3. Things are going to get messy! To help things be a little less messy, take two small pieces of tape, put that on both sides of the nail, then put a large piece around the nail. Their is also a thing called liquid latex (which I don't have) that can be painted around the fingers, then simply peeled off for easy clean up.

If you want to know more about liquid latex Elleandish (Janelle) has a good review on YouTube about it. 

4. Take your cup of clean room temp. water, or water that is not too hot or too cold. Some people have said to use filtered water and some say tap water is fine. I used room temp. tap water. I also strongly suggest having two cups of water, one for your right hand and another for your left. I only had one and when I went to do my left hand the water was too murky and was impossible to work with. 

*Make sure to have your polishes, toothpicks, and everything close by. You need to move quickly for this and it is best to have everything close.  

5. Uncap both of your nail polishes and leave them uncapped for this step, this helps to create the bulls-eye quickly. Take the first polish that you want to use and make sure the brush has a lot of polish on it that way it will drip into the water. With a fully loaded brush, place it close to the water and let the polish dip into the water, then wait for it to spread. Do this for the next color as well. Repeat this step as many times as you would like, to create a bulls-eye.

I used two colors a purple and teal cream polish, you can use more if you would like. Also not all nail polishes will work for water marbling, you really just have to test them out. I found that cream polish that will drip well worked the best. 

6. Once you have the bulls-eye that you want. Take a toothpick dragging from the center outward works best to make a design. For a beginner like us, you don't have to make a intricate design, you can just drag your tooth pick and make a simple design that doesn't need to be perfect. 

7. Now find a part of the design that you like then dip your finger in. You are actually suppose to dip your finger in at an angle, which I did not do. As you can see I dipped it straight in. Then take your toothpick and remove the excess polish around your finger.


8. Then remove your finger. As you can see even though I didn't do it right is still tuned out.

For each finger repeat steps 5- 8. You can dip them one at a time or dip up to three fingers at a time.

water marble
 Here is the final results of the water marble done on my left hand.

As always once your design has dried apply a top coat. As you can see my first attempt turned out okay on my right hand. A few fingers I had to re-dip because it didn't tun out or was not opaque enough.

water marble fail
 The sadness that is my right hand.

For my right hand this was a whole another story, as I ran into so many problems! As you can see, only three fingers somewhat turned out. I don't know what happened with the middle finger, then the ring and pinky finger and at that point with all of my frustration, I just painted a solid color.

Here are some of the problems I ran into (mainly with my right hand.)
- The first cup of water got to murky and would not work at all.
 - I didn't have an extra cup of room temp water, then I had to wait for another cup to hopefully get at room temp. This still was not working well.
 - Sometimes the polish just would not spread.


In conclusion, the actual water marbling steps are simple, the part that is difficult is the process, getting the right polish to spread, the right room temp water, and for the design to come out. With a lot of practice, trial and error water marbling can be done. Also even though I had issues with water marbling I will give this another try!

Hope this tutorial about water marbling was somewhat helpful, even though I ran into some issues myself. Like anything it is a learning process and we can all learn together.

Here is a video from Sara Beauty Corner, she gives a great video for beginners on how to water marble, just in case you need some extra help!

 
See you next time for my next nail tutorial!             

Saturday, June 13, 2015

Happy Blogiversary!

Hello everyone! Happy Blogiversary, as of Saturday June 13 I have been blogging for a year now. I started Munchkin's Magnificent Manis as a way to share my of love of nail design with all of you, which I have truly enjoyed over the year and look forward to continuing. I know my blog is not super popular, that is okay, the reason I stated this blog is not only to inspire all of you, but to also inspired myself to create design that would help us all improve and learn together. I would like to thank all of you around the world (it is always cool to see!) that have checked out my blog, and maybe even given some of the designs a try. Hope all of you have enjoyed my nail tutorials, reviews, and nail fun, and I look forward to share more nail fun in the year to come.

Thank you!