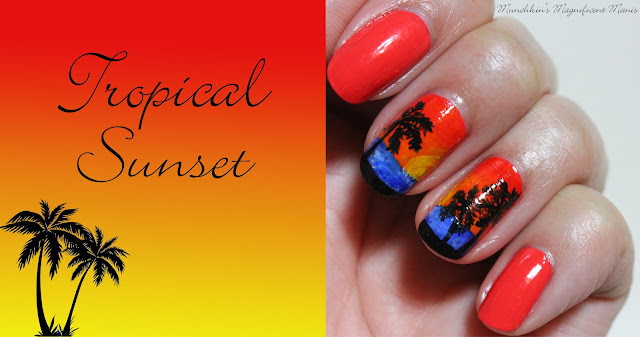
Topical Sunset Nail Design
Here are the nail polishes, nail art tools, and a lot of acrylic paint, that are used to create this tropical nail design:
Base and top coat - CND Stickey Base Coat and Revlon Extra Life No Chip top coat.
Nail polishes- Aloha from OPI (as your base color), and Sally Hansen- Hard as Nails- Black Heart (for the tips of the nails or the land.)
Acrylic paint- white, black, yellow, red, and blue.
Nail art tools- fan brush, two small detail brushes, and a very small detail brush.
Other- small jar or cup with water in it for cleaning up nail art brushes, and a paint palette for mixing paints.
This
design I actually create last year when I was in between jobs and
school (I was bored), and decided that I finally need to create this on
my own nails.
Practice design that I created over a year ago.
Let's start this tropical nail design to get away from it all!
Start off with a thin layer of base coat (CND Stickey base coat) to protect your nails.
For all of your nails, polish them with a coral color (Aloha from OPI), even the middle and ring finger nails need to have a polish as your base color, even though all of the design will be done with acrylic paint.
As stated above this whole tropical design will be done with acrylic paint, and their is a lot of mixing of colors for this design.
For the sky you will need four colors starting from the top a red, then dark orange, light orange and yellow.
For the ocean you will need a dark blue, medium color blue, and a light blue, along with white for the waves.
We will star off with the sky, for this you will need a fan brush to blend the colors together. First dip your fan brush into the red and the dark orange (I did two colors at a time) then brush that onto the nails until it is blended the way you like. Then on a clean fan brush add the light orange and yellow, then brush that on until it is blended, you may need to go over this a few time until you have it the way you like.
Once you have the sky the way you like we will go on to the ocean. With a thin detail brush draw a blue line about half way down the nail near the tip. Then fill that in with the dark blue paint, then with a medium blue start to make the water like it has small waves in it, then add white paint to make the water look even more like waves. With this their is a a lot of trial and error, you just sometimes have to keep going over it to make the water look like it has small waves in it. I actually like how the water turned out better on the practice one, because the water looks more like it has waves in it.
Next we will create the land, with a thin detail brush with black paint on it, draw a line near the tip of the nail and then fill that in. I suggest going over this with black nail polish because acrylic paint that is on the tips of the nails tend to rub off even with a top coat applied.
Then on to the palm trees. On the middle finger nail we will make one palm tree, and on the ring finger nail we will make two palm trees, a tall and a short one. For all of the trees, with a thin detail brush make a long line for the tree trunks, that are all different lengths.
Then for the branches make just a few curved lines for that part, like for example on the palm tree on the middle finger nail I made six different curved lines.
For the leaves this has a lot of small detail, so you will need a very tiny brush. On the curved branches make very small lines to make the leaves look like palm leaves, do this on all of the branches.
Last but not least, we will add the sun for the sunset. First we will make the sun with white paint, make a half circle on each nail and fill that in with white paint, then go over that with yellow paint. With the yellow, paint around the sun to give it a glow, and for an added touch you can add a little more yellow to the sky.
Once you have your tropical design the way you like, apply a top coat to seal in your nails and to help them last through your tropical vacation or if you are just dreaming of going on a tropical vacation, like me it will help your nails to last too.
Hope you enjoyed this tropical get away/ nail design!
See you next time for more nail fun!


No comments:
Post a Comment