Saturday, September 12, 2020

Holo Taco 1st Anniversary Collection

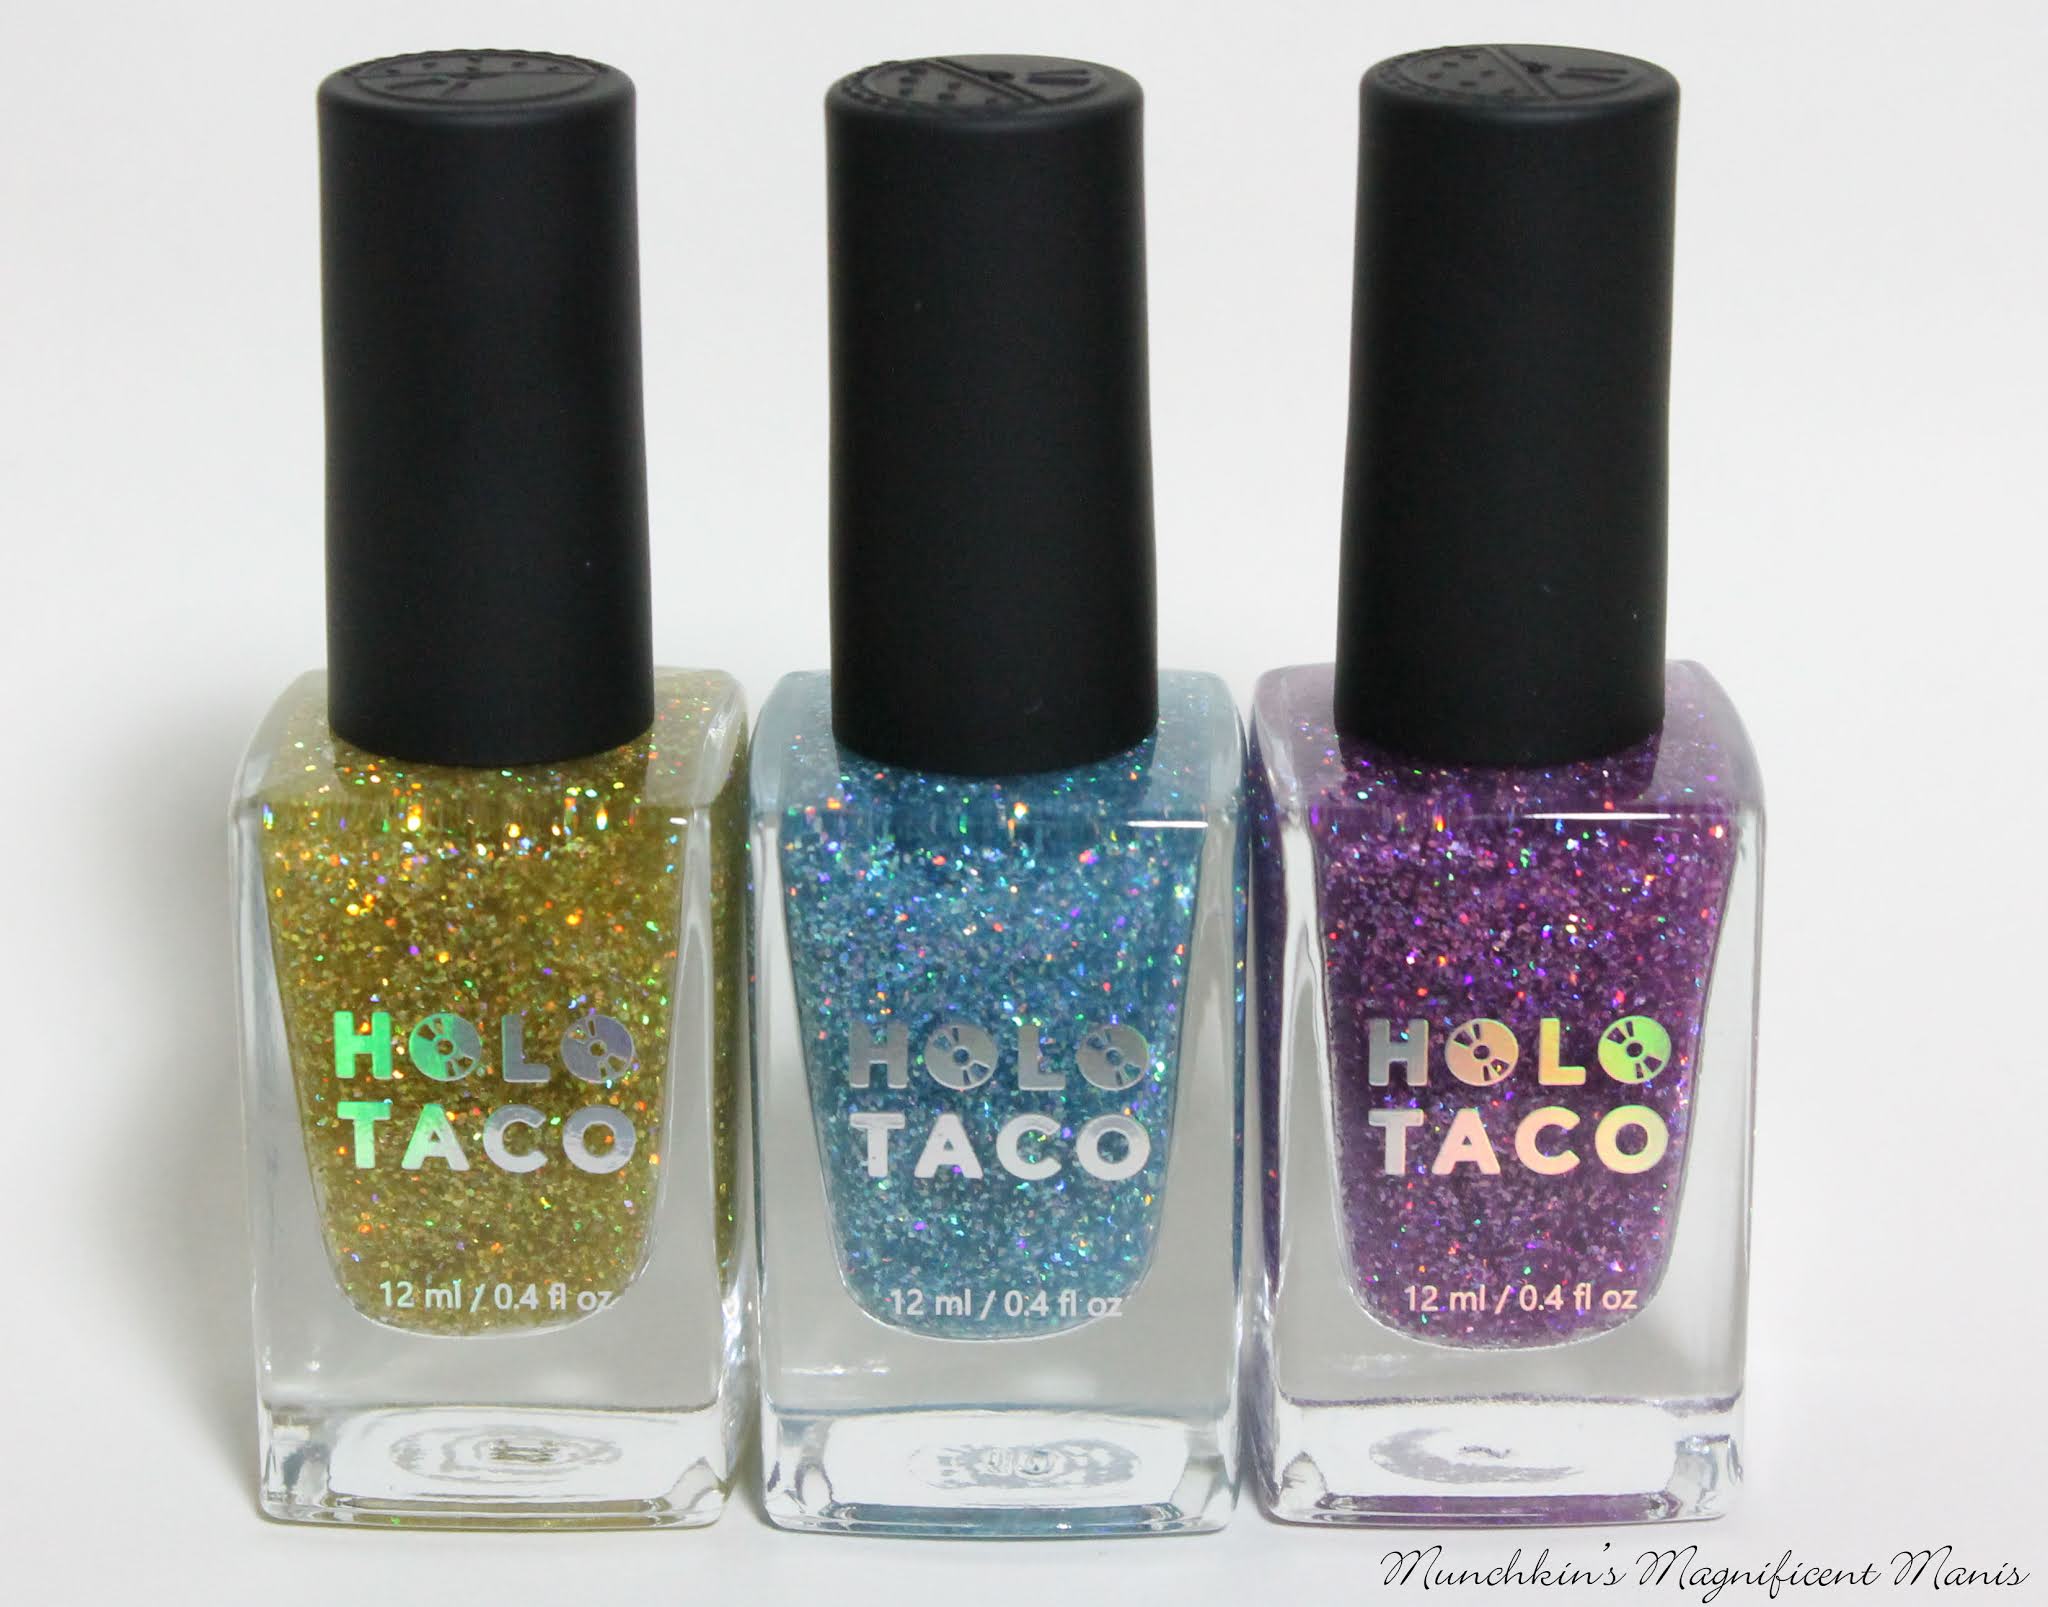
Hello everyone! Once again we have another Holo Taco nail polish review, this polish review is a little over due, this collection came out in July, but is still available on the Holo Taco website. The collection that we will be taking a look at is the Holo Taco 1st Anniversary flakie top coat trio. This collection was released to celebrate Simply Nailogical Cristine's nail polsih brand Holo Taco being around for one year.    

Holo Taco 1st Anniversary Collection
 
Holo Taco 1st Anniversary Collection
 
The Holo Taco first Anniversary Collection has three holographic flakie top coats, that come in three colors. All three of these polishes are top coats and are suppose to go over a opqaue colored polish, they are not meant to be opaque on their own. Also as stated above these polishes are still currently available, but are limited edition, so once they are sold out then they are gone forever.
 
In today's post I applied the flakie polishes over black, the rainbow collection and blue polishes.
 
First we will take a look at them over black, on all for the nails I did apply two coats of the Holo taco flakie top coat along with a clear top coat.
 
Holo Taco 1st Anniversary Collection
Holo Taco 1st Anniversary Collection 
 
Holo Taco 1st Anniversary Collection
Holo Taco 1st Anniversary Collection, Blue Flakie
 
First we will start off with Blue Flakie Holo Taco on the index nail, all of these topper are in a clear base, the blue flakie has blue shimmer with holographic pieces in it, some of the small pieces kind of look like small C's.    
 
Holo Taco 1st Anniversary Collection
            Holo Taco 1st Anniversary Collection, Purple Flakie
 
Next we have Purple Flakie Holo Taco on the middle finger nail, this topper has purple glitter/ shimmer with holographic glitter in it. Basically all three toppers are the same but with differnt colors in them. 

Holo Taco 1st Anniversary Collection
 Holo Taco 1st Anniversary Collection, Gold Flakie 
 
Lastly we have Gold Flakie Holo Taco, just like the last two have holographi glitter in them along with the gold glitter flakes in them as well. 
 
Also on my pinky nail I put both blue and purple flakie together on the one nail. 
 
Holo Taco 1st Anniversary Collection
 
Then on the thumb nail I applied all three flakie top coat the gold, purple and blue.

  
Holo Taco 1st Anniversary Collection
 
Holo Taco 1st Anniversary Collection, over Rainbow Collection

Holo Taco 1st Anniversary Collection, over Rainbow Collection

Holo Taco 1st Anniversary Collection, over Rainbow Collection
Holo Taco 1st Anniversary Collection, over Rainbow Collection 
 
Above I put the Holo Taco flakies over the rainbow collection polishes
 
Pinky to thumb; lemon sucker, orange dink, red licorice has the gold flakie topper.
 
Green taffy and blue freezie has the blue flakie topper.
 
Then Magenta Jelly and purple slushie has the purple flakie topper.
 
Holo Taco 1st Anniversary Collection, over blues

Holo Taco 1st Anniversary Collection, over blues

Holo Taco 1st Anniversary Collection, over blues
 
Lastly I applied the flakies over two polishes Zoya's Maren and China Glaze My Little Pony Too Busy Being Awsome (on the ring finger nail.)
 
Holo Taco 1st Anniversary Collection
Holo Taco 1st Anniversary CollectionHolo Taco 1st Anniversary Collection

Holo Taco 1st Anniversary Collection
 
All most all of the Holo Taco collections come in a nice collection box. This collection came in a nice holographic purple box, unfortunately the collections boxes do sale out fast, so you have to get them the day they come out. I really like the collection box it gaves the collection a nice fancy touch.
 
Holo Taco 1st Anniversary Collection
 
 
Also each polish comes in a individual black holographic box, this collection the logo is in gold holo, while the other polishes logo is in silver holo.
 
In conclusion I did really like these topper, they where all very pretty. One thing that I did notice when I applied the topper the clear base did kind of look dual on the nails,but the glitters still looked shinny, but once I applied a clear top coat the toppers looked fine. Cristine did say even though these are topper she recommend still applying a clear top coat. 
 
 
Holo Taco 1st Anniversary Collection

Holo Taco 1st Anniversary Collection

Holo Taco 1st Anniversary Collection

Holo Taco 1st Anniversary Collection

Holo Taco 1st Anniversary Collection
 
Of all three way I applied the topper I like the topper best over a black polish because I felt that you can see the topper the best on a dark polish. The rainbow polishes it was a little harder to see the flakies, but it was still pretty.
 
The Holo Taco Anniversary collection bundle and individual polishes are still avaiable on the Holo Taco website, along with the Rainbow Collection polishes were restocked!
 

1st anniversary bundle is $36.00
Individual polishes are $13.00 each  

Hope all of you enjoyed this Holo Taco Anniversary colletion review!

Next week we have another exciting Holo Taco polsihes that we will be taking a look at.

See you next time for more nail fun!

Saturday, September 5, 2020

Tropical Dreaming- Holo Sunset

Hello everyone! Today we will be creating one more tropical design, even though summer is sadly coming to a close, I still wanted to create one more tropical design using the Holo Taco Rainbow Collection polishes. 

Tropical Sunset Nail Design, Holo Taco
   Tropical Sunset Nail Design

 Here are the polish and nail art tools used to create this bright tropical sunset: 

Base and Top coat - CND Stickey Base Coat, and Revlon Extra Life No Chip top coat. 

Polishes- Holo Taco Rainbow; Lemon Sucker, Purple Slushie, Magenta Jelly, Orange Drink, and Blue Freezie.  

Arcylic paint- Black, and yellow.

Nail art brushes- Thin detail brush and a stripper brush. 

Other- Makeup sponge for gradient and a cup of water to clean off your nail art brushes. 

Tropical Sunset Nail Design, Holo TacoTropical Sunset Nail Design
 
Apply base coat and let that dry.
 
Polish- 
Base colors
 
Thumb- Blue Freezie
Index, middle, and ring- Lemon Sucker
Pinky- Purple Slushie

 
Let that dry.
 
 
Tropical Sunset Nail Design, Holo Taco
Tropical Sunset Nail Design
 
This design is very similar to the last weeks tropical design, we will just be using more colors for the gradient.
 
 
Purple, Magenta, Orange, Yellow, and Blue Gradient (Sunset)
 
First we will start off with the gradient with a clean makeup sponge, polish Purple Slushie at the top of the sponge, then Magenta Jelly, Orange Drink, Lemon Sucker, and Blue Freezie. It does look like their is a green polish added, but it is just the yellow and blue blending together.
 
Then dab the sponge on to the nails, to make the polishes blend into a gradient like sunset. You can repeat this step another time if you feel like your gradient is not opqaue enough.   
 
Once again for this design I did apply a top coat before I did the design just to smooth out the gradient, then after I did the tropical design I did apply another top coat.   
 
 
Tropical Sunset Nail Design, Holo Taco
Tropical Sunset Nail Design
 
Tropical Design 
 
Once again I will not do a detailed description of this design, just a simple description.
 
Starting with the middle finger nail, the sunset, make a line in the middle of the nail and a sun on top of that line, then fill in your sun with yellow. Under the sun make a few small lines in the water, also make some more smaller lines in the sky. For a final touch add two small birds in the sky, by making two curved lines.

On the index nail make a oval for the land and add one palm tree on the small island. Also add a few lines under the palm tree for grass.
    
On the ring finger nail repeat the same steps like the index nail, just put the island and palm tree on the other side of the nail. For this nail also add a line in between the orange and yellow and some small lines in the water. Also for this nail add one small bird in the sky.  
  

Tropical Sunset Nail Design, Holo Taco
Tropical Sunset Nail Design
 
Once you have your bright tropical sunset design the way you like apply a top coat to seal in your design and to help it to last. 
 
 
Here is the practice design that I created. One thing I would have done differently on my final design on my nails is like my practice design I would have not had as much purple, I felt like I had to much purple in the sky and not enough blue for the water.  

Hope all of you enjoined this tropical design and hopefully soon we can all enjoy a nice tropical vacation and not just have it on our nails. 
 
Also check out last weeks tropical design as well.  Holo Sunset using Holo Taco Rainbow Polishes

See you next time for more nail fun!

Saturday, August 29, 2020

Holo Sunset using Holo Taco Rainbow Polishes

Hello everyone! I don't know about all of you but summer has gone by way to fast, faster then normal it seems, even though this year we could not do much this summer. Anyways today we will be creating a tropical sunset nail design using three of the polishes from the Holo Taco rainbow collection, as always in the summer time I love to create tropical designs, but this summer escaped me and I have only created one tropical design, even though summer is coming to a close I do plan on creating one more tropical design.  

Holo Tropical Sunset- Holo Taco Rainbow

Holo Tropical Sunset- Holo Taco Rainbow

Here are the polishes and nail art tools used to create this holo tropical sunset:


Base and top coat- CND Stickey Base Coat and Revlon Extra Life No Chip top coat.

Nail polishes- Holo Taco- Lemon Sucker, Holo Taco- Orange Drink, and Holo Taco- Red Licorice.

Acrylic paint- Black.

Nail art brushes- Thin detail brush and stripper brush.

Other- Makeup sponge and a cup of water to clean off your nail art brushes.  

Holo Tropical Sunset- Holo Taco Rainbow

Holo Tropical Sunset- Holo Taco RainbowHolo Tropical Sunset- Holo Taco Rainbow

Apply base coat.

Let that dry.

For your base polish, start off with the lightest color yellow (Lemon Sucker.) 

The gradient will be done on all of the nails, the tropical design will be created on three of the nails. 

Let that dry.

Holo Tropical Sunset- Holo Taco RainbowHolo Tropical Sunset- Holo Taco Rainbow
 
 
Red, Orange, and Yellow Gradient (Sunset)

First we will start off with the gradient with a clean makeup sponge, polish Lemon Sucker at the bottom, then Orange Drink, then Red Licorice at the top. Then dab the sponge on to the nails, to make the polishes blend into a gradient like sunset. You can repeat this step another time if you feel like your gradient is not opqaue enough. 

For this design I did apply a top coat before I did the design just to smooth out the gradient, then after I did the tropical design I did apply another top coat. 

Holo Tropical Sunset- Holo Taco Rainbow

Holo Tropical Sunset- Holo Taco Rainbow
 
 
Tropical Design on the index, middle, and ring finger nail
 
For the tropical design I will not be doing a step by step process because I have done multiple tropical designs that I feel that you can always refer back to. So I will keep the explanation simple. 
 
On the Index nail make thick black strip for the land in between the yellow and orange and a thin strip for another piece of land in between the orange and red. Then make two palm trees on the thick black land.
 
On the middle finger nail make thick black strip again for the land on the right side of the nail on the orange part. Then make two palm leaves on each side of the nail.
 
On the ring finger nail repeat the same thing as you did on the index nail, just make the design on the other side (the right side, index nail is on the left side.)
 
Holo Tropical Sunset- Holo Taco Rainbow

Holo Tropical Sunset- Holo Taco Rainbow
Holo Taco- Red Licorice- Rainbow Collection
 
Once you have your design the way you like apply a top coat to seal in your design and to help it to last. 

Hope all of you enjoyed this holo tropical sunset nail design!
 
See you next time for more nail fun! 

Saturday, August 1, 2020

Under the sea- coral reef nail design

Hello everyone! Today on the blog we will be creating a coral reef nail design. I don't know about all of you but I would love to be on a nice tropical beach right now, or really any beach, but with everything that is going on in the world it's not to safe right now. So I thought we could bring the beach/ocean to us, on our nails.

Coral Reef Nail Design

Here are the polish and nail art tools used to create this reef nail design:


Base and top coat - CND Stickey Base Coat and Revlon Extra Life No Chip top coat.

Polishes- Zoya- Splash- Harbor, Zoya- Splash- Maren, and Picture Polish- Salt Water- Nailstorming.

Acrylic paint- red, blue, green, white, brown, peach and light yellow.

Nail art brush- thin detail brush.

Other- Make up sponge and water to clean off your nail art brush.


 Coral Reef Nail Design

Apply base coat, let that dry.

Polish-
Thumb- a light shimmer blue (optional)
Index, middle, ring, and pinky- greenish blue.

Let that dry.

Coral Reef Nail Design

For this nail design we will just be creating it on the index, middle and ring finger nail.

First we need to create the gradient. Take a makeup sponge with the same base color and polish that on the sponge and the take a dark blue polish and polish that on as well. Then dab the sponge on the nail to blend the the gradient together. Then let that dry.    

Next  we need to make the sand. On the tip of the nail paint that with peach and then add some brown paint to that. Paint that kind of like a french manicure, but it’s ok if it’s not straight it can be a little curved. 

Coral Reef Nail Design 

Once your gradient has dried. We will do create the nail art. Starting with the index nail, take a thin detail brush with blue paint on it and on the left side of the nail make a long line and then two lines at the bottom of that large line and then two smaller lines at the top. For the next coral, take that same detail brush with a light green on it and make a long line on the left side of the nail then a short line near the top. Next to that make a shorter line with a small line at the top.

The middle finger is similar to the index nail. Take your detail brush with with red on it, make a curved line on the sand and have four lines coming from that, then make a few small lines from that. Then just like the index nail make a the same green coral in the middle of the nail. Also on the red coal you make some small yellow dots on it. 

Coral Reef Nail DesignCoral Reef Nail Design 

For the pinky nail this nail is similar to the index nail, it is just like the blue coral that we made. Also you can make small yellow dots on the coal as well.

Lastly on the ring finger we will make a star fish. Make a large star shape with brown paint, then once that is dry add some peach dots on the points of the star fish.  

Coral Reef Nail Design
Coral Reef Nail Design  

Once you have you coal reef the way you like, apply a top coat to seal in your design and to help to to last. 

Hope all of you enjoyed this coral reef nail design!

See you next time for more nail fun!