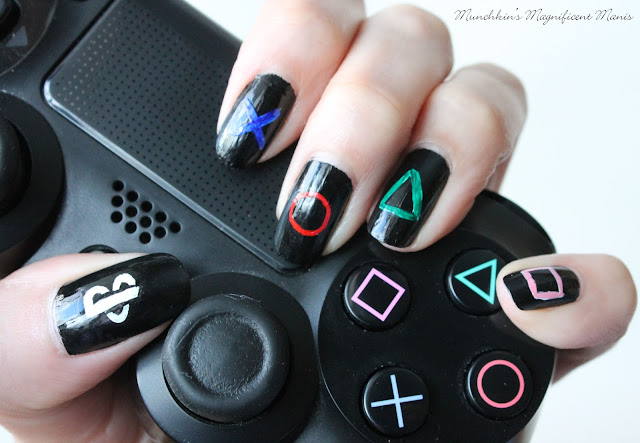
Anyways for this week I decide to do another nerdy nail design, PlayStation nails. Last year I did a Little Big Planet/ Sackboy nail design and that post has got a lot of view, So I thought that maybe all of you would be interested in a PlayStation nail design.
PlayStation nail design with the PS4 controller.
This is the area that I usually put the nail polishes and tool that we will need to use to create this design, but I thought that I would try something a little bit different and put the polishes and tools used right by the photo. We will see which one works out better having the polishes and tools in the beginning or as we go.
The skill level for this PlayStation nail design is:
Beginner
For the most part this design is simple and easy to create. Due to it just consisting of simple shapes. The only part that might be a little bit hared to create is the PlayStation logo on the thumb nail.
Let's start this fun PlayStation nail design!
Base coat used Nicole OPI- 3in1- base, top, & strengthener
1. Apply a base coat to protect your nails.
Polished used Sally Hansen- Hard as Nails- Black Heart
2. Paint all of your nails black.
White Acrylic paint and a small slanted nail art brush.
3. Then we will be creating all the main buttons on the PlayStation controller, the X, O, triangle and square button. First we need to make the outline the the buttons with white to make sure that the color will show over the black background. Take your thin nail art brush dipped into white paint and make a X on the index nail, a O on the middle finger nail, a triangle on the ring finger nail, and a square on the pinky finger nail.
4. As we let the buttons on the other nails dry we will make the PlayStation logo on the thumb nail. For the logo I forgot to first take a photo of the P then the S, so in the photo above it is almost done. For the logo first start off with your thin nail art brush dipped into white paint and paint a large P, then make a S like shape around the P.
Acrylic Paints used blue, red, green, white & red mixed together to make pink.
5. Now that the white outline of the buttons has dried, we can go over the white with the colors of the buttons. For the X go over that with a blue, the O a red, the triangle with green, then the square with a pink, if you don't have a pink and are using paint you can mix red a white together to get the pink you want.
Final PlayStation nail design
For some final touches on the PlayStation logo on the thumb nail, we will add a few black lines. With a clean thin nail art brush draw a line down the middle of the P, so the P is not attached and on the other side of the S draw a line on that as well. Then at the bottom of the P draw a line to make the P slanted at the bottom.
Then if needed to fix some of the buttons, you can go over it with a little bit of black paint. Like the O was it little off, so I just went over some of the O with black paint to make it all the same shape.
Top coat used Revlon Extra Life No Chip top coat.
Once your PlayStation nails have dried apply a top coat to seal in your design.
Hope all of you enjoyed this PlayStation nail design! This is a great way to show your love of gaming or as always just a fun design to create on your nails.
Also if you like this design and have not checked out the Little Big Planet Sackboy design, click the link below to give that design a try as well.
Little Big Planet- Sackboy Design
Also if you like this design and have not checked out the Little Big Planet Sackboy design, click the link below to give that design a try as well.
Little Big Planet- Sackboy Design
See you next time for more fun nail tutorial!


No comments:
Post a Comment