
growing up, one of my favorite things to do when it snowed was playing in the snow and building a snowman, either by myself or with my mom and brother. But now that I have to drive in the snowy, nasty weather, which is not as much fun, and of course when you are younger you look forward to snow days, where you get to miss school, which was always nice.
For this week's design we will be creating a winter wonderland themed nail design, with a snowman, a penguin, and or course some snow.

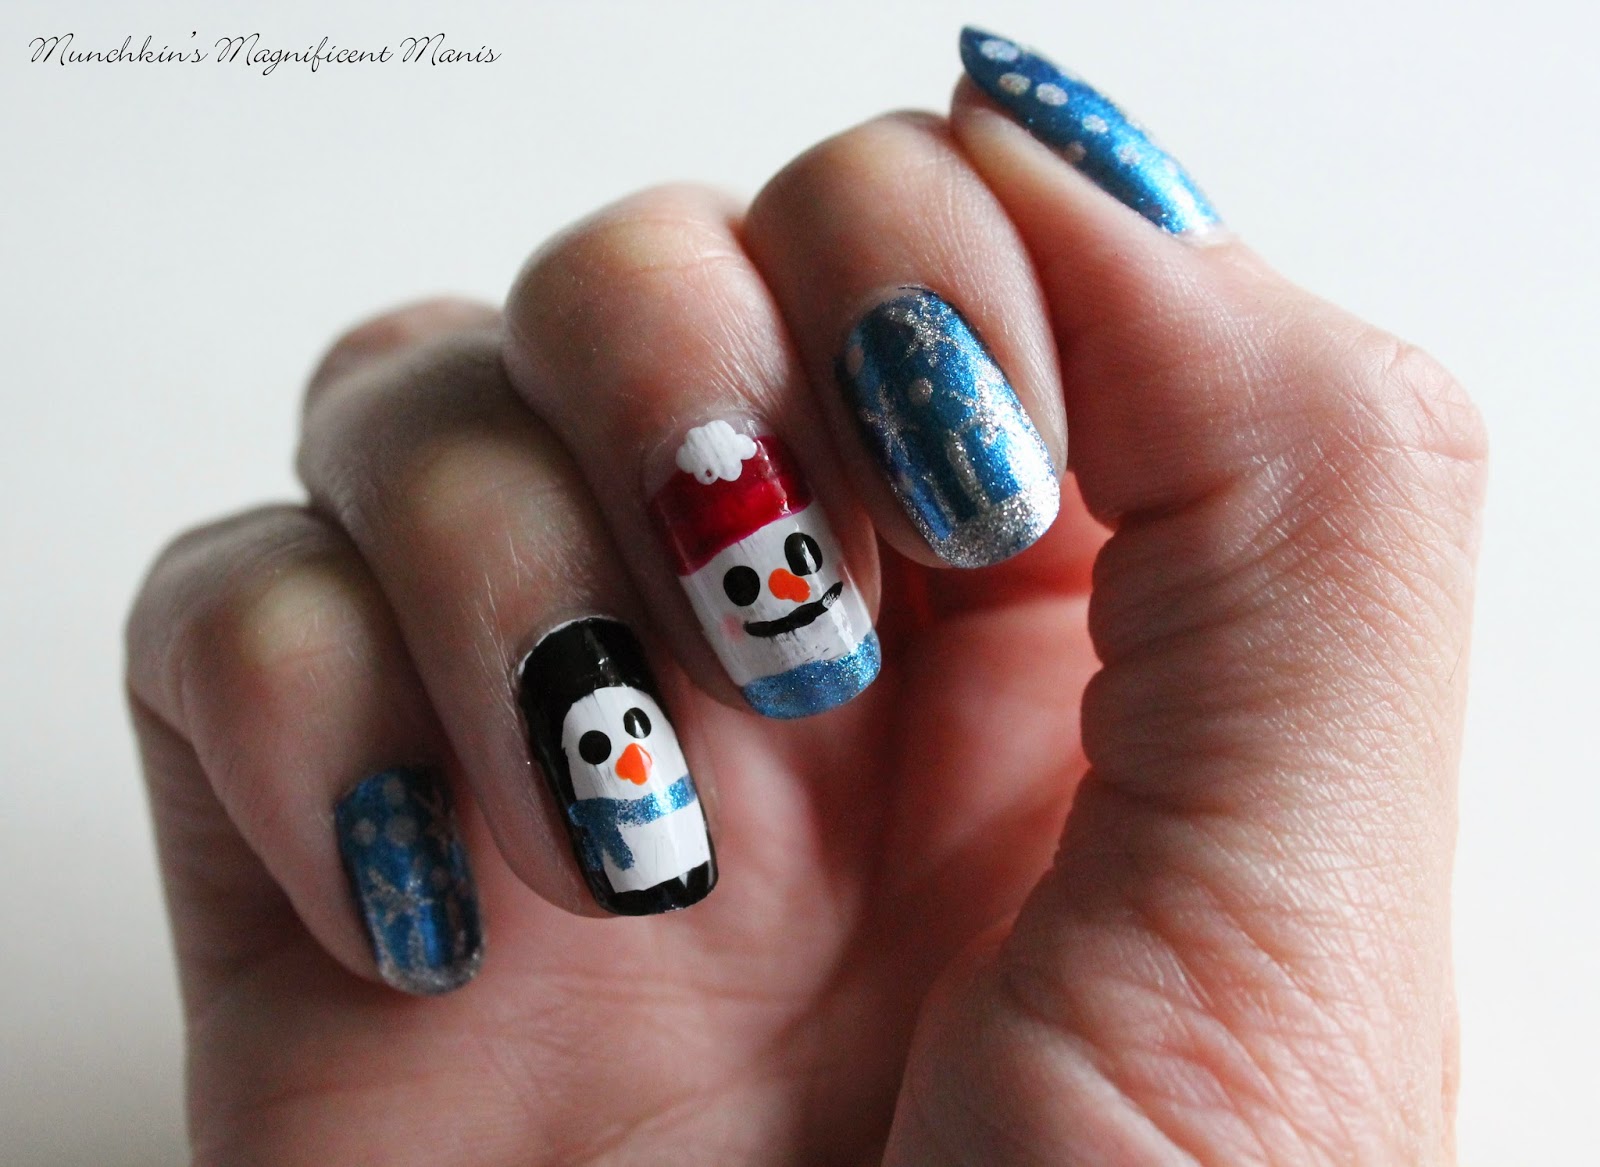
A snowman decoration that I got a Target, The final Winter Wonderland design
on the left hand.
The polishes and nail art tools used for this Winter Wonderland design:
 Top coat and base coat- Revlon Extra Life No Chip top coat, and Nicole OPI- 3in1- base, top, & strengthener.
Nail art polishes/ strippers- Kiss nail art- silver, and Kiss nail art- Black.
Nail polishes- Nicole by OPI- A Lit- Teal Bit of Love, Sally Hansen- xtreme wear- White on, Sally Hansen- Hard as Nails- black heart, NYC- Broadway Burgundy Frost, Sally Hansen- xterme wear- Sun kisses, Color Club Holo's- Harp on, and NYC- SoHo.
Nail art tools- small glass jar for nail polish remover to clean nail art brushes and dotting tool, dotting tool, and a small thin nail art brush/ stripper.
The skill level for this Winter wonderland design is:

Beginners
For the most part this design is simple. The snowflakes and icicles are easy to create. The only part that might be a little hard is creating the snowman and penguin, but for the most part even creating the snowman and penguin are simple.

1. Start off with one thin coat of base coat.

2. Paint your thumb, index, and pinky a glitter blue (Love the polish Nicole by OPI- A Lit- Teal Bit of Love !), then paint your ring finger white, and for now, leave the middle finger nail blank.

3. Next we will be creating the winter theme, the icicles and snowflakes. On the index and pinky finger, create a silver french manicure with the silver nail art polish/ stripper. Do this by slowing dragging your nail art polish across the nail and then fill in that part.

4. Now we will create the snowflakes. Once again take your silver nail art polish, make a small X for the snowflake.

5. To finish your snowflakes draw two more lines, until you have a star like shape. Do this three times or until most of the nail has snowflakes on it, remember to leave a little bit of space for dots/ smaller snowflakes, this will be shown at the end.
Once you have the right amount of snowflakes, we will start the icicles. We already have part of it started with the french manicure part, now we just need to add the dripping ice, take your silver nail art polish and draw two lines on the side under the french manicure.

6. Then draw four different size lines or enough lines to go across the nail, while leaving a little bit of space in between each line/ icicle.

7. Next we will make a large snowflake on the thumb nail. Take your silver nail art polish and draw a vertical line on the side of the nail, then a line in the middle, and two slanted lines one at the top and one on the bottom.

8. To finish off your snowflake, draw arrow like lines on the three larger lines all the way down the larger lines.

9. Next we will make the cute snowman. Take your white nail polish and draw a curved line at the top and bottom, then fill in that part. Make sure to leave some space at the top and bottom of the snowman's head.

10. We will let the snowman's head dry, then we will work on the penguin. Take your black nail art polish and draw a curved line at the top, do this by following the curved line of the nail. Then draw two lines on the side and a curved line at the bottom, then fill in all of these areas.

11. Now for the eyes. Take your dotting tool dipped in black polish and dot two eyes. By accident I ended up making one of the eyes a different size, but it still looks okay.

12. Next is the beak. Once again take your clean dotting tool, the smaller end and dip it into orange polish, then make a upside down triangle shape.

13. To finish your penguin, we will make the surf. Take your thin nail art brush/ stripper and dip it into the same color blue that you used as the background for the snowflakes. Then slowly drag your nail art brush across the middle of the penguin and then make two lines near the end of the surf.
Next we will make the feet, you do this by taking the larger end of the dotting tool and dip it into orange polish. Place the dotting tool at the bottom of the penguin and drag up to make small feet, do this two times to make feet.

14. Back to the snowman, we will make the red hat now. Take the brush that is in the glitter red polish and make a rectangle like shape with a little bit of a curve at the top and bottom of the hat, also remember to leave a little bit of room at the top of his hat, for his puff ball.

15. Next is the snowman's smile. Take you black nail art polish/ stripper and slowly make a small curved line under the eyes.

16. After you have made his cute smile, we will make his carrot nose. Take the small end of the dotting tool dipped in orange, place it in the middle of his face and then drag the dotting tool a little bit for his carrot nose.

17. We are almost done with the cute snowman. For an extra touch we will make rosy cheeks. First clean off your dotting tool, then with the larger end dip it into pink polish and dot two dots on the side of his face.
Then once we have the cheeks done, we will add a puff ball to the top of his red hat. Once again clean of the larger end of your dotting tool, then dip it into white polish, then on the top of his hat make a few dots to form a puff ball, I think I did this about five or six times.

Winter wonderland design on the left hand
To finish your snowman, add a black line in the middle of his hat, by taking your black nail art polish/ stripper and slowly while routing your finger make a line. Then for a final touch, I was going to use the blue glitter polish as a background, but it end up looking like a surf, which end up working out. That is done by just using the brush that came with the polish and filling in the tip of the nail.
Also we don't want to forget about the small snowflakes that are next to the larger ones. This is done by taking a silver holographic or a glitter silver polish, with either the larger and small end of your dotting tool, dip it into the holographic or silver polish and make small and large dotting in the empty space around the large snowflakes, for small snowflakes.

Another photo of the design on the left hand
Once you are happy with the amount of small snowflakes that you added, let your design dry, and then apply a top coat.
Winter wonderland design on the right hand
When it comes to the design that I make on each hand, I usually like the way the design turns out on my left hand, due to me being right handed. Every so often I still like to show all of you my designs that I have done on my right hand as well, even if it is the same as the left.
As always hope everyone enjoyed this winter nail design, and try to stay warm in the cold weather, unless you are lucky enough to live an area that is always warm.
Next week will be as you may have guessed a Christmas/ Holiday nail design.
See you next week for this bright and colorful Holiday nail design tutorial!
No comments:
Post a Comment