Saturday, July 27, 2024

Tropical Sunset- Tropical Nail Design

Hello everyone! Hope everyone is having a good summer so far. This summer My husband and I went to New York for our wedding anniversary. For our 10 year next year we hope to go back to Hawaii, the place we got married. Anyways today on the blog we will be creating a beautiful tropical sunset nail design because we are dream of a beautiful tropical vacation and watching the sunset on a beach, so for now creating one on our nails will have to do.

Tropical Nail Design

Here are the polishes and nail art tools used to create this tropical sunset nail design- 


Base and top coat- Holo Taco- Long-Lasting Base Coat, and Holo Taco- Glossy Taco- Top Coat.

Polishes- Holo Taco-Wireless Mode- Lite Mode Collection, Holo Taco- Red Licorice- Rainbow Collection, Holo Taco- Orange Drink- Rainbow Collection, Holo Taco- Lemon Sucker- Rainbow Collection, Zoya- Splash- Maren, and Sally Hansen- Hard as Nails- Black Heart.

Acrylic Paint- Black, white and yellow.

Nail art brushes- thin detail and stripper brushes.

Other- Water to clean off your nail art brushes, and Holo Taco Protective Peel.

Tropical Nail Design

Apply a base coat to clean dry nails, for this design I am using the Holo Taco long lasting base.

Let that dry.

Polishes- 

Thumb and pinky nails- A blue mutichrome polish (Holo Taco-Wireless Mode)

Index, middle and ring finger nails- Yellow holographic polish for your base (Holo Taco- Lemon Sucker)

Let that dry.

Next we will add Holo Taco Protective Peel to the index, middle and ring finger nails, this is a liquid latex barrier to help to make doing gradients less messy. 

Tropical Nail Design

Sunset Gradient:

To start off our nail design we will be creating a red, orange and yellow gradient for our sunset. Take a makeup sponge and first polish a red holo (Holo Taco- Red Licorice), then an orange holo (Holo Taco- Orange Drink), and then the holo yellow you used as your base color (Holo Taco- Lemon Sucker). It is ok if the polishes overlap on the sponge, it is actually better if they do overlap, that way the gradient will blend better. 

Then dab the sponge on the nails, the index, middle and ring finger nails, you will need to do this a few time to be opaque. 

For the ocean we will also sponge this on as well, original I did use a green and a blue polish but it didn't show up when I finished this design. So really you just need to sponge on a blue polish (Zoya- Maren) near the tip of the nails.

Lastly apply a top coat this helps the gradient to blend better. Let that dry.

Tropical Nail Design

Topical Island and Sunset:

Next we will be creating the tropical part of this design. First we will make the sunset on the middle finger nail. First take a detail brush with white paint on it and make a small oval on top of the water. Let that dry and then go over that with yellow paint.

For the land we will make a wavy shape on the tip of the nail. I did first paint this on with black paint and then went over it with black polish that way it would not wear away as fast. 

On to the two palm trees on the index nail the palm tree is on the left side, on the ring finger nail the palm tree is on the right side. To create a palm tree, take a thin stripper brush with black paint on it make long thin line for your tree stump, then make two curved lines at the top of that line, two more short ones from those line, then a short line for those two line. For the leaves we need to make very small thin line that are very close together, I feel like if you make your line some what close together, but not to close it can look like a blob or a cool looking palm leaf.

Ocean Water Waves: 

For our final detail for the ocean we will create some small waves. Take a thin stripper brush with white paint on it and make a line one the shore and then make each small line at a time for the waves, then with a detail brush with a small amount of white paint on it brush upward on the line you just made for the wave to give a wave effect to your design. 

Tropical Nail Design

Once your nails are tropical vacation ready apply your final top coat to all of the nails, to seal in your design and to help your nails to last through all of the sunset on your vacation. 

Here is the practice design 

Hope all of you enjoyed this tropical sunset nail design!

See you next time for more nail fun!

Saturday, June 22, 2024

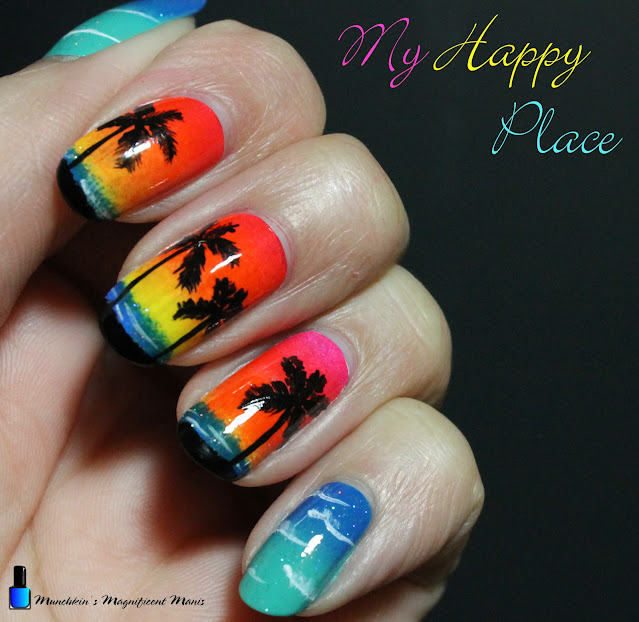
My Happy Place- Tropical Nail Design

Hello everyone! Hope everyone is having a good start to summer and trying to stay cool. Today on the blog we will be creating a tropical design, this is my favorite time of year summer and I always love to create beautiful topical designs. Even more so lately I have been dream of my happy place some where tropical, just seating by the ocean and of course swimming in the ocean too. If this is also your happy place then you will also love to create this nail design. 

Tropical Nail Design

Here are the polishes and nail art tools used for your happy place, a tropical nail design: 

Base and Top Coat- CND Stickey Base Coat and CND Super Shiney Top Coat. 

Polishes- Zoya-Splash- Maren, Zoya- Splash- Harbor, Sally Hansen- Hard as Nails- Hard to Get, OPI- La Paz-itively Hot, OPI- Hello Kitty- 5 Apples Tall, Sally Hansen- Triple Shine- Play Koi, Sally Hansen- Triple Shine- Lemon Shark, Sally Hansen- Hard as Nails- Black Hearts, and Holo Taco- Scattered Holo Taco.

Acrylic Paint- Black and white.

Nail Art Tools- Thin stripper and detail brush, two makeup sponge for gradients.

Tropical Nail Design

Apply a base coat to clean dry nails, and let that dry.

For this design we will first be applying our base colors and then do the gradients.

Polish- 

Thumb and Pinky Finger Nails- Light green polish (Zoya- Harbor)

Index, Middle, Ring Finger Nails- white polish (Sally Hansen- Hard as Nails- Hard to Get), we will be polishing these nails white to help the colors, mainly yellow to show up better and to pop. 

Let that dry.

Tropical Nail Design

Tropical Nail Design

Ocean Gradient on the Thumb and Ring Finger Nails:

First we will start off with the ocean design which is the most simple part of this design. Take a makeup sponge and first polish the same color as the base color the light green polish (Zoya- Harbor) then right next to that color polish a darker blue (Zoya- Maren). Then dab the sponge on the nails, both the thumb and pinky finger nails, you will need to do this a few time to be opaque. 

For the small wave details, take a stripper brush with white paint on it and make a few wavy lines in random spots on the nail so it looks like waves, then what I did was take a clean detail brush and right away try and smudge the line so it kind of look more like a wave. 

Lastly to give the ocean more of a sparkle look, you can apply a scatter holo top coat. 

Tropical Nail Design

Tropical Island Design, the Sunset Gradient: 

First we will start off with the gradient, just like the ocean gradient we just did we will first make a sunset gradient. Take another makeup sponge, first polish a pink (OPI- La Paz-itively Hot), a red (OPI- Hello Kitty- 5 Apples Tall), a Orange (Sally Hansen-Play Koi,) lastly a yellow (Sally Hansen-Lemon Shark) on to the sponge. 

With the pink staring at the cuticle dab the sponge on the nails, you will need to repeat this step a few time to be opaque. As you can see the gradient I did on my nails the pink showed up a lot more on the ring nail and not so much on the middle and index nail. 

Tropical Nail Design

Ocean Water:

For the ocean water if you have a small part of your sponge that is clean you can use that, or you can cut some of your already used sponge to make a fresh piece of sponge. Take the darker blue that you used for your ocean and polish that on your sponge and then dab that on the tip of the nails, the reason that we dab the blue on with a sponge, is I feel like it give a more wave look to the water.  

Tropical Nail Design

Palm Trees:

For our final detail for our design, we will create some palm trees on the index nail make one palm tree on the left side of the nail, the middle finger nail two palm trees one taller then the other, then on the ring finger nail make one palm tree on the right side of the nail. 

This time I will describe how to create a palm tree, I feel like it has been a while since I fully explained how to paint a palm tree.  

Take a thin stripper brush with black paint on it make long thin line for your tree stump, then make two curved lines at the top of that line, two more short ones from those line, then a short line for those two line. For the leaves we need to make very small thin line that are very close together, I feel like if you make your line some what close together, but not to close it can look like a blob or a cool looking palm leaf. 

Once you your palm trees are done we need to make some land for your palm trees to be on. Take a black polish and swipe it on the tip of the nail kind of like a messy French manicure the line doesn't need to be straight. 

Lastly for the final touches on the water we need to make a few lines for the waves, take your stripper brush with white paint on it make just a few lines in the water. Then for an added sparkle take that same scattered holo polish and polish that on to your water. 

Tropical Nail Design

Once your nails are tropical vacation ready apply a top coat to seal in your design and to help it to last through your vacation. 


Here is the practice version of My Happy Place. 😊🏝️

Hope all of you enjoyed this tropical nail design!

See you next time for more nail fun! 

Saturday, June 8, 2024

Don't Worry Be Happy- Smiley Face & Flower Nail Design

Hello everyone! Hope everyone is having a nice spring/ soon to be start of summer. Today on the blog we will be creating a happy face and flower nail design, that is great for summer, well really any time you just want to feel happy. For this design we will be using the new Orly Melting Point Collection. 

Smiley Face & Flower Nail Design

Here are the polishes and nail art tools used to create this fun happy face and flower nail design:


Base and top coat- With these polishes Orly suggests that you don't need a base and top coat, I didn't use one with this design, I did still use CND Super Shiney Top Coat.

Polishes- Orly Melting Point Collection.

Acrylic Paint- Black and white.

Nail art tools- Medium dotting tool, this stripper and liner brush.

Other- Water to clean off your nail art brushes. 

Smiley Face & Flower Nail Design

Apply a base to clean nails if you would like. If you are using the Orly Melting Point collection you can apply a base coat or you don't have to apply a base coat, it is up to you (I did not apply a base coat.) 

Polishes- 

Thumb Nail- Orly- Glass Act

Index Finger Nail- Orly- The Floor is Lava

Middle and Ring Finger Nail- Orly- Having a Smeltdown

Pinky Finger Nail- Orly- Erupt To No Good

Let that dry.


Smiley Face & Flower Nail Design

Happy faces- 

First we will start off with the white base for the happy faces. I did a white base first that way the yellow polish would stand out over the background/ base polish. 

Starting with the thumb nail make a circle with white paint, near the tip of the nail and then make another near the cuticle that is very close the side of the nail.

Smiley Face & Flower Nail Design

Smiley Face & Flower Nail Design

On the middle finger nail make one large circle near the tip of the nail very close to the side of the nail. 

On the ring finger nail make two circles one near the cuticle and another one near the tip of the nail. 

Once you are done making all of your circles take your yellow polish and fill in each white circle, you may need to go over this a few time to be opaque enough. I did have to go in with a nail art brush to make sure the white was all covered. 

Let your now yellow circles dry and the we will make the eyes and smile, for that step take your liner brush with black paint on it and make two thick lines for the happy faces eyes, then take a striper brush with black paint on it make a curved line for the smile.

Flowers- 

Now on to the flowers on each nail. First we will start off with the center part of the flowers take your dotting tool with yellow polish on it on the thumb nail make a dot near the tip of the nail and one near the left hand side near the cuticle. 

On the middle finger nail make a yellow dot with your dotting tool near the cuticle on the left hand side and then make a dot near the tip of the nail on the left hand side. 

Lastly on the ring finger nail make one dot on the lower left hand near the tip of the nail.

Next we will make the flower petals around each of the yellow dots that we made. Take your liner brush with white paint on it make thick lines that look like petals around each of the yellow dots, due to the flowers all being close to the nails they will all be half flowers, so you will only need to make a few petals. 

Smiley Face & Flower Nail Design

Colorful Dots- 

To finish off this design we will make colorful dot all around the nail. We will be using all of the polishes from the Orly Melting Point Collection. Take one color at a time on your dotting tool and dot each color on the thumb, middle and ring finger nails. 

Smiley Face & Flower Nail Design

Once you are happy with your nails apply a top coat to seal in your nails and to help your nail art to last. 

Here is my practice design, I felt like it was worth showing because I did change a few of the nails a little bit.

Hope all of you enjoyed this happy face and flower nails design!

See you next time for more nail fun! 

Saturday, May 25, 2024

Orly Melting Point Collection Review

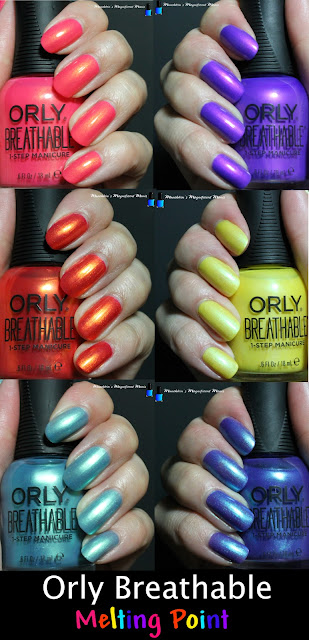
Hello everyone! Today on the blog we will be taking a look at the newest collection for Spring and Summer 2024 from the brand Orly, the Melting Point collection. This collection has six very bright and described on the box and website as a rich liquid metal like polish or really bight shimmery polishes.  

Orly Melting Point Collection

Orly Melting Point Collection
The front of the collection box 

Orly Melting Point Collection
The back of the collection box, with the description and the colors of the polishes. 

Orly Melting Point Collection
Here are all of the polishes in the bottles. 

This collection is a part of there breathable line, which I want to start off by saying that nails do not breath. The actually means according to the website is that you don't need a top and base coat so you don't need as many layers of polish, which kind of makes it seem like your nails can "breath". This formula also has Argan oil, Vitamin B5 and C in it to I guess be a better formula for your nails. 

Also the polishes have .6 fl oz/ 18ml of polish in each bottle which is a lot of polish in each bottle. 

For all of these polishes they all where two coaters except for the yellow (which is common for a yellow polish), but for me I ended up doing three coats to have full coverage it might just have been the way I polished, but I really feel like that could be two coaters. Also each polish had really great formula and applied very well. 

As stated above Orly suggest that you don't need a top and base, I did apply a top coat and not base, I personal feel better with a lest a top coat for that extra protection on the nails, due to the job that I have. 

Let's take a closer look at each polish.

Orly Melting Point Collection, The Floor Is Lava

Orly Melting Point Collection, The Floor Is Lava

Orly Melting Point Collection, The Floor Is Lava

First we have The Floor Is Lava, this is described as a bright pink with gold shimmer in it and is inspired by a lava lamp. 


Orly Melting Point Collection, Alloy Matey

Orly Melting Point Collection, Alloy Matey

Orly Melting Point Collection, Alloy Matey

Second we have Alloy Matey this is described as a bright purple with a lighter purple shimmer in it. 

Alloy-Matey- Orly.com $11.00 USD 

Orly Melting Point Collection- Cesium The Day

Orly Melting Point Collection- Cesium The Day

Orly Melting Point Collection- Cesium The Day

Third we have Cesium The Day, this is described as a lemon yellow shimmer polish. This polish will take three coats for full coverage, which is common for a yellow polish. 


Orly Melting Point Collection- Erupt To No Good

Orly Melting Point Collection- Erupt To No Good

Orly Melting Point Collection- Erupt To No Good

Fourth we have Erupt To No Good, this is described as a bright orange with a golden shimmer in it just like the pink polish, The Floor Is Lava. 

Orly Melting Point Collection- Having A Smeltdown

Orly Melting Point Collection- Having A Smeltdown

Orly Melting Point Collection- Having A Smeltdown

Fifth we have Having A Smeltdown, this is described as a turquoise light blue shimmer polish, this poish leans both light blue and green. This polish of course remind me of ocean water the water that is close to the shore. 


Orly Melting Point Collection, Glass Act

Orly Melting Point Collection, Glass Act

Orly Melting Point Collection, Glass Act

Lastly we have Glass Act, this is described as a purple with an aqua blue shimmer in it. 


In conclusion this is the second time that I have tried Orly polishes and once again I am very impressed! The formula was very good and applied very well these polishes also wore very well, as stated above I did where a top coat and no base coat and through out the week they did wear very well very little tip wear and chipping. I highly recommend this collection if you love bight vibrant colored polishes like me, which I am sure you do if you read this blog post. 

If you are interested in purchasing this collection it is available on Orly's website for $66.00 USD
 

Also of course this collection is great for creating some fun and bright tropical nail design, which I look forward to doing very soon! 

Hope all of you enjoyed this Orly Melting Point Collection review!

See you next time for more nail polish fun!