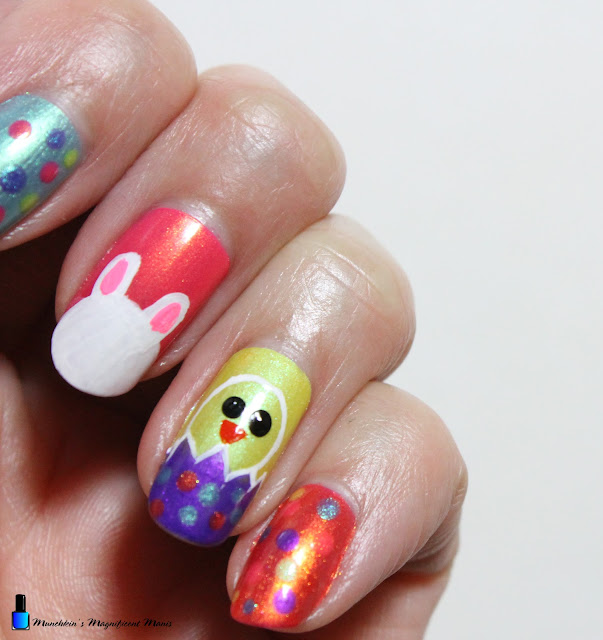
Hello everyone! Happy Easter, well almost Easter. Today on the blog we will be creating a cute Eater themed nail design, with two bunnies and a chick in an egg, along with some dots.
Top and base coat- CND Stickey Base Coat and CND Super Shiney Top Coat.
Nail polishes- The Orly Melting Point Collection (6 polishes)
Acrylic paint- White, black, red, yellow, and bright pink. Mix yellow and red to make orange.
Nail art tools- Dotting tool, thin striper and linear brushes.
Other- Water to clean off your nail art brushes.
Apply a base coat to clean dry nails, let that dry.
Polishes-
Thumb- Purple polish (Orly- Melting Point- Glass Act)
Index- Light blue green polish (Orly- Melting Point- Having a Smeltdown)
Middle- Bright pink polish (Orly- The Floor is Lava- Melting Point)
Ring- Yellow polish (Orly-Melting Point-Cesium The Day)
Pinky- Orange polish (Orly- Melting Point- Erupt To No Good)
Let that dry.
Bunny Design On The Thumb Nail:
First we will start with the bunny on the thumb nail. Take a linear brush with white paint on it and make a circle in the middle of the nail for your bunnies head, then feel that in your will need to do this a few times to be opaque. Also make two ears on top of your bunnies head as well.
Let that dry. Take a dotting tool with black paint on it and make two circles for the eyes. Then take your linear brush with black paint on it and make a small oval nose, next take your striper brush with black paint on it and make a month, then two lines on the sides of the face for the wickers on both sides.
Lastly take your linear brush with pink paint on it and make an oval in both of the ears, to make the inner part of the ears.
Bunny on the Middle Finger Nail:
Next we will make the second bunny this is more less just a bunny shape or a bunny peeking. Take your linear brush with white paint on it and make a circle near the tip of the nail, fill that in you will need to go over this a few times to be opaque. Also once again make two ears on top of the head.
Let that dry and then make to ovals in the ears for the inner part of the ears.
Easter Chick in an Egg on the Ring Finger Nail:
On the ring finger nail we will make a chick in an egg. First we will make the egg that our little chick will be in, take your striper brush with white paint on it and make a zig zag line half way up the nail and then two curved lines down the side of the nail. Then take a purple polish (Orly-Melting Point- Alloy Matey) and fill in the egg, you will most likely have to go over the outline of the egg again, due to the polish covering up the outline.
For the chick, take your thin striper brush with white paint on it and make a circle for his head, I used a yellow background that way you don't have to feel in your chick. For the eye take your dotting tool with black paint on it and make two dots for the eyes.
Lastly for the beak take your linear brush with orange paint on it and make an upside down triangle for the beak and fill that in.
For the final detail on the egg with your dotting tool take any random polish that you have put on the nails and dot that on the egg.
Dots on the Index and Pinky Nails:
Take your dotting tool with polish that you have used on the nails and dot them on random spots on the nails, make sure to wipe off the dotting tool in-between each polish.
Once your nails are Easter ready apply a top coat to seal in your nails and to help them last through all of your egg hunts.
Hope everyone that celebrates Easter has a good Easter!


