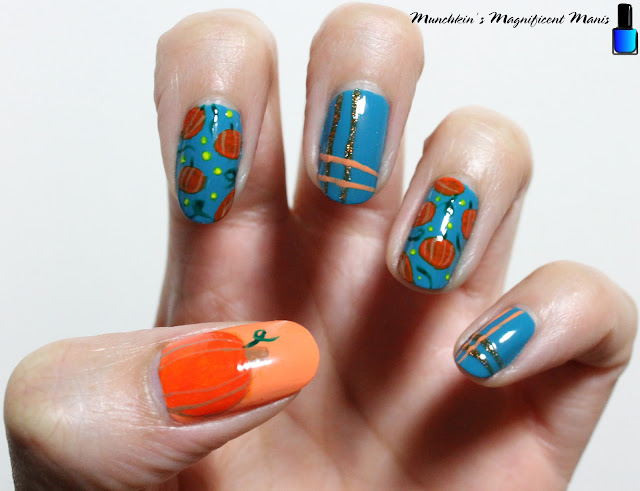
Hello everyone! Today we have another fall nail design, a pumpkin themed design. It's that time of year again where we have pumpkin spice everything, which I don't mind, I love pumpkin flavored things. Even thought I don't care for fall nail colors, I did still want to create some fall themed nail art with out the boring neutral nail polish colors. Also just a note I do get most of my inspiration from Pinterest and then make it my own.
Here are the polishes and nail art tools used to create this pumpkin nail design:
Base and top coat- CND Stickey Base Coat and CND Super Shiney Top Coat.
Polishes- Milani- Quick Teal (don't think this is made any more, this is a very old but still good polish that I have), OPI Hawaii- Is Mai Tai Croooked, and Holo Taco- Zyler the cat.Acrylic paint- red, green, yellow, and brown.
Nail art brushes- thin deal, liner and stripper brush.
Other- water and acetone to clean off your nail art brushes.
Apply a base coat, let that dry.
Polish-
Thumb- a light orange (OPI Hawaii- Is Mai Tai Croooked)
Index, middle, ring and pinky finger nail- A teal polish (Milani- Quick Teal, this is a very old polish that I am sure that don't make, but you can use any kind of teal polish)
Let that dry.
Small Pumpkin Design on Index and Ring Finger Nails:
Starting off with the small pumpkin shapes on the index and ring finger nails. First make an oval shape for a full size pumpkin with orange paint, you will need to go over this a few times to make them opaque enough. On my nails I only made a few full size pumpkins, two on the index and one on the ring finger nail, the rest where just half size.
Also repeat this step a few time for the half shapes of the pumpkins, just make a half oval. Then for the stems, make a small thin line at the top of the pumpkin. Let your pumpkin dry and then, take a brown paint and make a few curved lines on your pumpkins for some more details.
For the final touches for some vines, take your thin stripper brush and make some curved lines and some lines with some loops in it. Also for you can add some yellow dots around the nails as well.
Line Design on the middle and pinky finger nails:
For the lines on the middle nail first take your thin stripper brush with a light orange polish (OPI Hawaii- Is Mai Tai Croooked) and make two lines near the tip of the nails. Then take a glitter orange polish (Holo Taco- Zyler the cat) and make two line going up the nails on the left hand side. Try and get the lines to be straight, which is still hard for me to do as well.
On the pinky finger nail just switch the polishes that you used and repeat the same steps, or you can keep them the same.
Larger Pumpkin on the Thumb Nail:
Last we will make a pumpkin on the thumb nail, Take an orange paint on a liner brush and make an oval near the cuticle, then fill that in with that orange, you will need to go over this a few time to be opaque.
Then take a brown paint and make a thick line or small square at the top of the pumpkin for the stem, this will also give some time for your pumpkin to dry.
Once it is dry, take a brown paint on a thin stripper brush and make some curved line n your pumpkin and also you can outline the pumpkin as well.
Lastly you can make a green stem or leaf on your pumpkin, make a curved line with a loop in it.
Once your pumpkins are ready to be picked, apply a top coat to seal in your design and to help it to last though all of your yummy pumpkin treats.
Hope all of you enjoyed this pumpkin nail design!
See you next time for more nail fun!


No comments:
Post a Comment