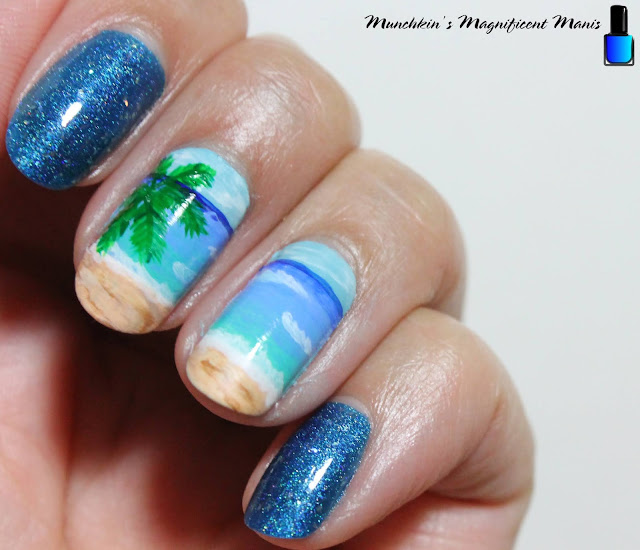
Hello everyone! As summer comes to a close, we have one more tropical design for the summer. It might be the end of summer, but it is never too late to create a tropical nail design to make it an endless summer, after all summer is my favorite season and always goes way too fast.
Here are the polishes and nail art tools used to create this summer, tropical nail design:
Base and top coat- CND Stickey Base Coat, Revlon Extra Life No Chip top coat, and OPI- Matte Topcoat.
Polishes- Pretty& Polished- Sea Spray, Finger paints- Tiffany imposter, and Holo Taco- Blue Flakie- Anniversary.
Acrylic paint- blue, green, yellow, white, brown, and light beige.
Nail art tools- thin detail and stripper brush, and a flat brush.
Apply a base coat. Let that dry.
Polish-
Thumb, index, and pinky finger nail- a blue holographic polish. (Pretty& Polished- Sea Spray)
Middle and ring finger nail- a light blue (Finger paints- Tiffany imposter)
On the thumb, index and pinky nail, I also applied a holographic glitter top, just as an added touch. (Holo Taco- Blue Flakie- Anniversary)
Also on the nails that we will be doing the nail art on, the middle and ring finger nail, we will apply a matte topcoat to help the paint to blend together.
* Paints that need to be mixed or just needed, for the ocean and palm tree:
Dark green, light green (green and yellow), lighter green (white and green), dark blue, light blue (dark blue and white).
On both nails we will make the ocean water. First leave a little bit of the blue polish showing for the sky.
Then make a dark blue line under the sky, then we will make a gradient for the water starting with light blue, a light green (the green with white in it.) and the light beige for the sand.
For the water you will need to go over this a few time and the third pass over you can start to blend the colors together, this also includes a little bit of the darker blue.
For the blending part I found that using a dry, clean flat brush to blend the colors to work out very well.
For the water once it has dried, take a detail brush with white paint on it and make a line from the water to the sand that looks like a small wave, then your flat brush and blend the small wave to give it a wave look. Do this again two times in the water as well and a little bit in the sky for the clouds. Hopefully that make sense. 😉
Now on to the sand, take a brown paint, and paint a small amount over the light beige, then add a little more light beige and blend the two tougher, to give a sand look.
Lastly we need to make a palm tree on the middle finger nail, on the left hand side of the nail. Their is six palm leaves that we need to make, also the palm leaves are created with a light green and then a few dark green lines.
Once you have your tropical nail design just right apply a top coat to all of the nails. Then to change things up a little take a matte top coat and go over just the sand and sky, leaving the water and palm tree glossy.


Looks good, nice holo :-D
ReplyDelete