Wednesday, May 21, 2025

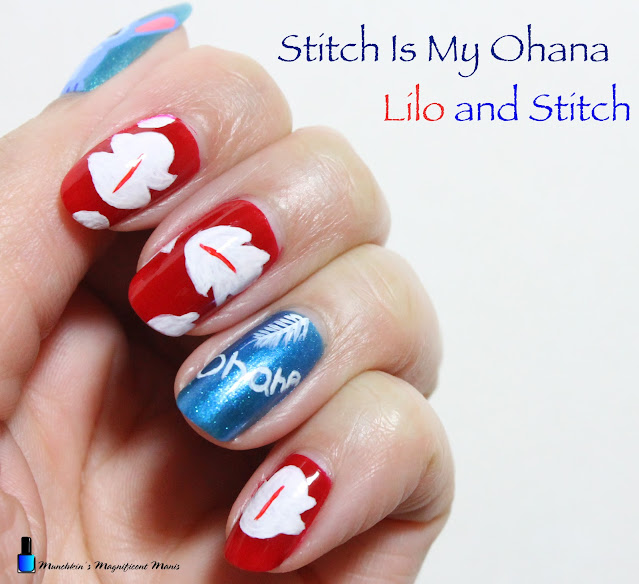
Stitch Is My Ohana- Lilo and Stitch Nail Design

Hello, Aloha! Today on the blog we will be creating a design for the new live action Lilo and Stitch movie that is coming to theaters May 23. The animated movie that came out back in 2002 is my all time favorite Disney movie, the story is great and the fact that it takes place in Hawaii is a plus too. I just hope that the live action is as good as the animated movie.  

Lilo and Stitch Nail Design

Here are the polishes and nail art tools used to create this Lilo and Stitch nail design:


Base and top coat- CND Stickey Base Coat and CND Super Shiney Top Coat.

Polishes- Zoya- Renee- Redbook trio, OPI Fiji- Do you Sea what I Sea, and China glaze- Shades of Paradise- Mer-Made For Bluer Waters.

Acrylic paint- White, blue, black, and red. 

Nail art tools- small dotting tool, thin striper, linear, detail brush.

Other- water to clean off your nail art brushes. 

* For this design I need to make a few colors so I just mixed a few paints to make the colors.
Mix red and white to make pink.
A lot of white and a little blue to make a light blue.
a little white and a more blue to make a medium blue.  

Lilo and Stitch Nail Design

Apply a top coat to clean dry nails, then let that dry.

Polishes- 

Thumb- a light shimmer blue (China Glaze- Mer-Made For Bluer Waters)

Index, middle, and pinky nails- a red cream polish (Zoya Renee)

Ring finger nail- a shimmery blue (OPI Do you Sea what I Sea)

Let that dry.

Lilo and Stitch Nail Design

Lilo and Stitch Nail Design

Lilo's Red Dress On The Index, Middle and Pinky Finger Nails: 

First we will start off with the leaves on Lilo dress that we will be making on the index, middle and pinky nails. Take a linear brush with white paint on it make a oval shape, then I took a wet cotton swab and wiped the sides of the oval, that way the top and bottom of the oval are still there, or you can just make two curved lines like you where going to make an oval shape (if that makes sense?) 

Then on each side make two point for the leaves, their should be a total of four point for the leaves, then fill in your leaf with white paint. On each nail I only made one large leaf and a small part of the leaf on the index and middle finger nails, the pinky nail is the only nail that I made one large leaf. 

One you have your leaves, take a thin striper brush with red paint on it and make a small thin line in the middle of your large leaves. 

Lilo and Stitch Nail Design

Lilo and Stitch Nail Design

Ohana Means Family, Ohana On The Ring Finger Nail:

Next we will be writing Ohana and making a small plan leaf on the ring finger nail. Take a thin detail brush with white paint on it and write the word Ohana on a slight curve on the nail, our you can just write it straight across.


Now we will make the small palm leaf near the cuticle. Take a thin striper brush with white paint make a thin line down the nail a make a small lines down that nail for your palm leaf. 

Lilo and Stitch Nail Design

Lilo and Stitch Nail Design

Stitch On The 
Thumb Nail: 

On the thumb nail we will make Stitch, take a linear brush with your medium blue on it and make a oval in the middle of the nail, fill that in then make two lines going down the head for the start of his body and then fill in that area with the medium blue. 

For his ears take the pink paint that you made on a thin striper brush and make an oval shape with a flat bottom near the head on both side, fill that in. Then make a thick outline with the medium blue for the outside of his ears. 

Also take that same medium blue on the striper brush and make a few little lines on the top of his head for a little bit of hair.

For his eyes take a thin linear brush with a light blue paint and make two ovals on the center of his face. 

With a dark blue make a small oval for his nose.

For his smile and tummy first take a thin striper brush with light blue paint and make a curved line under his nose for a smile, then off to the side make a long line on each side of the smile and then fill that in with the light blue for his tummy. 

For his paws make two half circles with the medium blue, near the cuticle then fill that in and make two small lines on his paws for his fingers.

Now back to the eyes, take your detail brush with black paint and make a smaller black oval in the large oval. For his pupils take a small dotting tool with white paint on and dot it on to the black oval.

Lilo and Stitch Nail Design

Once your nails are all ready to for the Lilo and Stitch movie apply a top coat to seal in your design and to help it to last.

Lilo and Stitch Nail Design
Here is the practice version 

Also back in 2016 I made a Lilo and Stitch design too, it is kind of similar with some changes, also make sure to check out that design too. 


Hope all of you enjoyed this Lilo and Stitch nail design along with the movie.

See you next time for more nail fun! 

Saturday, May 3, 2025

Starrily Northern Lights Collection Review

Hello everyone! Today on the blog we will be taking a look at the brand Starrily, and their Northern Lights Collection that is new for Spring 2025. This came out during the spring time, I don't think it is actually a spring collection, for some reason whee I think of the Northern Lights I think of winter time. Anyways Starrily is an Indie brand nail polish company that can only be purchased online. This is the first time that I have tried out the brand Starrily, I have been pretty happy with Indie brand polish so I thought I would give them a try. 

This collection has six polishes, with mainly magnetic polishes, one shimmer, and gold reflective  topper. The magnet you do have to purchase separately or you can use any brands magnet as long as it is for nails. I used a nail polish magnet that I already had from Holo Taco. 

Starrily Northern Lights Collection

Starrily Northern Lights Collection

Each polish comes in an individual cartoon with the nice Starrily design on it. 

Starrily Northern Lights Collection
Here it a view of the box the front and both sides of the box.

Starrily Northern Lights Collection
All of the Polishes in the Northern Lights Collection

Let's take a look at the polishes in this collection. 

Also I took the photos on a black and a white background because sometime I feel like the color shift shows different on each background. 

Starrily Northern Lights Collection- Geomagnetic Storm Sights

Starrily Northern Lights Collection- Geomagnetic Storm Sights

Starrily Northern Lights Collection- Geomagnetic Storm Sights

Starrily Northern Lights Collection- Geomagnetic Storm Sights

Starrily Northern Lights Collection- Geomagnetic Storm Sights

First we will take a look at Geomagnetic Storm Sights this is a mutichrome, magnetic polish that has a teal, green, and purple shift, along with a gold reflective glitters. 

In the photos I tried to create the cat eye look with the magnet on the index and ring finger nail. On the thumb, middle and pink I tried to create the velvet style with the magnet. I do feel like the cat eye was very subtle, I may have just not held the magnet long enough. 

The cat eye is when you have the magnet place under the finger or over the nail to create a line on the nail. Velvet is when you have the magnet on the side of the nails and the magnet pushes the magnet particles to the surface.

Starrily Northern Lights Collection- Geomagnetic Storm Sights

Starrily Northern Lights Collection- Geomagnetic Storm Sights

Geomagnetic Storm Sights has a good formula it was opaque for me in three coats, for magnetic polish it is best to apply three coats, two for opacity and a third for the full magnet effect. Also I magnetize each layer. 

Geomagnetic Storm Sights is very pretty and really looks like the Northern Lights on the nails. 


Starrily Northern Lights- Ethereal Nights
 
Starrily Northern Lights- Ethereal Nights

Starrily Northern Lights- Ethereal Nights

Starrily Northern Lights- Ethereal Nights

Second we will take a look at Ethereal Nights this shimmer polish with a black base and green, teal and blue colored shimmer. On the website this polish is said to be inspired by the lush green forest where you can see the Auroras. 

This polish is not magnetic. The green shimmer stand out the most with this polish and the blue is very subtle and really only shows when your nails are close to the light, like the photo above. 

Starrily Northern Lights- Ethereal Nights

Starrily Northern Lights- Ethereal Nights

Starrily Northern Lights- Ethereal Nights

Ethereal Nights has a good formula, it was kind of sheer on the first coat, I think due to the shimmers needing to show. After three coats this polish did reach full opacity. This polish is also very pretty. 

Ethereal-Nights $16 USD 

 
Starrily Northern Lights- Oceanic Moonlight

Starrily Northern Lights- Oceanic Moonlight

Starrily Northern Lights- Oceanic Moonlight

Starrily Northern Lights- Oceanic Moonlight

Third we have Oceanic Moonlight this is a sapphire blue shimmer magnetic polish that has a silver magnetic effect, that when you use the magnet it gives a light blue shift to the nails. 

In the photo's above it is hard to see the magnetic effect, I did try what the Starrily website had said 30 seconds per coat and 1 minute for the final layer and I had the magnet under the nail while polishing. I do feel like in person it is somewhat earlier to see the magnetic effect. The only photo that you can really see the magnet effect somewhat is the thumb nail photo.

Starrily Northern Lights- Oceanic Moonlight
    
Starrily Northern Lights- Oceanic Moonlight

Starrily Northern Lights- Oceanic Moonlight

Starrily Northern Lights- Oceanic Moonlight

Oceanic Moonlight has a good formula and was actual opaque in two coat, for the magnetic effect I did apply three coat to do the magnet. This polish is ver pretty and does remind me of the ocean. 
 
Starrily Northern Lights- Polar Lights

Starrily Northern Lights- Polar Lights

Starrily Northern Lights- Polar Lights

Starrily Northern Lights- Polar Lights

Fourth we have Polar Lights this is another magnetic, shimmer polish that has a blue, teal, cyan/green color shift. When you use the magnet you can see more of a sliver shift to it, which you can see in the photo's above (you can really see this on the pinky nail.) This polish is suppose to represent the aurora over an icy landscape. 

Starrily Northern Lights- Polar Lights

Starrily Northern Lights- Polar Lights

Starrily Northern Lights- Polar Lights

Polar Lights has a good formula, this polish did take three coat to be opaque because of it being a lighter color, and with magnet polish I prefer to do three coats anyways to try and get that magnet effect. 

Polar-Lights $16USD 

Starrily Northern Lights- Golden Starlight

Starrily Northern Lights- Golden Starlight

Starrily Northern Lights- Golden Starlight

Starrily Northern Lights- Golden Starlight

Fifth we have Golden Starlight this is a topper that I wore over Ethereal Nights and a black polish, this polish is described as a gold reflective topper with a silver shimmer in some lights. 

Starrily Northern Lights- Golden Starlight

Starrily Northern Lights- Golden Starlight

Starrily Northern Lights- Golden Starlight

Golden Starlight has a good formula for a topper, in the bottle and in real life this polish looks wow so shinny and sparkly, in the photos above I used my usually set up with my SLR and photographer light, I just could not capture the true beauty of this polish with the SLR. 

Starrily Northern Lights- Golden StarlightStarrily Northern Lights- Golden Starlight

With my cellphone camera and my hand held low to the light I was able to capture the glow from this gold reflective polish. This trooper it seems like it is best in bright light but your hand had to be held low to the light. 


Starrily Northern Lights- Aurora Ignite

Starrily Northern Lights- Aurora Ignite

Starrily Northern Lights- Aurora Ignite

Starrily Northern Lights- Aurora Ignite

Lastly we have Aurora Ignite this is a magnetic polish that is described as a deep red base with green, gold and red shifting shimmer. In some light this polish looks brown or a burgundy as well and with the color with a red base and green shift this polish look Christmas like. This is suppose to represent how the Aurora sometimes can look like a fiery red in the sky. 

Starrily Northern Lights- Aurora Ignite

Starrily Northern Lights- Aurora Ignite

Starrily Northern Lights- Aurora Ignite

Starrily Northern Lights- Aurora Ignite

Aurora Ignite has a good formula as well this was opaque in two coats, I did do a third for the magnetic effect. The magnetic effect turned out the best on this on I feel, this one I applied two coast of polish for full coverage and the the third coat I magnetized for 30 seconds and it showed up the best. 

So I feel like the method was the best way to magnetize, I had tried three different ways.

Aurora-Ignite $16 USD

In conclusion this collection is very pretty and I did really like the Starrily polishes for this being the first time using this brand. I am not really sure why they released a Northern Lights collection  for spring time, when I think of Northern Lights I think of the winter time, which is actually is the best time to see them (I looked it up.) I do feel like they did a  great job with the theme of this collection this definitely feels like a Northern Light collection with the colors and the topper looking like stars. 

When it is winter or colder I will revisit these and see if I can get the magnetic effect to show up better on all of the polishes. Over all I do recommend these polishes I am just personally now ready for bright colored polishes.

Here is the link to the collection on Starrily website. https://www.starrily.com/products/northern-lights-collection $90 USD 

Hope all of you enjoyed this Starrily Northern Light Collection review! 

Next we have a bright summer collection that I am very excited for! 🌴🌺

See you next time for more nail fun!