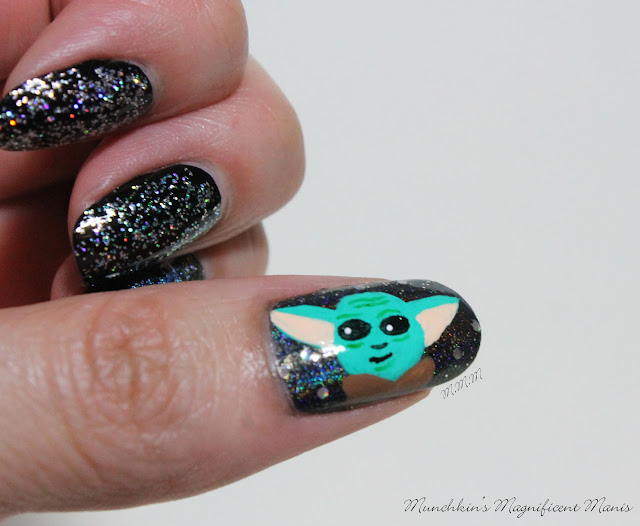
Hello everyone! Today on the blog we will be creating a cute Baby Yoda design or The Child to all of you Mandalorian fans. Even before I watched the Mandalorian on Disney Plus I fell in love with this 50 year old child, and thought it would be great to make a Baby Yoda (The Child) nail design.
Baby Yoda (The Child) Nail Design
Here are the polishes and nail art tools used for this cute design:
Base and top coat- CND Stickey and Revlon Extra Life No Chip Top Coat.
Nail polishes- Color Club- Black Magic, Sally Hansen hard as nails- Black Heart, Cover Girl Boundless color- Disco Dazzle, Color Club- Silver and Green glitter polish, Zoya- Alicia, Zoya- Dream, and Zoya Aurora.
Acrylic paint- White, black, green, brown, and peach.
Nail art tools- Thin detail brush and very small detail brush, and a makeup sponge (not shown.)
Other- Cup of water to clean off your nail art brushes.
Baby Yoda (The Child) Nail Design
Polish-
Thumb nail- Black holographic polish (I used Color Club- black magic)
Index, middle, ring, pinky- Black
Let that dry.
Then on the index, middle, and pinky finger polishes those nails with a holo glitter polish. The index and pinky nail use a silver glitter and the middle finger a green glitter, or you can just keep them all a silver glitter.
On the ring finger we will create a galaxy design.Take a makeup sponge with a sliver holo polish on it and sponge it near the cuticle down the nail, and then take a blue holo polish and sponge it right next to the sliver and then do the same with a purple holo, on the other side of the silver.
Then take a glitter polish with a few larger and small glitters in it (I used Cover girl Disco Dazzle) and polish over the nail.
Then let that dry.
For the final detail you can add some small stars with a few dots and x marks.
Baby Yoda (The Child) Nail Design
Now on to Baby Yoda/ The Child on the thumb nail, we will be making him horizontal on the nail. First mix a dark green and a white to make a lighter green. Then take a thin detail brush with that green you just made and make circle in the middle of the nail.
For his ears make a large triangle on each side of his head, then another smaller triangle with a peach colored paint in the large green triangles.
For his face make two black ovals for his eyes and then add a small white dot on the side of the ovals. For his nose make a small curve under/ between his eyes, then under his nose make another curve for his mouth.
Then for some small details, we will make his wrinkles, with a darker green then his body make two wavy lines on his forehead, and then two lines for his eye brows, two more lines under his eyes, and then a curved line under his mouth.
Lastly we will make the top half of his robe, take a brown paint and make two oval shapes under his head and fill that in, then make a small square/ just extend the brown to the end of the nail.
For a final touch, take that same glitter polish that you used for your galaxy nail and add a few larger glitters to the background for the stars.
Baby Yoda (The Child) Nail Design
Once you have your Baby Yoda design the way you like apply a top coat to seal in your design and help it to last through all of your space adventures.
Here are some more photos of the Baby Yoda design with The Child figure, Star Wars Black Series.


OMG I loved the show - despite not being a big SW fan ;-) Boyfriend is a huge SW fan!!!
ReplyDeleteThis manicure is just wonderful and perfect and amazing :-D
Thank you so much! I also am not a big fan of Star wars, but you gotta love Baby Yoda, he is just so cute!
ReplyDelete