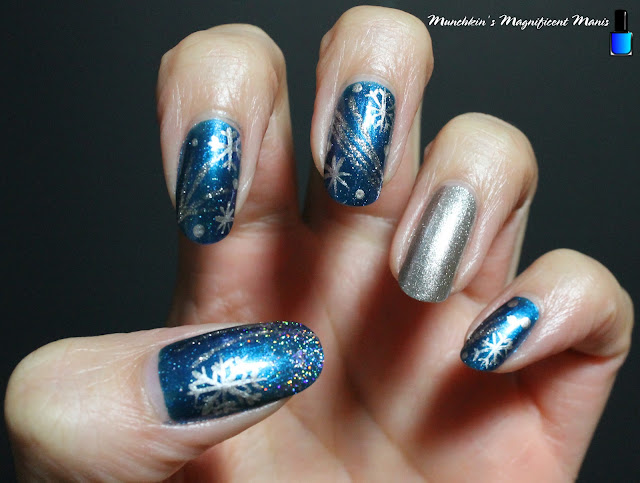
Hello everyone! Today on the blog we will be creating a winter snowflake themed nail design. In the last posted where we created a snowman on our nails, I had said that the weather where I live has been kind of on the mild side/ kind of warm for winter. Well last week winter weather hit us and it was in the single digits and the teens with snow. Anyway that's why I thought it would be fitting to create a pretty snowflake nail design, plus I just felt like creating another snowflake design. 😀
Here are the polishes and nail art tools used to create this pretty snowflake nail design:
Top and base coat- CND Stickey Base Coat and CND Super Shiney Top Coat.
Polishes- Holo Taco- Twice in a Blue Moon- Magnetic Magic Collection, Sally Hansen- xtreme wear-Celeb city, Holo Taco- Flakie, Holo Taco- World's First- Chorme Collection, Kiss nail art striper- Silver.
Nail art tools- Thin stripper brush, small dotting tool, and a makeup sponge.
Other- Water to clean off your nail art brushes.
Apply a top coat, let that dry.
Polishes-
Thumb, index, middle, and pinky finger nails- shimmery blue (Holo Taco- Twice in a Blue Moon)
Ring finger nail- Silver (Sally Hansen- xtreme wear-Celeb city)
Let that dry.
We will first start off with the thumb nail. On the thumb we will first make a glitter gradient (this is done only on the thumb nail) take a glitter polish and first polish some mainly on the tip of the nail, then take a makeup sponge with that same glitter polish on it and dab that on the tip of the nail mainly focusing on the tip of the nail, making the glitter look like it is fading up the nail.
Let that dry.
Take a nail art polish or a silver polish on a thin brush and make two curved lines on the side of the nail right next to each other.
Lastly we will make a large snowflake on the lower right hand corner. Take a thin stripper brush with sliver metallic polish on it and make a cross shape then make two lines on each side of the cross shape, then make two very small lines on every large line to complete your snowflake.
We will now go on to creating the next design part on the index and middle finger nails. Starting with the index nail take your silver nail art polish and make four line from the left side of the nail.
Then make a more simple version of the snowflake that we just made on the thumb nail, on the upper right hand corner/ near the cuticle. Then near the tip of the nail make a star shape snowflake.
For the final touch take a dotting tool with silver metallic polish on it and make a few dots in some of the empty space on the nail.
On to the middle finger nail, take your nail art polish and make a few lines across the nail.
Then make two snowflakes one near the cuticle again and one near the tip of the nail that is a simple star shape snowflake.
Then finish off the nail with a few silver dots.
Lastly we will finish this nail design with the pinky nail. Once again take your nail art polish and make a few lines from the side of the nail.
On this nail because it is the smallest nail we will just make one snowflake near the tip of the nail.
Then once again make a few silver dots on the empty space around the nail.
Once your nails are ready for the snow, apply a top coat to seal in your nail and to help it to last.


