Saturday, April 18, 2020

Nail Polish Collection Tag

Hello everyone! Today we will be doing something a little bit different, a YouTuber that I am subscribed to Kelli Marissa, did a My Nail Polish Collection Tag video about a week ago, and I thought it would be fun to answer the questions she had in her video. 

Here we go!

1. How many nail polishes do you own?  
 - I own 245 polishes this also includes my base and top coasts.

2. What is the first nail polish you remember buying? 
-  I don't really remember, but I do remember the first Zoya polishes that I bought it was Zoya's Dream, Aurora and Nori.
Zoya Dream, Zoya Aurora, Zoya Nori

3. What is the most recent nail polish you added to your collection?
- Zoya Alessia, Jen, Jett, and Kaede, this was back in January 2020/ December 2019. I have not purchased many polishes lately. 

Zoya


4. What is your lest favorite nail polish you own?
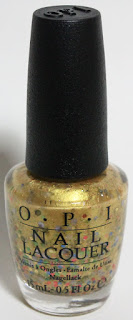
- I would probably have to say OPI's Pineapples Have Peelings Too. This polish is just kind of weird, it has a gold base with rainbow glitter pieces in it, maybe if the glitter pieces where a different shade of gold maybe it would look better. This polish I bought because I wanted the OPI Hawaii collection, and really I can only think of one time that I wore this polish and it was just on one nail.
 OPI's Pineapples Have Peelings Too

5. What is the rarest nail polish you own? 
- I don't think I really have any rare polishes? Maybe the Glam Polish 626 collection it was a limited edition collection that is no longer available on the Glam Polish website.    

Glam Polish 626 collection 

6. The most expensive polish I own is? 
-  I would say Fun Lacquer Million Dollar Dream, I remember this polish being around $16, which I feel is kind of pricey for one polish. Other then that I know I have not payed any more for a polish.  

Fun Lacquer Million Dollar Dream 

7.  What brand do you own the most of ?
- Zoya, I own 45 bottles of Zoya polishes.

8. What color do you own the most of ?
- Properly blue polishes because that is my favorite color. 

9. Which nail polish in your collection means the most to you ?
- OPI Go with the Lava Flow this was the polish I wore when I got married in Hawaii and means the most to me.

OPI Go with the Lava Flow 

10.  What is your go to nail polish right now?
- Anything Holographic! 


Some other questions that I made up.

11. What is your lest favorite brand of nail polish?
- Essie, I only own five of this brand of polishes (four are minis). I just never care for this brand. When I worked in the nail salon I always hated when people would ask for an Essie because I feel like the brushes are a pain to work with and the formula is to thin or thick. I also personally think the polishes that Essie makes are kind of boring, and not innovative. 

12. What is your favorite brand of nail polish?
- Of course Zoya. I feel like their polishes are always really good quality and I like that they do have some holographic polishes in their line. I would also say that I like OPI their polishes are nice as well, but lately I feel like they keep releasing the same colors over and over. Another brand I would say recently is China Glaze, I fell like that have been really trying to make more unique polishes. 

13. What is your lest favorite nail polish colors?
- Neutral, light pale pinks, white polish, basically anything boring.

14. What is your favorite nail polish colors?
- Of course blues, anything holographic, and I also like wearing red polishes on my nails, I feel like you can't go wrong with reds on your nails.    


Well that's all of the questions that I have.

Hope all of you enjoyed this post and maybe you can even answer these questions as well.

See you next time for more nail fun!  
  

Saturday, April 11, 2020

Quarantine Easter- Easter Nail Design

Hello everyone! Happy Quarantine Easter! For all of you that celebrate Easter, times are weird, scary, and uncertain. For all of us that celebrate Easter, we will not be able to celebrate the way we have always had for previous years, by going to church and spending time with family, which will make it not feel like Easter, which I know it will feel that way for me. But I guess for now we will just have to think of the good times with family (and of course we can always call them) and of course the true meaning of Easter. 

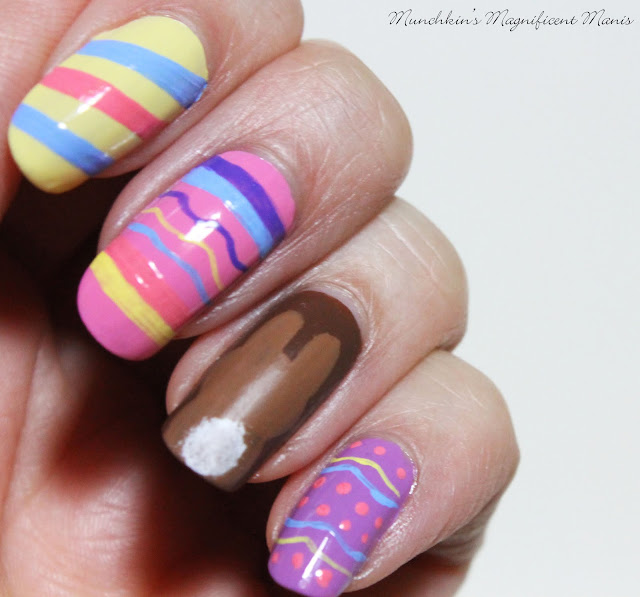
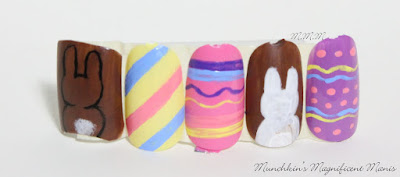
Anyways today we will be creating a Easter eggs and chocolate bunny nail design to at lest fell a little like Easter, at lest on our nails. 

Easter Nail Design 
Easter Nail Design

Here are the polishes and tools used to create this Easter nail design:  


Base and top coats- CND Stickey Base Coat, Revlon Extra Life No Chip top coat, and NYC- Matte Me Crazy topcoat (I don't think this company is in business anymore, but you can use any matte topcoat.) 

Polishes- Nicole by OPI- That's Just Plain Nuts!, Julep- Lilou, Zoya Sunshine- Missy, and Zoya Sunshine- Delia. 

Acrylic paints- White, red (to make pink), blue, black, pale/ light yellow, purple, and brown.  

Nail art brushes- Thin detail brush and stripper brush.

Q-tip for the bunny tails. 

Small cup of water to clean off your nail art brushes.

Easter Nail Design
  Easter Nail Design Easter Nail Design 

Apply base coat, let that dry.

Polish-
Thumb and ring finger nail- brown  
Index- a light pale yellow
Middle- a light pink 
Pinky- purple

Paint colors- 
Light pink (mixed white and red)
Light blue (mixed white and blue)
Light yellow
Purple
White,black, and brown.

Let that dry as well.

Easter Nail Design 
 Easter Nail Design 

Easter Eggs- 

First we will start off with the Easter eggs on the index, middle and ring finger nail. For the index nail we will just make three stripe going down the nail. Take your thin stripper brush with some light blue paint on it and make a thin line going across the nail and then make another thin line next to it (we will make this line kind of thick), then fill in that area. Repeat this step with pink and then blue after that, you can always add more stripes or less depending how long or short your nails are. 

Next for the pink middle finger nail we will be making two lines on the top and bottom of the nail and some squiggly in the middle of the nail. Take your stripper brush with purple paint kind of near the cuticle, make a thin line and then another line next to that one, fill that in with purple. Repeat this step under the purple with blue and then near the tip of the nail repeat this step for the pink and yellow. In the middle of the nail make three squiggly lines with purple, yellow and blue. 

Easter Nail Design  
 Easter Nail Design
Easter Eggs- 

Lastly for the egg design on the pinky nail. Once again take a stripper brush with yellow paint on it and make a squiggly line near the cuticle and then a blue one  right under that nail. Repeat this step near the tip of the nails. Then we will add some pink dots, you can do this with a brush or dotting tool, just add some dots to some of the purple area, making sure some purple is still showing.


Chocolate Bunny on the ring finger nail-  

The chocolate bunny we will be making it on the ring finger and the thumb nail, each nail will be done different, the ring finger nail is probably the easiest of the two. For the ring finger nail take a brown paint that is lighter then your background color and first make the two ears, then make a circle for the head, and then another circle for his body, fill in each area as you go, you may need to go over it a few times. Once your bunny body is dry take a Q-tip and a small bit of white paint and dab the Q- tip where the tails should go to make the tail look fluffy.

 Easter Nail Design
Easter Nail Design 

Chocolate Bunny on the thumb nail- 

Lastly we will make the chocolate bunny on the thumb nail, this bunny is more of an outline compared to the bunny on the ring finger nail. Take a stripper brush with black paint on it, for the ears make a line, then a curved line at the top, and another straight line going down then a curved line in the middle of the head, then repeat the last step for the other ear. 

For the head, make a curved line on each side of the head. Lastly for the bunny body make two curved lines on each side under the head. For the finishing touch just like the other bunny take a Q-tip and a small bit of white paint and dab the Q- tip where the tails should go to make the tail look fluffy.

Easter Nail Design   Easter Nail Design

Once your nails are Easter ready, apply a glossy top coat to all of the nails and let that dry, to give your chocolate bunnies that chocolate look apply a matte top coat to your thumb and ring finger nail. I did apply a matte top coat to the thumb nail, but it still look a little bit shiny.  


 Here is my practice design where I made the bunny on the ring finger nail white chocolate, but I ended up liking both bunnies to look like milk chocolate.


Speckled Egg Nails
Speckled Egg Nails
Speckled Egg Nails on my right hand

Also here is another very simple way you can make your nails look Easter like. I did this on my other hand, the speckled egg look. I just polished my nails with some Easter colored polishes and added a topcoat that had black and white pieces in it. If you don't have this kind of polish you can always just make small dots on the nail with paint and a brush. 

 
 Here are the polishes I used; Revlon- Rebel graffiti, Julep- Brandis, Zoya Sunshine- Missy, Zoya Mini- Lillian,Zoya Sunshine- Delia, and Julep- Lilou.   


Hope all of you enjoyed this Easter design and hope all of you have a Happy Easter!

See you next time for more nail fun!  

Saturday, April 4, 2020

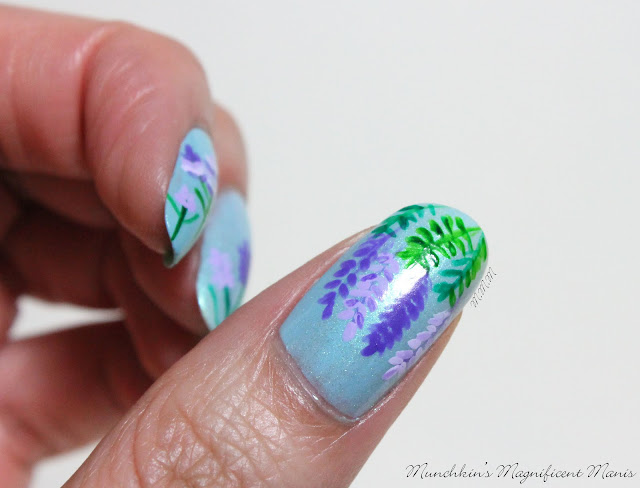
Lilac Lavender Fields- Flower Nail Design

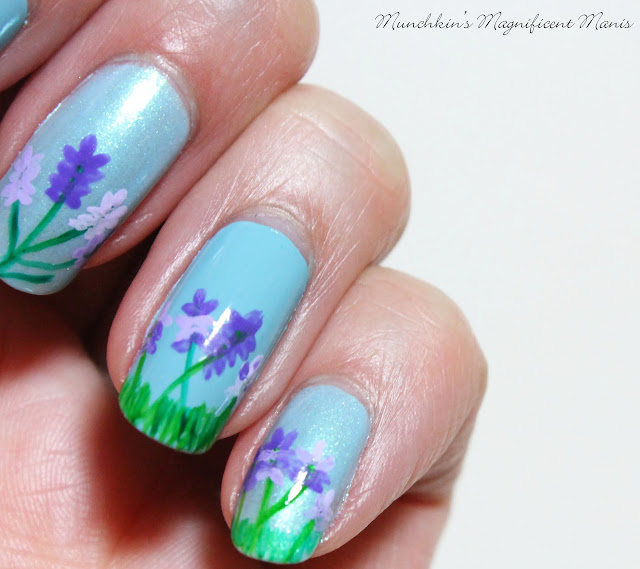
Hello everyone! As usually hope everyone is staying safe and healthy, and now that it is spring time maybe even going outside, to enjoy the some what nice weather. Today we will be creating a lilac/ lavender nail design to have our nails spring time ready.

 Lilac and Lavender Nail Design
 Lilac and Lavender Nail Design

Here are the polishes and tools used to create this flower nail design:

 
Base and top coat- CND Stickey Base Coat and Revlon Extra Life No Chip top coat.

Polishes- Finger paints- Tiffany imposter and Zoya Mini- Rayne.

Acrylic paint- Purple, white, green, and yellow.

Nail art brushes- A thin stripper brush and a very small thin brush.

A small cup of water to clean off your nail art brushes.

Lilac and Lavender Nail Design 
Lilac and Lavender Nail Design

Apply top coat.

Let that dry.

Polish-
Thumb, middle, and pinky- a shimmery light blue (Zoya- Rayne.)
Index and ring finger nail- a cream light blue (Finger paints- Tiffany imposter.) 

Or you can just polish all of your nails with any kind of light blue polish.

Let that dry.

 Lilac and Lavender Nail Design
 Lilac and Lavender Nail Design

For the lilac's I used three different shades of purple; a dark purple, a light and a very light purple. First I just used the base purple that I had and added a little bit of white to make it lighter or slightly lighter.

Also for the stems and grass, we will be using two shades of green a dark green and a light green. For the light green I just added some yellow to the green I already have.

 Lilac and Lavender Nail Design
  Lilac and Lavender Nail Design

For each nail I made the flower different, all of the flowers start off with just thin lines coming from the tip of the nails using a darker green or lighter green. On the ring finger I did add some grass. 

For all of the lilac flower, just take very small brush with which ever shade of purple you choose, starting on top of the stem of the flower make one small dot and then going down the steam make a small dot on each side, you can going down as far as you would like. You can also switch the shades of purple or keep them the same.

Lilac and Lavender Nail Design 
 Lilac and Lavender Nail Design

Also on the pinky finger nail I added grass as well.  

Lilac and Lavender Nail Design
 Lilac and Lavender Nail Design

The thumb nail design we will be making a little bit different, but the same concept as the other nails, the only different is the leaves and flower are kind of on a tree and not from the ground like the other nails. Also the stems on this design have more leaves.

Lilac and Lavender Nail Design 
   Lilac and Lavender Nail Design

Once you have your lilac's spring ready apply a top coat to seal in your design and to help it to last. 

Hope all of you enjoyed this lilac of lavender nail design!

See you next time for more nail fun!