Qtica Smart Pods
Let's take a look at the Smart Pod system. The scent we will be using today is
Mandarin Honey.
Mandarin Honey.
Before we start I want to say that I do have a pro account with Zoya, where I did get sent this product and as far as I know this product is still only available for pro accounts. Then you may ask why am I reviewing this? When I was sent this I did email the spa coordinator asking if this would be available for customers and she did say yes, I am just not sure when.
Also all of these items are available to everyone in full size on Zoya's website. So I thought it was still worth reviewing.
Qtica Smart Pods
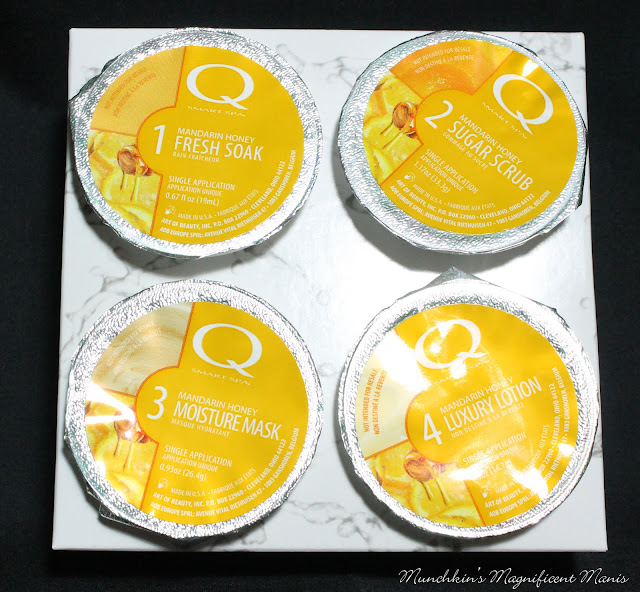
What are Smart Pods? They are per-measured individual/ sealed cups (that are disposable/ recyclable) with the same products that are found in the Smart Spa line; the soak, scrub, mask, and lotion. This system can be used for both manicures and pedicures.
Qtica Smart Pods
Here is what you get in the kit a fresh soak 0.67oz, sugar scrub 1.17oz, moisture mask 0.93oz and luxury lotion 0.5oz.
This set is designed more for salons to use on individual clients, to use just the right amount on each person and not waste a lot of product/ money, to be sanitary (this is extremely important,) and you can make sure each person in the salon is uses the same amount of product.
Now we can get to using the Smart Spa system. This is a very simple four step system that can be done at home as well as the salon.
Make sure you also have a towel or two to wipe your feet off as well.
Also I will be going over how I use this system at home on my own feet, because not everyone is a nail tech and this can still be used a home along with the salon, and I fell like it would be more helpful to explain the home use, which is still very similar to salon use.
Qtica Smart Pods - Step 1 Fresh Soak
For this step I do not soak my feet, I always give myself a pedicure after I take a shower. So I used this more as just a soap to clean my feet, but you can always put this soak in the tub and soak your feet.
Step 1- Fresh Soak, If you do soak your feet? Put the soak in the pedicure tub or bath tub (if you are using this at home) and soak your feet for 5mins and then pat dry your feet.
The next step is not in the system, it is using a foot file. I use a Ped Egg and a cheap foot file that I got for a salon store. I gently rub the Ped Egg on the bottom of my feet, mainly on my heals and my big toe where I have a callus, then I take the other foot file and gently go over that same area. Also I get some dead skin on the inside/ side of my foot that I just kind of rub off with my fingers.
For my feet I don't require much work at all, just gently using a foot filing on my feet and this system, I don't have much dead skin or callus. I am going to be honest I feel like a lot of people if they just washed their feet and used lotion their feet would be so much better.
Also I want to let all of you know that Callus are NOT meant to be removed!! They are their for a reason to protect your feet and if you keep removing them or a salon keeps removing them it will only get worse! You are only suppose to soften/ smooth the callus, that is what the foot files I use does. I learned this in nail tech school, and when I was a nail tech I don't know how many people I told this to and they didn't seem to believe me.
Anyways on to the next steps.
Qtica Smart Pods - Step 2 Sugar Scrub
Step 2- Sugar Scrub, gently rub/ massage the sugar scrub on both of your feet and you can even put this on your legs as well. Then rinse it off and pat dry. This scrub is used to exfoliate and soften the skin.
Qtica Smart Pods - Step 3 Moisture Mask
Step 3- Moisture Mask, Apply this mask all over your feet and even on your legs some. Let it set for 3- 5 mins, rinse off and then pat dry. This mask is for rejuvenate, brightening, and leaves your skin feeling nice and soft.
Qica Smart Pods - Step 4 Luxury Lotion
Step 4- Luxury Lotion, the final step in your pedicure system the lotion. Just rub/ message this into your feet and legs. Then you are done and have nice soft feet that will last a month.
I only give myself a pedicure once a month, which is all you really need. I did only use this system on myself, so I was able to use this for three months, I really could have gotten away with using this for four, but around the third use it was staring to get to low.
Also unlike at a salon, after I use this system I do not polish my nails I always wait, I just don't want my nails to be to moisturizes, this can potentially make your polish chip faster.
My final thoughts on this system is I love this system like most Zoya/ Qtica products. This is a great way to give all the Smart Spa products a try with out buying the full size products.
The only product I would not repurchase is the fresh soak because as stated above I don't soak my feet. I have used the lotion and scrub before I got this system, so I knew that I would like them. The scrub weirdly enough I only like to use on my feet, I feel like for some reason on my hands it makes them peel around my fingers. As for the mask I had never tried it, and I love it so much I purchased a full size (which is so big! It will last me forever!) It really does make your feet feel very soft and helped my small callus, which was not bad from the start, but now fell even better. The mask is also great for the hand as well.
When you use this system you feel like you are using quality products, like having a spa at home.
The Smart Spa line comes in a verity of scents:
Colada Sparkle
Lemon Grass Ginger
Eucamint
White Tea
Lime Zest
Lemon Dream
Mandarin Honey (this was the scent I used)
Almond Oatmeal
Guava Passion
Exotic Mango
Grapefruit Surprise
Vanilla Wild Plum (This one smells great too!)
Strawberry Cranberry
Pomegranate Lime
Here is a link to Zoya/ the Qtica part of the website so you can purchase any of these items, I only have links to the full size items so far. These items are pricey, but you can also use the Zoya discount codes on all products even the Smart Spa items.
Smart Spa- Soaks 32oz, $36
Smart Spa- Sugar Scrubs 7oz is $18, 44oz is $68
Smart Spa- Masks 38oz, $56
Smart Spa- Masks 8.5oz is $16, 34oz is $36
Hope all of you enjoyed this review of the Qtica Smart Pod System in Mandarin Honey and hopefully leaned something as well.
See you next time for more nail fun!


