Friday, November 17, 2017

Crisp Fall Day- Fall Nail Design

Hello everyone! Hope everyone is having a nice fall, I know in the area I live, it seem like it just started to fell like fall. Fall is not really my favorite time of the year because it is staring to get cold and for nail polish colors as well. The only nice thing about fall is when all of the leaves change color, it looks kind of pretty. So for today's nail design we will incorporate the nice part about fall with some fall colors, along with a cute fox.  


Fall Nail Design
  Fall Nail Design

Here are the polishes and nail art tools we will use for this design:


Base and Top coat - CND Stickey Base Coat and  Revlon Extra Life No Chip top coat.

Nail polishes- Revlon- Gold Coin and Zoya- Marjorie- Redbook Trio.

Acrylic paint- black, white, blue, red, green, and yellow.

Nail art tools- thin detail brush, thin linear brush, small detail brush, and a medium size dotting tool.

Other- cup of water to clean off your nail art brushes.


Let's start this fall nail design, that will be great for a crisp fall day!

Fall Nail Design  Fall Nail Design

As always start off with a thin layer of base coat.

Once your base coat has dried polish your thumb, middle, and ring finger nail with a gold polish. Then polish your index and pinky nail with a burgundy or plum colored polish. 

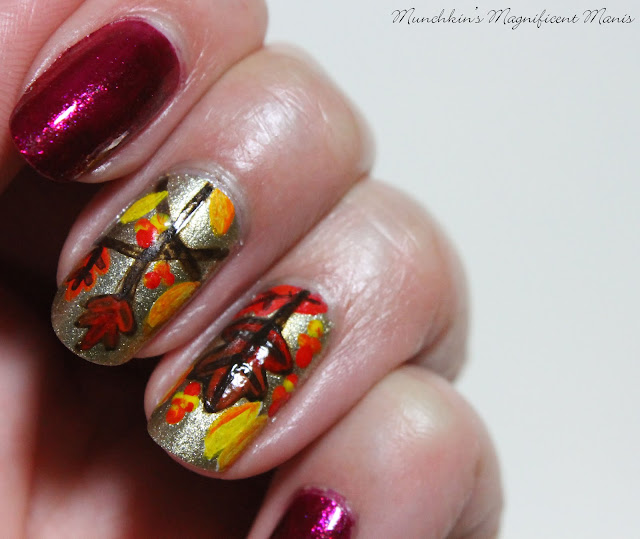
Let that dry, then we will make some leaves on our middle and ring finger nail. Starting with our ring finger nail, with a thin detail brush with brown paint on it (if you don't have brown paint mix yellow, red and blue to make brown) make a large leaf shape with two points on each side and one in the middle. Once that dries paint over that with red and orange paint. 

For the three yellow leaves, first make the shape with white paint, that way it will show up.Then go over that with yellow paint and some orange as well. 

Near the cuticle make another leave, this leaf will be red and orange.

Just for an added touch make a few small different colored dots that are together, with your dotting tool. 

*For this design I actually found that is looked kind of better if you didn't wipe off your brush between colors, it kind of helps the fall leave colors to blend together.*

Fall Nail Design 
 Fall Nail Design

On to the middle finger nail,we will make some more fall leaves. For this design the leaves will be on some branches. Make a few random brown lines for the branches. Then make some different leaf shapes on the branches, I made five leaves, some where the same shape other where different. Just like the ring finger nail go over the leaves a few times to make them multiple colors. Also once again add some colorful dots on the branches.

Fall Nail Design, Fox 
   Cute fox on the thumb nail

Next we will make the cute fox on the thumb. I always like to make the characters on the thumb nail because of this nail being the largest nail and their being more space to create.
For the shape of the fox, we will first start off by making the outline with white paint. Make a large circle for his head, then his body, and the on the side a half of his tail. For the white part of the fox's face make that part more of an opaque white. 

Once the white outline has dried go over the top of the head, body, and tail with orange paint. For his face make a black oval for this nose in the middle and then two circles for his eyes. Then on his ears make two brown triangles.Near the cuticle make to brown circles for his paws. On his tail paint just the tip white.          

The fox I was a little afraid it was going to look a little like a cat, but is ended up turn out just right and super cute. 

Fall Nail Design
 Practice fall nail design 

Sometimes I like to share my practice version of my nail design. I really liked how this one turned out and thought it was worth sharing. The fox I ended up doing twice and the second time (shown about) turned out good, and turned out well in the final design as well. 

Fall Nail Design 
Fall Nail Design on black background 

Fall Nail Design 
   Fall Nail Design on white background 

Once you have your cute fall nail design the way you like, apply a top coat to protect your nails and to help them last through this crisp fall weather. 

Hope all of you enjoyed this cute fox and fall leave nail design. I really was happy with how cute the fox turned out for this design!

Also hope all of you have a wonderful Thanksgiving (which is quickly approaching, next week!) 

See you next time for more nail fun!     

Wednesday, November 1, 2017

Boo- Halloween Nail Design

Hello everyone! Hope everyone had a safe and Happy Halloween! Sorry that this post didn't go up in time for Halloween, it's a day late. I didn't have time to do a blog post on this design before Halloween, but I still wanted to do a tutorial for all of you. For this Halloween design, we will be making a ghost with a pumpkin on our thumb, a spooky scene on the middle finger nail and then a spider web on the ring finger nail.  

Halloween Nail Design 
Halloween Nail Design

Here are the spooky nail polishes and nail art tools that we will use:


Base and Top coat- CND Stickey Base Coat and Revlon Extra Life No Chip top coat.

Polishes- Zoya- Urban Grunge- Troy, Glam Polish Experiment 626- No more caffeine for you, and Glam Polish Experiment 626- Evil Genius.   

Acrylic Paint- White, black, yellow, red, and a very small amount of green.

Nail art brushes- thin detail brush, thin liner brush and a very small thin detail brush.

Other- small jar or cup with water in it to clean off nail art brushes.

Let's begin this spooky/ cute nail design!

Halloween Nail Design 
  Halloween Nail Design 

Start off with a thin layer of base coat to protect your nails. 

Once your base coat has dried on your thumb, middle, and ring finger nail polishes those nails with a pewter/ blacken grey with silver shimmer in it (I used Zoya- Troy.) Then for your index nail, polish that with a bright lime green (I used Glam Polish- No more caffeine for you) and then on your pinky finger nail, polish that with a dark purple (I used Glam Polish- Evil Genius.) 

For this design I wanted to incorporate two of the colors from the Glam Polish Experiment 626 (Lilo and Stitch collection) the bright lime green and the dark purple. I just thought those two colors where fitting for Halloween.     

Spider web on ring finger nail- 

Now that your base colors have dried we will start our design, first we will start off with the spider web on the ring finger nail. Take your thin liner brush with white paint on it and make three lines, starting near the middle and a little off to the side near the cuticle. Then starting near the cuticle start to make a few small curved lines, I made four small curved lines. Then go down the nail, repeating this same steps. I did not fill up the whole nail, but you can if you would like.

 Halloween Nail Design
 Halloween Nail Design
  
Spooky scene on middle finger nail-  

Next we will make the spooky scene on the middle finger nail. Take you thin liner brush with white paint on it and make a circle in the middle of the nail for the moon. I only went over this one time to make it look a little sheer, I thought it would look better not being an opaque white. 
Once your moon has dried we can make the tree, take your thin detail brush with black paint on it and make a long branch covering the moon, and then make a lot of smaller branches coming from the big branch, and then very small branches from those.
Now to add two small bats, with that small detail brush with a grey paint, make a straight line, then two curved lines then two very small lines on the curved lines, then you have your very small bats.

Halloween Nail Design    Halloween Nail Design, Ghost and Pumpkin

Ghost and Pumpkin on the thumb nail- 

Last but not least is the ghost and pumpkin on the thumb nail. First we will make the circle for the pumpkin using white paint that way the orange will show up. Also if you don't have orange paint, mix yellow and red paint to make the orange. After your white circle has dried fill that in with orange, you will have to go over this a few times to be opaque. 

As we let that dry on to the ghost, with a small detail brush with white paint on it make   
two lines staring from the the pumpkin and the go up and making a curved line, then fill that in, this is for the head. (hopefully that makes sense?) Then make two arms one holding the pumpkin and one up in the air, like he is waving. After that make two feet like shapes on each side of the pumpkin. Also once again your ghost does not have to be an opaque white, it is okay to look a little sheer. Once your ghost body had dried we will make a face, with a small brush just dot two small dots for his eyes and then make a smile with two lines on the sides.   

Back to the pumpkin, make three triangles two for his eyes and one for the nose, then make a curved line for his mouth. You will need to go over this a few times with the yellow that way it is opaque. Then finally to finish our pumpkin and ghost add a small green line at the top of the pumpkin for the steam. 

Halloween Nail Design
  Halloween Nail Design

Once you have your Halloween nail design the way you like apply a top coat to seal in your design and to help it last throughout all of your tricks and treats.   

Hope all of you enjoyed this Halloween nail design, even if it is a day late. 

See you next time for more nail fun!