Friday, August 24, 2018

Pool Party- Swimming Pool Nail Design

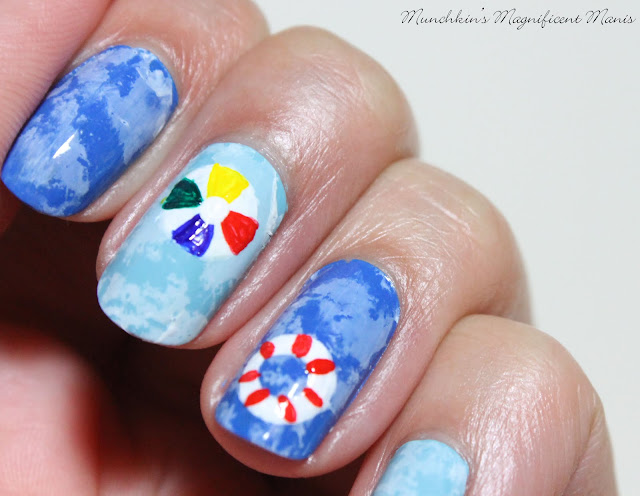
Hello everyone! Hope everyone is enjoying the last bits of summer, But just because the calendar says that summer is coming to an end does not always mean that the weather will automatically get cold. For today's design I wanted to create a fun pool party nail design with all of you, to celebrate/ enjoy the last bits of summer by the pool or beach. 

pool nail design 
Pool Nail Design

Here are the polishes and nail art tools used for this pool nail design:

 
Base and top coat - CND Stickey Base Coat and Revlon Extra Life No Chip top coat.

Nail polishes-  Finger paints- Tiffany imposter, OPI- Hello Kitty- My Pal Joey, and  China glaze- white on white.

Acrylic paints-  White, red, blue, yellow, and green.

Nail art brushes- thin detail brush, and a medium dotting tool.

Other nail art supplies- Liquid latex for easier clean up around your nails, a plastic cup of room temp water for marble effect, rubbing alcohol in a spray bottle or hair spray, toothpicks to clean up the polish from the water, and paper towel. (Items not shown in photo above)

Other- cup of water for cleaning up nail art brushes.  

Let's start this pool party! Where is your favorite place to swim in a pool, at the lake or in the ocean? My most favorite place to swim is the ocean, but I don't live near an ocean so I have to settle for a lake.  

pool nail design
pool nail design

Start off with a thin layer of base coat, and then let that dry.

Once your base coat has dried polish your thumb, middle, and pinky finger nail with a light blue polish, and then polish your index and ring finger nail with a darker blue polish, or you can always polish more of your nails with the dark blue, it is up to you.

Now let your base colors of blue dry. Then grab a plastic cup of room temp water, this will be for the marbling effect for the pool water. You will also need hair spray or rubbing alcohol in a spray bottle for this as well.

For less of a mess apply a liquid latex around your fingers, if you are allergic to latex don't use this around your finger, you can always use tape instead.   

pool nail design 
 pool nail design

For this part of the design we will kind of be doing a water marble design. Take a white polish with a lot of polish on the brush and drip it into the water, and wait for is to spread. 

Then take your spray with rubbing alcohol or hair spray and not to close to the cup start to spray the polish to where it has a splatter look to it.

Then dip your finger into the part of the polish that you like, then take a toothpick and remove the extra polish from the cup, and then take your finger out of the cup, and remove the liquid latex, also if need to clean up any of the polish that might have gotten on your fingers.

Repeat this step for all of your nails, and then let this part dry.

pool nail design 
          pool nail design

Once your marble design has dried we will make this look more like a swimming pool, by adding in a beach ball and a pool float.  

On the middle finger nail we will make a beach ball. Take a thin detail brush with white paint on it and make a circle. Then add a blue, yellow, red and green triangle shapes to the ball. To finish the ball take a dotting tool with white paint on it and make a dot in the middle of the ball.

For the ring finger nail we will make a pool float. With that same detail brush with white paint on it make a donut shape. Then make red lines going all around the tube/ float.

pool nail design 
 pool nail design

Once your pool design is swim ready, apply a top coat to seal in your design and to help it last through all the rest of your summer pool parties.   

Also for the marbling, I feel like it kind of looks like clouds too, but I made it work for the swimming pool design. So you can also use this technique for make clouds too.

Hope all of you enjoyed this nail design!

See you next time for more nail fun!

Friday, August 10, 2018

China Glaze Summer 2018 Review

Hello everyone! Hope everyone is having a nice summer, even though it is going way to fast. Today I have a few polishes from China Glaze, that are part of their summer collection that I wanted to show and go over with all of you before summer is over, after all a lot of polish companies are already releasing their fall collections. 

China Glaze Summer
China Glaze Summer

Two of the polishes that I will be showing all of you are from their Shades of Paradise collection;  Mer-Made For Bluer Waters and Boujee Board. The other polish is from their Flashback OMG Holographic collection called DV8.

China Glaze- Mer-Made For Bluer Waters 
China Glaze- Mer-Made For Bluer Waters

First we will be taking a look at Mer-Made For Bluer Waters from the Shades of Paradise Collection. This is a shimmer ocean blue polish with a shift of dark and a lighter blue. This polish covered in three coats, it was sheer on the first coat but was fully opaque in three coats, but shimmer polishes ares usually more sheer anyways that way you can see the shimmer. Also the formula seem runny/ drippy and the brush seem to hold a lot of polish, so be careful when polishing this color on your nails.

I really liked this polish it looked very pretty and went on well for a more sheer formula.

China Glaze- Mer-Made For Bluer Waters 
 
China Glaze- Mer-Made For Bluer Waters

This polish I purchased at Sally beauty

China Glaze- Boujee Board
 China Glaze- Boujee Board
 China Glaze- Boujee Board

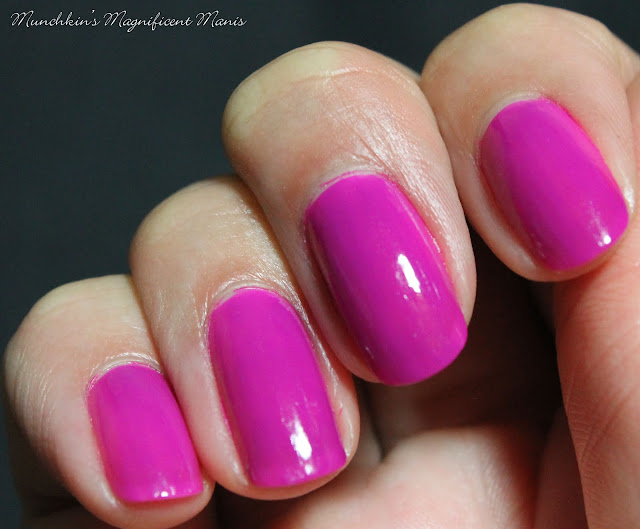
Next we have Boujee Board another polish from the Shades of Paradise Collection, this is a purple magenta polish that has a velvet matte finish. I did apply a top coat for the photos above that is why the polish looks shinny. 

This polish took three coat to be opaque, due to it being a velvet matte finish, I felt like it dried very fast when applying the polish, so it might be best to polish fast with this type of polish, which I am kind of slow at polishing. In my photo the polish looks kind of pink and purple, but on the actual nail it looked purple. Also in the photos the polish looked kind of patchy, some spots look light some look dark, I am not sure if this happened because I made this matte polish glossy. 

This polish I did like the color, but I did not like the velvet matte finish. I don't mind matte polishes I just prefer them to be glossy on application and then make them matte with a matte topcoat.
 
Revlon Holographic pearls topcoat, 
the topcoat I ended up putting over Boujee Board.

Also this polish did have a small bit of chipping the next day which was easy to fix, I also ended up adding a holographic top coat over this polish, which helped the wear and to cover up the patchy parts. When I went to remove this polish at the end of the week it also stained my nails a pinkish color. 


Here is Boujee Board with the velvet matte finish on a white and a black background.

China Glaze- Boujee Board 
          China Glaze- Boujee Board

Also China Glaze has a set of mini polishes with six of the polishes in mini form (this Shades of Paradise collection has 12 polishes in the collection.) I did purcahse the set of minis and I went to polish them on my nails and most of them applied very bad. I applied three coat for the velvet matte and they didn't look good even with three coats. I did ended up returning the set just because I felt like the quality was not that good and the fact that they applied so bad for me. I did only like two of the colors from that set, so I picked up two of the larger polishes, and really after I applied them both the one I liked the best was Mer-Made For Bluer Waters. 

I also purchased this polish from Sally Beauty 

Flashback OMG Holographic collection- DV8 
Flashback OMG Holographic collection- DV8.

Lastly we have DV8 from the Flashback OMG Holographic collection. This is a blue linear holographic polish.

It was opaque in two coats, the first coat went on very weird for me, it was like the polish wanted to move around and leave patches with no polish on the nail. The secound coat was okay, I could just see the brush strokes on the nail, which again was very weird. I have a lot of holographic nail polish that apply great, but this applying horrible. In the photos and on the nail after two coat it looked pretty if you didn't really pay attention to the brush strokes. 

Flashback OMG Holographic collection- DV8         Flashback OMG Holographic collection- DV8.

Here is a photo of my right thumb nail where I was able to capture the brush strokes, where you can see lines on the nail from the brush.

This polish disappointed me so much! As you may know I love holo polishes, but the formula was so bad on this, that I will be returning this polish back to the store. Most/ all of the holo polishes that I have apply great and wear great too. The biggest disappointment of all was the very next day this polish chipped very bad, and I was able to just peel off this polish as well.   

In conclusion I was kind of disappointed with these polishes, out of all three I only like one Mer-Made For Bluer Waters. I usually like all of the polishes that I purchase and worst of all the polish finish I love holo was the worst one. Honestly after purchasing these polishes I don't think I will be buying any more China Glaze polishes, which makes me feel sad because they do have some pretty polishes, I just can't get them to wear well on me and apply well.

Hope you enjoyed this review even though it was not that great.

See you next time for more nail fun!      

Friday, August 3, 2018

Sunset in Paradise- Tropical Nail Design

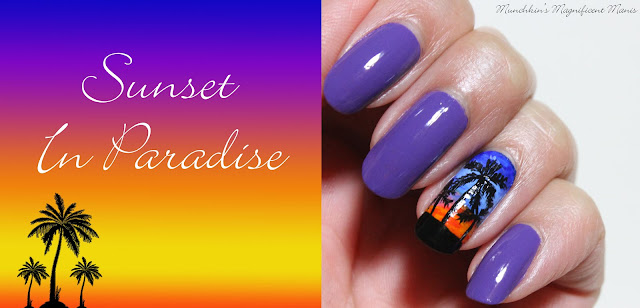
Hello everyone! Once again we will creating a tropical nail design, if you have been checking out the M.M.M blog for a while now, then you know that summer time is my favorite season and I love to create tropical designs in summer. I don't know about all of you but I feel like especially this summer has been going way to fast, I feel like it was just memorial day (the start of summer) and now it's mid summer. Before summer is over with I do have a few more topical design that I want to create before summer has sadly ended. 

Tropical sunset nail design   
Tropical sunset nail design 

Here are the nail polishes, paints, and nail art tools used for this tropical design:


Base and Top coat - CND Stickey Base Coat and Revlon Extra Life No Chip top coat.

Nail polishes- Essie- Coconut Cove (your base color that goes under your tropical design), OPI Hawaii- Lost my Bikini in Molokini, Sally Hansen- Hard as Nails- Black Heart (for the tips of your nails.)

Acrylic paint- black, white, red, yellow, and blue.

Nail art brushes- Flat large brush, fan brush and stripper brush.

Small jar or cup of water to clean off our nail art brushes.     

Let's start this sunset in paradise nail design!

Tropical sunset nail design
Tropical sunset nail design  

Before I start this post I just want to say that this design is very similar to the Fiery sunset design that I created a few weeks ago, so I will be taking a lot of the wording from that post and putting it into this one. Of course some of the different is this one is on two nails, a darker sunset and just palm trees, but for the most part this has the same concept, Anyways.

As always start off with a thin layer of base coat, and then let that dry.

Once your base coat has dried polish your index, middle, and pinky finger nail with a purple polish (I used OPI- Lost my Bikini in Molokini), these will stay as is with no nail art on them. 

Then polish your thumb and ring finger nail with a white/ or off white polish, this is where will be creating our nail design. I only applied one coat of the white polish, this will act as your base (will not show at all on the nails) because the whole tropical design is done with acrylic paint and the paint does still need a polish base to stick to.  

Tropical sunset nail design
 Tropical sunset nail design 

These steps need to be repeated on the thumb and ring finger nail, that we will be creating the tropical design.

* Paints colors you will need for the sky: dark blue, light blue, white, purple (which you can't really see in this design, but it's their), pink, red, orange, and red.* 

Let your base polish color dry. Then for the topical design on the thumb and ring finger nail. On a larger flat brush near the cuticle paint a dark blue, then a light blue, then have a small bit of purple and pink in the corner. Then with the fan brush (while the paint is still kind of wet) start to blend those together, you will need to go over this a few time for the sky to be opaque. I did the blue, darker part first and then went to the orange, red part.

Then after I got the first part of the sky the way I wanted, I moved on the the secound half the red and orange part. On that same brush I took orange and yellow and red and blend them together. 

*For the sky it does take kind of a lot of blending and adding more paint to get the sky the way you want it, sometimes I had to add more of a color in to have it look just right because some of the sky would look to dark or to light.*

 Tropical sunset nail design
 Tropical sunset nail design 

Now on to the land and the palm trees. Take a black nail polish (that way it last longer and it doesn't tend to rub of) and make the tip of your nails black, kind of like a french manicure. 

For the palm tree we will first make a the large palm tree in the middle of the nail, then the two small palm trees next to it. Take your thin stripper brush with black paint on it, from the middle of the nail make a long straight line for the tree trunk.Then make six curved lines and two straight lines for the outline of the palm tree, then you just add small lines to the branches for the palm leaves. 

For the smaller palm trees repeat the last step with fewer curved lines. 

Tropical sunset nail design   
 Tropical sunset nail design 

Once you have your sky colors blended the way you like and your palm trees as well, apply a top coat to seal in your design and to make it nice and shinny.

Tropical sunset nail design   
 Tropical sunset nail design

For this nail design it is best to use acrylic paint, it would probably be hard and kind or impossible to blend regular nail polish, but if you use gel polish this could probably be done that way, I just have never tried it that way. 

Also if you did not check out the fiery sunset nail design, check that one out as well.

Anyways I hope all of you are having a nice summer and enjoined this tropical nail design!

See you next time for more bright and fun nails!