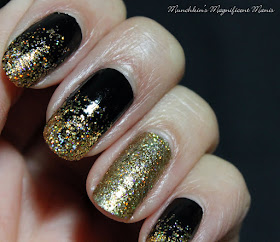
Hello everyone! Merry Christmas Eve! Today on the eve of Christmas, we will be creating a cute glitter filled nail design. Each nail will have a different design on it, that you can also do on each nail or just put on on a accent nail.

Christmas Nail Design
Here are the polishes and tools used to create this cute Christmas nail design:
Yes I used way to many polishes, but most of the glitters are just for the Christmas lights, so very little is used, and of course you don't have to use that many glitters for the lights, I just choose to do so.
Base and top coat- CND Stickey Base Coat and Revlon Extra Life No Chip top coat.
Acrylic paint- black, white, red, and brown, and mixing red and white for pink.
Nail art brushes and dotting tools- thin detail and stripper brush, and a medium size dotting tool.
Optional, for glitter placement- a toothpick.
Nail polishes-
Your base polishes are-
China Glaze mini- Sesame Street- 50 Shimmering Years, China glaze mini- Grinch- Deliciously Wicked, Zoya- Twinkling- Alessia, China glaze mini- Grinch- Merry Whatever, Sally Hansen- xtreme wear-Celeb city, and China Glaze mini- Sesame Street- T is for Tinsel (over top of Celeb city).
Polishes for the Christmas lights-
China glaze mini- Grinch- Resting Grinch Face, China Glaze mini- Sesame Street- #This is my Street, China Glaze mini- Sesame Street- Cele- Bert, China Glaze mini- Sesame Street- On the nice list, China Glaze mini- Sesame Street- A Grouchy New Year, and China Glaze mini- Sesame Street- Gift Fur You.
Christmas Nail Design
Apply a base coat, let that dry.
Polishes on each finger-
Thumb- Rose gold glitter polish, China Glaze- 50 Shimmering Years.
Index- Light shimmer blue glitter, China glaze- Deliciously Wicked
Middle- shimmery blue, Zoya- Twinkling- Alessia
Ring- Gold glitter polish, China glaze- Merry Whatever
Pinky- Sliver- Sally Hansen- xtreme wear-Celeb city, China Glaze- T is for Tinsel (over top of Celeb city.)
Let that dry.
Christmas Nail Design
Gingerbread Man on the Thumb Nail-
With a thin detail brush with brown paint on it, make a circle for his head near the tip of the nail, the make two arms, and two legs, then also fill in the body with brown as well. You will need to go over this a few times.
For the eyes take a dotting tool with black paint on it and make two dots in the middle of head.
For his smile make a straight line and a curved line under that, then fill that in with pink.
For his pink cheeks and white buttons, just make two pink dots with your dotting tool on each side of the mouth. Then for the buttons make two dots down is tummy.
Lastly for a final detail, making the frosting lines. Take a thin stripper brush with white paint on it and make a squiggly line on his head and one on each arm and leg.
Christmas Nail Design
Christmas Light on the Index Nail-
Take a thin stripper brush with black paint on it and make a thin zig zag line going down the nail. Then with a lot of different glitters, with a toothpick or just the brush in the bottle, place the glitters on the line you just made for the lights.
Christmas Nail Design
Ornaments and Snowflakes on the Middle Finger Nail-
Take a thin stripper brush with white paint on it and make three circles, that are all at different levels, then make a small square at the top of the circles and make a line going from each square to the cuticle area. To finish your Christmas ornaments make a curved line and a small dot under that for the refection on the ornament.
For the larger snowflakes make a star shape, then for the smaller snowflakes just take a dotting tool with white paint on it and make a few random dots all over the nail.
Christmas Nail Design
Reindeer on the Ring Finger Nail-
With a thin detail brush with brown paint on it make a circle near the tip of the nail, then fill that in.
For his eyes take a dotting tool with black paint on it, and dot two eyes in the center of his head, then with that same dotting tool with red paint on it make a red dot. For an added touch you can add a red glitter polish on top as well.
Then for his antlers, take your detail brush with black paint on it and make two lines coming from his head and make two small ones from that line.
Christmas Nail Design
Christmas Lights on the Pinky Finger Nail-
Take your thin stripper brush with black paint on it and make a line down the nail that has loops in it. If the loops are a little to hard to make, you can just repeat the same light design that we did on the index nail.
Once again for the lights take a few different glitters, with a toothpick or just the brush in the bottle, place the glitters on the line you just made for the lights.
Christmas Nail Design
Once you have your Christmas design the way you like apply a top coat to seal in your design and to help your design to last through all of your Christmas celebrations.
Hope all of you enjoyed this Christmas nail design!
Merry Christmas and Happy Holidays!
See you next time for more nail fun!


