Polishes- China Glaze- Chalk Me Up!, Zoya Mini- Daisy, Zoya Mini- Rayne, Zoya Mini- Leslie, Zoya Mini- Eden, Holo Taco- Polar Princess, and Sally Hansen- Hard as Nails- Hard to get.
Acrylic paint- White, black, yellow, green, red, and pink. (mixed yellow and red for orange if you don't have an orange paint.)
Nail art brushes- Thin detail, linear and stripper brushes.
Polishes-
Thumb- a light blue cream polish ( China Glaze- Chalk Me Up!)
Index- a light yellow shimmer (Zoya- Daisy)
Middle- a light blue shimmer (Zoya- Rayne)
Ring- a light purple shimmer (Zoya- Leslie)
Pinky- a pink cream polish (Zoya- Eden)
Then take an iridescent polish, Holo Taco Polar Princess and polish it over the pink to give the pink a shimmer.
Let that dry.
For this design we will just be creating nail art on the ring finger and the thumb nail. The Index, middle and pink nail will just stay the blank colors with no nail art.
For your little chick I first made an outline of him with white and then went over him with yellow that way the yellow would pop more/ you can see it better.
First take a linear brush with white paint on it and make a large oval in the middle of the nail, add two lines above his head for hair, make a small half body for your chick too, we will let that dry.
Once your base white has dried take a yellow paint and paint over the white a few time until it is opaque.
For the egg shell make some triangle shapes along your nail above your chick, then fill in the bottom half of the nail with white polish.
Lastly for his face make two small black dots for his eyes and then for his beak take a orange paint and make a small upside down triangle.
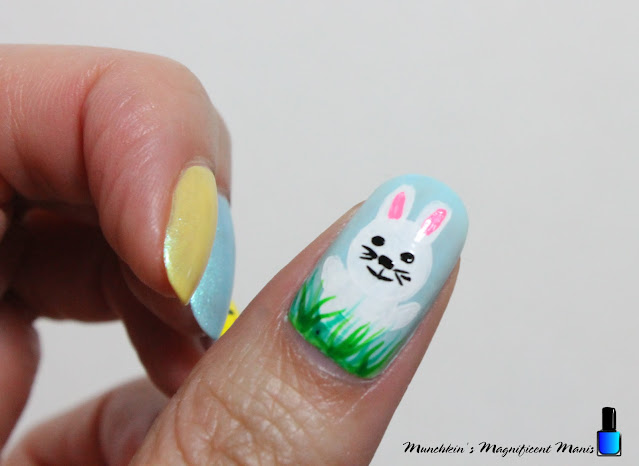
On the thumb nail we will make a bunny in the grass. Take a detail brush with white paint on it and make a circle in the middle of the nail and fill that in for his head, then for his ears make two small oval shapes. For his body make a large oval, then for his arms make two thin oval shapes on each side of his body.
Let that dry.
For his face take that same detail brush with black paint on it and make two small dots for his eyes and one user that for his nose.
Then take a stripper brush with black paint on it, make a few lines on the side of his face for whiskers. Then make a small line down his nose and a curved line for his smile.
Lastly for his ears make a thick oval shape in his ears with pink paint.
Now will need to make the grass for our bunny to sit in. Make sure you have two greens, a light and a dark green. First take your light green on a stripper brush and make some grass like lines under/ on your bunny, then do the same with a darker green.
Here is the practice version of the Easter design. I actually like how the chick turned out in the practice version because he looks chubby, I could not get him to look like this on my nails, my nails are not as wide as the nails that I practice on.
Hope all of you enjoyed this Easter nail design and if you celebrate Easter hope you have a good Easter!
See you next time for more nail fun!


No comments:
Post a Comment