Pages

Saturday, March 30, 2024

Easter Time- Easter Nail Design

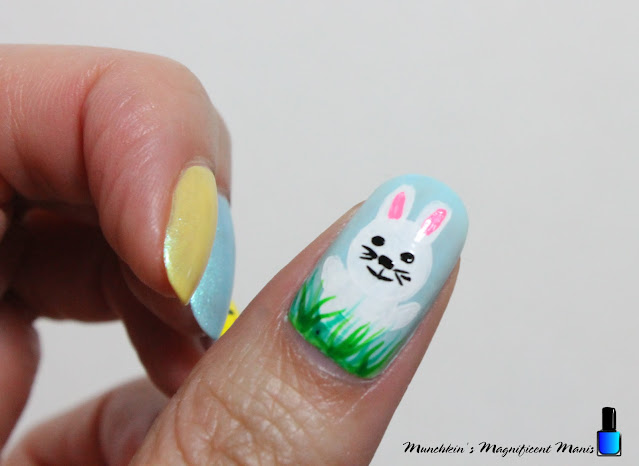
Hello everyone! Happy Easter! Today on the blog we will be creating a cute Easter nail design with a bunny and a chick in an egg. 

Easter Nail Design

Easter Nail Design

Here are the polishes and nail art tools used to create the Easter design- 


Base and top coat- CND Stickey Base Coat and CND Super Shiney Top Coat. 

Polishes- China Glaze- Chalk Me Up!, Zoya Mini- Daisy, Zoya Mini- Rayne, Zoya Mini- Leslie, Zoya Mini- Eden, Holo Taco- Polar Princess, and Sally Hansen- Hard as Nails- Hard to get. 

Acrylic paint- White, black, yellow, green, red, and pink. (mixed yellow and red for orange if you don't have an orange paint.) 

Nail art brushes- Thin detail, linear and stripper brushes. 

Easter Nail Design

Apply a base coat and let that dry.

Polishes- 
Thumb- a light blue cream polish ( China Glaze- Chalk Me Up!)
Index- a light yellow shimmer (Zoya- Daisy)
Middle- a light blue shimmer (Zoya- Rayne)
Ring- a light purple shimmer (Zoya- Leslie)
Pinky- a pink cream polish (Zoya- Eden) 

Then take an iridescent polish, Holo Taco Polar Princess and polish it over the pink to give the pink a shimmer. 

Let that dry. 


Easter Nail Design
Easter Nail Design

For this design we will just be creating nail art on the ring finger and the thumb nail. The Index, middle and pink nail will just stay the blank colors with no nail art. 

Easter Nail Design

Chick in the Egg on the Ring Finger Nail- 

For your little chick I first made an outline of him with white and then went over him with yellow that way the yellow would pop more/ you can see it better.

First take a linear brush with white paint on it and make a large oval in the middle of the nail, add two lines above his head for hair, make a small half body for your chick too, we will let that dry. 

Once your base white has dried take a yellow paint and paint over the white a few time until it is opaque. 

For the egg shell make some triangle shapes along your nail above your chick, then fill in the bottom half of the nail with white polish. 

Lastly for his face make two small black dots for his eyes and then for his beak take a orange paint and make a small upside down triangle.

Easter Nail Design

Easter Bunny on the Thumb Nail- 

On the thumb nail we will make a bunny in the grass. Take a detail brush with white paint on it and make a circle in the middle of the nail and fill that in for his head, then for his ears make two small oval shapes. For his body make a large oval, then for his arms make two thin oval shapes on each side of his body. 

Let that dry. 

For his face take that same detail brush with black paint on it and make two small dots for his eyes and one user that for his nose. 

Then take a stripper brush with black paint on it, make a few lines on the side of his face for whiskers. Then make a small line down his nose and a curved line for his smile. 

Lastly for his ears make a thick oval shape in his ears with pink paint. 

Now will need to make the grass for our bunny to sit in. Make sure you have two greens, a light and a dark green. First take your light green on a stripper brush and make some grass like lines under/ on your bunny, then do the same with a darker green. 

Easter Nail Design

Once your nails are Easter ready apply a top coat to seal in your nails and to help them to last.

Here is the practice version of the Easter design. I actually like how the chick turned out in the practice version because he looks chubby, I could not get him to look like this on my nails, my nails are not as wide as the nails that I practice on.  

Hope all of you enjoyed this Easter nail design and if you celebrate Easter hope you have a good Easter!

See you next time for more nail fun! 

Saturday, March 23, 2024

Lush Lemon Flutter Cuticle Butter Review

Hello everyone! Today on the blog we will be taking a look at a cuticle care item, the Lush Lemon Flutter Cuticle Butter. This is not a new item, I just had never tried it before and really had no need to try it because I had a cuticle cream that I loved Nail Butter, sadly that product you could only get online and I think Nail Butter went out of business. So then I wanted to find another cuticle cream that might be just as good. 

When I purchased this at the Lush store at the mall the girl at the store did hype of this product saying this was a holly grail product and I have read some review online in the past that said it was good, so I wanted to give it a try for myself. 

Lush Lemon Flutter Cuticle Butter Review

Let's see if this cuticle butter is any good and if it could replace my beloved Nail Butter. I have/ had been using the for about six months, back in August of 2023 was when I first stared to use Lemon Flutter. 

Lush Lemon Flutter Cuticle Butter Review

Above is a photo of what the product looks like, it has a thick butter like constancy. When you use this you only need a tiny bit to put on each nail, due to the product being very thick. This butter is kind of on the greasy side because their is a lot of oils in it, but you really only need the smallest amount and if you apply lotion after it's not to bad. 

Lemon Flutter clams to help soften dry, cracked skin and to nourish your nails, it also can be used on your feet, elbows and knees or I guess anywhere that is very dry. 

Lush Lemon Flutter Cuticle Butter Review

Above is a photo of the back of the packaging with all of the ingredients. Also here is a list of the Ingredients as well just in case you can't read it in the photo.

Fresh Lemon Infusion, Fair Trade Shea Butter, Beeswax, Cupuaçu Butter, Soya Oil,Organic Avocado Oil, Organic Linseed Oil, Mango Butter, Extra Virgin Coconut Oil, Organic Castor Oil, Fragrance, Wheatgerm Oil, Sicilian Lemon Oil, Lavender Oil, Tagetes Oil, Chamomile Blue Oil, Gardenia Extract, Triethanolamine, Stearic Acid, Cetearyl Alcohol, *Citral, *Citronellol, *Coumarin, *Geraniol, *Limonene, *Linalool, Methylparaben, Propylparaben

*Got the ingredients list from the Lush website.* 

As you can see there is a lot in this product. The noted Ingredients on the website are Lemon, Avocado, Shea and Linseed. 

Lush Lemon Flutter Cuticle Butter Review

Lemon Flutter contains 1.7oz (50g) of product for $25.00 USD. Which I think is kind of pricey for a small amount of product. As stated above a little goes a long way and after using this for 6 months as you can see it doesn't look like I used much at all. 

So what do I think of this product, I sadly do not care for it and after that 6 months of use I stoped using it. I would apply this just at night let it soak into the nails for a while, then apply CND Solar Oil, then lotion. 

I felt like it's didn't do anything for my nails/ cuticles, my nails are in really good condition, My hands do get dry in the winter and some of my nails do peel just a little at the tip of the nail. When I used Nail Butter and CND Solar Oil for all thoughts years I felt like I could see some improvement, not with Lemon Flutter. 

In Conclusion I am disappointed in the product and felt like it didn't do anything for the nails/ cuticles and for the price of $25, it is not worth it, just use a cuticle oil. So no this did not replace my beloved Nail Butter, which I miss so much. ☹️😭  

In the past I have used Burt's Bee Cuticle Cream, which is also Lemon scented and has the same constancy and is way more affordable it is only $6.49 for 0.6oz. So if you would like to use a cuticle cream I do remember liking this, but that was before I tried Nail Butter, now I am not sure if I would still like the Burt's Bee Cuticle Cream. 

For my cuticle and hand care I have still been using CND Cuticle Oil and now I am trying another cuticle oil from a brand that is made in Hawaii called Kapa Nui, along with different lotions. I have been using this cuticle oils since February and so far I do like it, I will see with prolong use if it I do see any improvement in my nails, I do get a little bit of peeling on the tips of my nails. 

In 6 months or maybe sooner I will do a review on the Kapa Nui Cuticle oil to report back on my thoughts of prolong use of this oil. 

If you would like to purchase the Lush Lemon Flutter it is available at Lush stores or at www.lush.com for $25.00 USD. 

Hope all of you enjoyed this review, even if I didn't personally like the product maybe you do or you might want to give it a try, this is just my opinion.

See you next time for more nail fun! 

Saturday, March 16, 2024

Spring Time Swirls- Swirl Nail Design

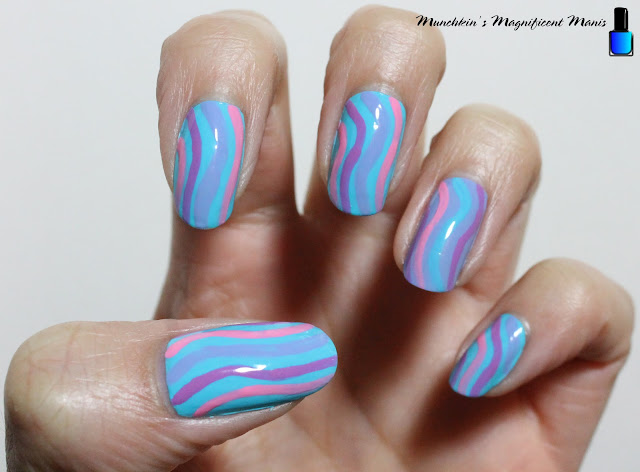
Hello everyone! Today on the blog we will be creating a simple swirl design. When I was looking for inspiration I thought it would be fun for spring a summer time to create a swirl bright color design. This design is supposedly is trending this year.

Swirl Nail Design

Here are the polishes and nail art tools used to create this nail design: 


Base and top coat- CND Stickey Base Coat and CND Super Shiney Top Coat.

Polishes- Sally Hansen- Insta Dri- Peeps Blue, Finger Paints- Heavenly Hues, Zoya Sunshine- Delia, and Sally Hansen- Insta Dri Jelly Belly- Bubble Gum.

Nail art brushes- Thin detail brush.

Other- Acetone and water to clean off your nail art brush.

Swirl Nail Design

Apply a base coat to clean nails.

Polish- This is your base colors.

Thumb, index, middle, pinky finger nails- Light blue (Sally Hansen- Insta Dri- Peeps Blue.)

Ring finger- Periwinkle blue (Finger Paints- Heavenly Hues)

Let that dry.

Swirl Nail Design

For this design I just switched the colors on each nail, from purple, pink, and periwinkle, with the light blue base. Then with the periwinkle base you would use purple and pink again and just add the light blue for the swirls. 

Swirl Nail Design

Swirl Nail Design

Swirl Nail Design

For this design it is very abstract with random lines. For this design I jump around from each nail for each color. First take a thin detail brush with a periwinkle polish on it and staring on the middle of the nail make a swirl line (this is for the nails with a light blue base). 

For the ring finger nail with a periwinkle base use the light blue polish to make your first swirl. 

Then for the other swirls switch between pink and purple, just make sure the other swirls are  right next to each other, leaving space in between each swirl so that you can still see the base color.   

Swirl Nail Design

Once you are happy with how your swirl nail design look, apply a top coat to seal in your design and to help it to last. 

Swirl Nail Design

Swirl Nail Design

If you want to go even more simple you can just put the swirl design on the ring finger and the thumb nails, and leave the other nails with no design.

Also as with any design you can use any colors that you want, you can use more spring colors, very bright colors for summer or later in the year you can use fall or winter colors. 


Here is the practice version.

Hope all of you enjoy this swirl nail design!

See you next time for more nail fun!