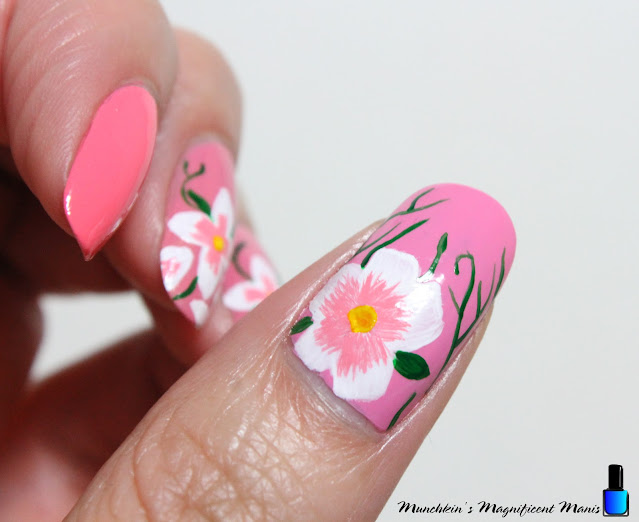
Hello everyone! Happy spring time! Here in the USA it is now spring time, even though it may not feel like it just yet, at lest where I live. Today we are going to create a spring themed nail design, with white and pink flowers.
Here are the polishes and nail art tools used to create this pink spring nail design:Base and top coat- CND Stickey Base Coat, and CND Super Shiney Top Coat.
Nail polish- Sally Hansen- Color Therapy- Mauve Mantra, Zoya Sunshine- Minnie, and Zoya Sunshine- Missy.
Acrylic paint- Red, green, yellow, and white. Mix red and white to make pink.
Nail art tools- Thin detail and stripper brush, and a small flat brush.
Other- Cup of water to clean off your nail art brushes.
Apply base coat.
Let that dry.
Polish- Different shades of pink polish. I pretty much always like to have a mix of different polishes on my nails, you of course can just have one shade of pink polish.
Thumb- Light pink (Zoya Sunshine- Minnie).
Index and pink finger nail- a slightly brighter light pink (Zoya Sunshine- Missy).
Middle, and ring finger - Light pink with a little bit of pink shimmer ( Sally Hansen- Color Therapy- Mauve Mantra).
Let that dry.
Multiple Flowers on the Middle and Ring Finger Nails-
First we will start off with the smaller flowers on the middle and index nails. For both nails we will make one larger flower near the tip of the nails and a few flower petals around that. The middle finger nail does have a few more petals than the ring finger nail.
For the large flower, take a detail brush with white paint on it starting near the tip of the nail make a petal shape, then two on the sides, and one at the top, you will need to go over this a few times to be opaque. Repeat this step on the other nail.
On the middle finger nail I decided to add a four more petals on the sides, the ring finger nail I just added two petals.
Once the white has dried take a thin stripper brush with pink paint on it (I just mixed red and white to make my pink paint) on the white petals make very close lines on each petal.
Lastly on the flowers make a small yellow dot on the center.
As always with any design you can add more larger flowers or more petals, depending on your nail length and size.
For a final touch we will add leaves and vines. Take your thin stripper brush with green paint on it and make leaves on the sides of the flowers and a few around the nail. Then make some random lines around the flower for the vines.
Large Flower on the Thumb Nail:
On the thumb nail we will make one large flower. Take a small flat brush with white paint on it, starting from the middle of the nail swipe up to make a petal, then do this again on both sides and then twice under those to petals. You will need to go over this a few times to be opaque.
Once that is dry, similar to the smaller flower we will make the pink part of the flower. With your thin detail brush make a lot of small lines close together on each petal.
Lastly for the flower make the yellow circle in the center of the flower.
For the final touch again, we will make two leaves on the side of the flower and a small one on top, and then more lines for the vines.
Once your nails are spring time ready apply a top coat to seal in your design and to help it to last though spring or at lest until you want to change your nails.
Hope all of you have enjoyed this white and pink flower nail design.
See you next time for more nail fun!


No comments:
Post a Comment