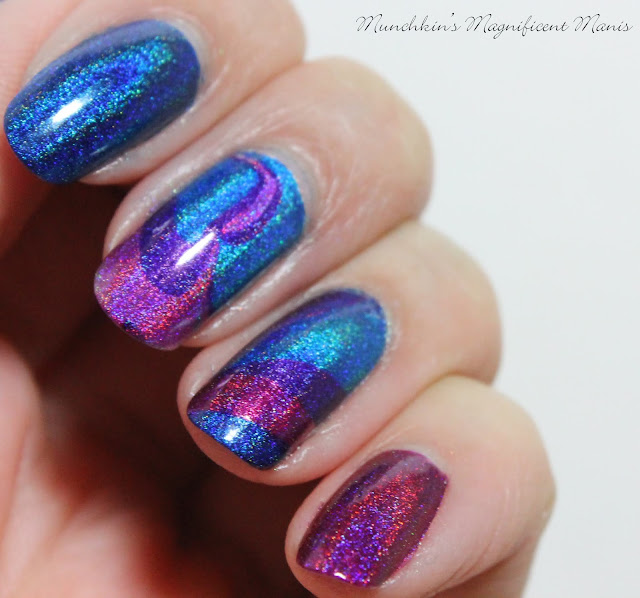
Hello everyone! Today we will be doing water marble again, back in 2015 I tried water marbling for the first time and it turned out okay for my first try. So today we will try water marbling again. My original idea I got from when I was cleaning up my nails with these same polishes one time and it look really cool on the paper towel, but when I tried to do something similar it didn't work out to well. The whole idea was to blend three polish together, so then I thought water marbling the three polishes together, shown in the photo below, would work out better and that worked out perfectly.
Here are the polishes and tools used to create this water marble design:
Base and top coat- CND Stickey Base Coat and Revlon Extra Life No Chip top coat.
Polish- Color Club Halo's- Harp on, Holo Taco- Blue Freezie- Rainbow Collection, Holo Taco- Magenta Jelly- Rainbow Collection, and Holo Taco- Purple Slushie- Rainbow Collection.
Not show- A plastic cup of water at room temp to water marble with, toothpicks, tape or liquid latex to put around your finger for easy clean up.
Apply base coat, let that dry.
We will just be doing the water marble on the thumb, middle and ring finger nails. But as always you can do this on all the nails.
For your base colors on the nails that we will be water marbling ( the thumb, middle and ring finger nail) polish with a silver holographic polish. It is best to use a light based color polish for your marbling.
index nail a blue holographic polish and pinky nail a magenta holographic polish.
Let that dry.
Open all three of your polishes and have them ready to marble.
Take a cup of water and with a fully loaded brush and dip your polish over the water (without touching the water) and create a bullseye with one of the polishes at a time, repeat this with all three colors.
Then take a toothpick and and drag the polish to make a pattern, if you mess up on your pattern just clean off your polish in the cup with that toothpick and try again.
Then once you have a pattern you like quickly dip your finger in the cup and back out again and your marble should come out on your nails.
Each nail will look different, which is the cool part about water marbling.
Then once you have finished all the nails that you want to water marble take the tape or liquid latex off to reveal your design and if you still have polish on your fingers can clean that up with acetone and a clean up brush.
Once you have your design just right apply a top coat to seal in your design and to help it to last.
I think this water marble did turn out very well and it is great that the Holo Taco Rainbow Holo's do water marble!
Hope all of you enjoyed this holo water marble!
Also if you want more detailed tutorial check out my first water marble post
Along with the Unicorn Frap design I did as well that also was a water marble.
See you next time for more nail fun!


No comments:
Post a Comment