Target Nail Design
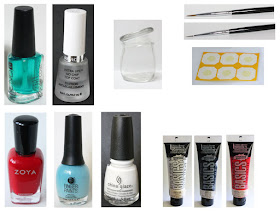
Here are the polishes and nail art tools used for this Target nail design:
Base and Top coat- CND Stickey Base Coat and Revlon Extra Life No Chip top coat.
Polishes- Zoya- Renee- Redbook trio, Finger paints- Tiffany imposter, and China glaze- white on white.
Acrylic paint- white, black, red, and red and white to make pink.
Nail art brushes- small detail brush and small liner brush.
Small cup or class jar with water in it to clean off nail art brushes.
Other- hole punch stickers for bullseye design.
Let's go to Target with this cute Target inspired nail design!
Target Nail Design
Start off with a thin layer of base coat to protect your nail and to help your nail design to last.
Let your base coat dry, I always like to let my base coat dry when I do my own nails, when I am doing other people's nails I just go right in with with the polish.
Once that has dried polish your pinky and middle finger nail red, your ring and thumb nail with a light sky blue and then your index nail white. I wanted to add a light blue to this design because I didn't want to just use red and white (I do not like to polish the whole nail white, I just don't like the way white nails look) so I add the light blue for some contrast, and it did some what look patriotic because of the red, white and blue color scheme.
Target Nail Design
Let your base colored polishes dry, then on to our Target design. We will first start off with the bullseye the Target logo on the index nail. Take a hole punch sticker and place that on the nail, this helped me to get the bullseye to look better. Then with red paint fill in the center dot and then the outer bigger circle go over the top and bottom line. Then right away take off the sticker, I ended up going over the larger circle a little bit to make the two curved lines a little thicker.
For the middle and pinky finger nails we will just be leaving those two nails red, with no design on them.
I love Target Nail Design
Now on to the harder part the words I heart/ love Target. Painting words on the nail is hard to do I actually don't really care to do words, but I do them anyways just for a challenge I guess.
For painting letters/ words on the nails make sure to lay your hand flat on a table and carefully paint I and then a heart shape and then the word Target. I always use acrylic paint for words, well all nail art that I create, it makes it so much easier for words and just in case you mess up you can wipe it and try again.

Target dog design on the thumb
Last but not lest is is the cute Target dog mascot, I try to have him look like the cute cartoon version of the puppy. With a thin detail brush with white paint on it make a egg shape for his head with two triangle shapes at the top for his ears. Then fill that in with the white paint you will have to go over this a few time to make it fully opaque. I always like to have my paints to start of sheer and then build up the color for all of my designs.
For the ears and mouth I didn't have a pink paint so I mixed white and red to make a light pink. For the pink part of the ears, just make two small triangle where the ears are.
For the eyes just make to large black circles, then on one of the eyes make a red thin circle around one of the black circles for the red bullseye.
For his nose make a small oval under his eyes. Then for his mouth make a small pink line going down from his nose and then a thick curved line for smile. Now your Target pup is all done.
Target Nail Design
Once you have your Target nail design the way you like, apply a top coat to seal in your design and to help your nail design to last for your next Target trip. If you are anything like me you go to Target every week or ever other week, so this design will only last one Target trip.
Hope all of you enjoyed this Target nail design as much as you enjoy the store itself!
See you next time for more nail fun!


No comments:
Post a Comment