For this design I will be showing all of you it a little bit different, do to their being a different design on all 10 fingers I will not be showing a step by step tutorial (sorry!) on this one because this post would probably go on forever.
All of these designs are created with the OPI Hawaii collection, along with some other polishes that I have in my collection and acrylic paint, to add to the design.
Starting with the thumb on the left hand:
Volcano and ocean design. OPI This Color's Making Waves
and Go with the Lava Flow
On the thumb I based this design off the polishes, This Color's Making Waves with the ocean, and Go with the Lava Flow with a volcano, I did only use a tiny bit of the actual polish color in this design. This design was created with a small thin detail and liner brush, acrylic paint and Sally Hansen- Triple Shine- Pool Party as the sky color.
Sad Pineapple design, OPI Pineapples have Peelings Too!
On the index finger nail this design is based off of the polish, Pineapples have Peelings Too! This design I got inspiration for a design I found on Pintrest, of a Pineapple that is sad and crying. This design was also created with a small detail and liner brush, yellow, green, black and blue acrylic paint and Sinful color- Let's Meet over the yellow paint of the pineapple.
Purple Bikini design, OPI Lost My Bikini in Molokini
On the middle finger nail this design is based on the polish Lost My Bikini in Molokini. Molokini is a crescent shaped volcanic crater located off the south coat of Maui. For this design I created a purple polka dot bikini, with a detail brush and a small dotting tool, white acrylic paint to make the purple of the bikini to show and for the white dots, the background is Finger Paints- Tiffany Imposter.
Hula girl design, OPI That's Hula-rious! and Do You Take Lei Away?
On the ring finger nail this design is based on the polish That's Hula-rious! and Do You Take Lei Away? The beige color is used for the hula girls tummy and the light green is used for her grass shirt, along with My Gecko Does Tricks. For her top Go with the Lava Flow was used, and then for the lei a small amount of Hello Hawaii Ya?, Is Mai Tai Crooked?, Suzi Shops and Island Hops, Aloha from OPI, That's Hula-rious, and Lost My Bikini in Molokini with a dotting tool to make small flowers.
Aloha design, OPI Aloha from OPI
On the pinky finger this design is based on the polish Aloha from OPI. For this design I kept is simple by just writing Aloha with a heart for the O.This design a thin detail brush was used to write Aloha, with black and red acrylic paint. Aloha has many different means from a greeting like Hello, goodbye, and love.
Now on to the right hand nail designs:
Beach scene design, OPI Just Lanai-ing Around
On the right hand thumb nail this design is based on Just Lanai-ing Around. Lanai is the sixth largest of the Hawaiian Islands and is also the name for a patio or porch on a home in Hawaii. For this design I was going to create a little house with a porch but then deiced it would be better to make a beach scene with a little chair and a ball. This beach scene was create with a small detail brush, black, white, blue, orange acrylic paint and Do You Take Lei Away for the sand.
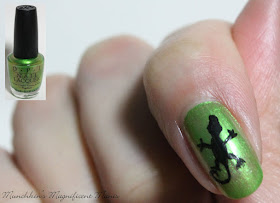
Gecko design, OPI My Gecko does Tricks
On the ring finger nail this design is based on My Gecko does Tricks. For this design a small detail brush and black acrylic paint was used to made a small gecko outline.
Shopping bag design, OPI Suzi Shops & Island Hops
On the middle finger nail this design is based on Suzi Shops & Island Hops. On my right hand I some what tried to keep the designs a little more simple because I am right handed, so for this design I just made a simple outline of a shopping bag, with a thin detail brush and black acrylic paint.
Palm tree design OPI Hello Hawaii Ya?
On the ring finger nail this design is based on Hello Hawaii Ya? This polish name was a little a little tricky to think of a design for so I decided to keep it simple on my right hand, and make a palm tree. Once again this design was created using a liner blush with black acrylic paint and Sally Hansen- Hard as Nails- Black Heart on the nail tips.
Mai Tai Drink design, OPI Is Mai Tai Crooked?
Last but not least on the pinky nail Is Mai Tai Crooked? For this design I create the tropical drink Mai Tai with a thin detail brush, white, yellow, and orange acrylic paint.
Here is the final Hawaii design on the left hand
Here is the final Hawaii design on the right hand
Hope all of you enjoyed this Hawaii design that is great for summer and your next trip to Hawaii! Also hope all of you liked the way I did this post, even if it was not a step by step, I personally kind of liked how I took a final close up photo of each nail.
Aloha and see you next time for more nail fun!


No comments:
Post a Comment