Happy Mother's Day! Final red rose with hearts nail design.
The nail polish and nail tools used in this Mother's day nail design is:
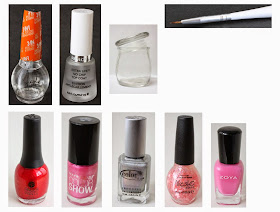
Base and top coat- Nicole OPI- 3in1- base, top, & strengthener and Revlon Extra Life No Chip top coat.
Nail polish- Finger paints- Cubism Crimson, Maybelline- Color show- Rose rapture, Color Club Halo's- Harp on, Nicole by OPI- Love your life, and Zoya Mini- Eden.
Nail art tools- Small glass jar with nail polish remover, and a thin brush- short.
The skill level for this mother's day nail design is:
Intermediate
This design is intermediate due to the line work that is done to create the roses. Although their is not much to this design just two roses and glitter heart pieces, the roses can be tricky to create.
Let's get this Mother's day red rose nail design started!
1. Start off with a thin layer of base coat.
2. Once your base coat has dried, apply a red and pink polish to every other nail.
3. Then once your red and pink polish has dried, we will create a rose outline on the thumb nail. Take your thin nail art brush dipped into a silver holograph polish (I used Harp On by Color Club), then make a small circle in the middle of the nail.
5. On the other side of the rose make two more curved lines.
6. On that same side make two more larger curved lines. Then two on the top and bottom, do this until the shape starts to look like a rose. (You can refer to the final photo to see the finished rose.)
7. For the second rose on the ring finger, we will make a red rose. Repeat steps 3-6, but this time fill in the shapes to create a kind of blob looking shape. Don't worry once we outline the rose, it will look like a rose.
8. Once the red part of the rose has dried, take your thin nail art brush dipped in a light pink and start to outline your rose. Starting off with a circle, then a few swirls around that, then outline the rose.
9. For the middle finger nail we will add three glitter heart pieces. Due to the hearts being hard to get out of the bottle. First dab a small drop of the clear glitter base on your nail so the heart will stick, then you will need to fish out a heart from the nail polish bottle, take a tooth pick and place the heart on your nail. Due this for as many hearts that you want on your nail.
To add a little touch of glitter on the pinky and index nail, just take your heart glitter polish minuses the heart shape glitter, and just paint the small glitter on your nail.
Once you rose Mother's day nail design has dried apply a top coat.
As with all nail designs you can always change it up. For this design you can always change it to your mom's favorite flower. Also due to the red, pink, the heart and roses this could also be a Valentines day nail design as well.
Hope all of you enjoyed this Mother's Day nail design. Happy Mother's Day everyone!
See you next time for my next design tutorial!


No comments:
Post a Comment