Pages

Saturday, July 30, 2022

Dippin Dots Collection Review

Hello everyone! Hope everyone is having a good summer. Sorry that it has been a while since I have posted anything. Today we have a fun collection from China Glaze the Dippin' Dots Collection. Who remember Dippin' Dots being a big thing in the 90's, I remember just seeing them at theme parks and that they were suppose to be the ice cream of the future. Anyways when I first saw this collection I was very excited, due to the very bight colors in the collection. 

China Glaze Dippin Dots Collection

China Glaze Dippin Dots Collection


Let's take a look at the polishes in this collection. Also by the way I did not purchase all of the polishes in the collection, their is a blue and pink that look similar to polishes that I already own, so I decided to pass on those two. There is six polishes in this collection.

China Glaze Dippin Dots- Lemon Ice

China Glaze Dippin Dots- Lemon Ice

China Glaze Dippin Dots- Lemon Ice

China Glaze Dippin Dots- Lemon Ice

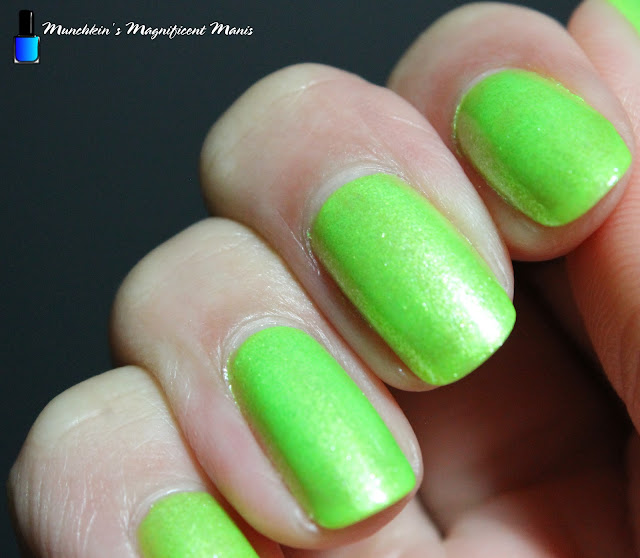
First we will start off with this super bright highlighter yellow called Lemon Ice. This as stated is a very bight highlighter with very fine/ small silver glitter in it. This was opaque for me in three coats, It was a little bit of a thicker formula, also if you are kind of messy when you polish this is a little hard to clean up due to the small glitter. 

China Glaze Dippin Dots- Frosty Lime

China Glaze Dippin Dots- Frosty Lime

China Glaze Dippin Dots- Frosty Lime

China Glaze Dippin Dots- Frosty Lime

Next we have another super bight highlighter color, Frosted Lime. Once agin this a very bright highlighter green with the same fine/ small sliver glitters in it. This was opaque for me in three coats. This had a thiner formula then Lemon Ice and I felt applied a little better.

China Glaze- Dippin Dots- Arctic Confetti

China Glaze- Dippin Dots- Arctic Confetti

China Glaze- Dippin Dots- Arctic Confetti

China Glaze- Dippin Dots- Arctic Confetti

Third we have Arctic Confetti, this is a white/ light pink crelly with rainbow confetti pieces in it. A crelly, if you don't know this is more common in Indie polish brands, they have a jelly like formula that is a little more sheer that way the glitter can show through. This was opaque for me in three coats. I like that China Glaze decided to do a more unique to main stream polish like this. Also this polish does look a lot like ice cream to me too, which is cool.

China Glaze- Dippin Dots- Rainbow Ice

China Glaze- Dippin Dots- Rainbow Ice

China Glaze- Dippin Dots- Rainbow Ice

China Glaze- Dippin Dots- Rainbow Ice

Lastly we have Rainbow Ice, a rainbow confetti topper that looks like sprinkles. This polish has way to much clear base in it which made it hard to apply, I actually had to poor this out on my nail mat to apply this topper to really get any of the pieces on to the nails. 

This polish I used as a base are from the China Glaze My Little Pony Collection, the pink is She's A Mane- Iac and the blue is Too Busy Being Awesome. I felt like these two polishes looked similar to the two in the Dippin' Dots Collection. 

In conclusion this collection is a very fun and bright collection, I feel like it does have a few unique polishes to it. I love the super bright highlighter colors; Lemon Ice and Frosted Lime, those two are my favorites. I do also surprisingly like Arctic Confetti even though it is a light pink/ white. The only one I would pass on is Rainbow Ice, due to it having too much clear base. 

You can purchase these at Sally's for $8.29 each. dippin-dots-nail-lacquer-collection

Hope all of you enjoyed this China Glaze Dippin' Dots Collection Review!

See you next time for more nail fun! 

Monday, July 4, 2022

Golden Sandy Beach- Tropical Nail Design

Hello everyone! Happy Fourth of July to all that celebrate! Today we will not be creating a Fourth of July design, but a tropical design, which I love to do in the summer time. I love tropical anything in the summer time, really anytime. 

Tropical Nail Design

 Here are the polishes and nail art tools used to create this sandy beach design:


Base and top coat- CND Stickey Base Coat and CND Super Shiney Top Coat.

Polishes- Finger paints- Tiffany Imposter, Holo Taco- Hydropower- Electric Holo Collection, and Holo Taco- Gold Flakie- Anniversary.

Acrylic paint- Blue, white, yellow, green, and peach.

Nail art brushes- Thin stripper brush, flat brush, and fan brush.

Other- Water to clean off nail art brushes.

Tropical Nail Design

Apply a base coat.

Let that dry.

Polishes-

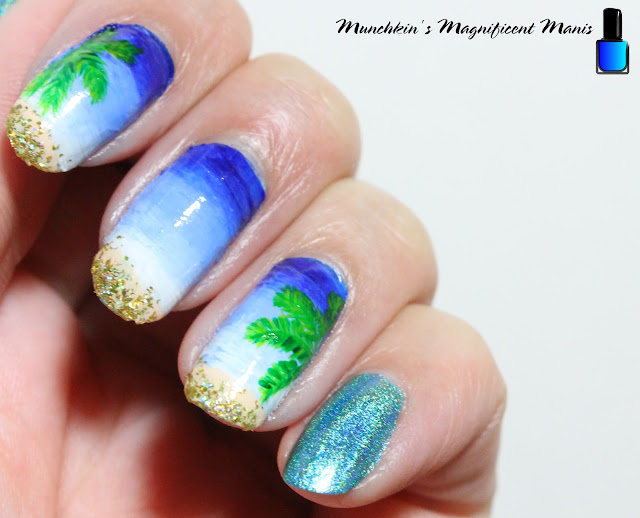
Thumb and pinky- aqua color holographic polish (Holo Taco- Hydropower)

Index, middle, and ring- a light blue cream polish (Finger paints- Tiffany Imposter), this is your base color for the nail art. You need a base color of nail polish if you are going to use acrylic paint for your nail art that way it has something to stick to, other wise it might not last as long.

Let that dry.

Tropical Nail Design

For the nail art we will be creating it on the index, middle and ring finger nails. 

Ocean water:

First we will start off with the water, you will need a dark blue, light blue and white for the water. If you don't have a light blue like me, take your dark blue and add white to make the light blue that you want. 

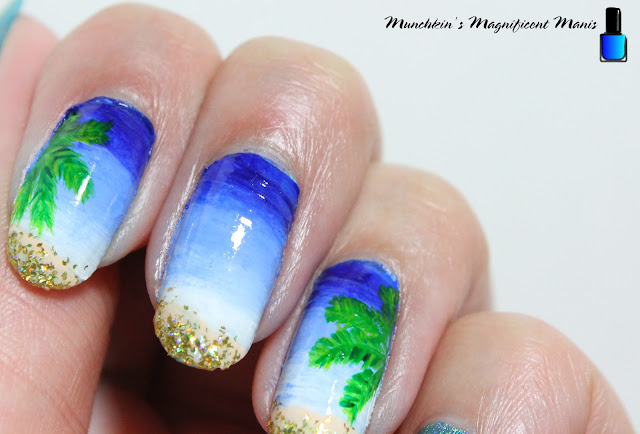
Starting near the cuticle, with you flat brush paint dark blue, light blue, and white. Then take your fan brush and swipe the three colors to blend them together.You will need to go over this a few times to be opaque, I did this three times.

To start your sand just paint a peach colored paint  on the tip of the nails. 

Tropical Nail Design

 Palm leaves- 

On the side of the index and ring finger we will make palm leaves.

First you will need a dark green and light green. If you don't have a light green mix yellow and green to make the light green that you want.

Starting off with the light green, take your stripper brush and make 4 curved lines from the side of the nail and then 1 small straight line at the top of the nail. 

For the palm leaves on each curved lines make very small close together lines. 

Once you have the light green lines done, for more detail take the dark green and make a few lines in over the light green lines. I did take a little bit of yellow as well but really that did not do much, so you can do that or not it is up to you. 

For the final touch take a gold glitter polish (Holo Taco- Gold Flakie) on a makeup sponge and dab that on the tip of the nails over the peach paint. You may need to do this a few times depending on the glitter you used.

Tropical Nail Design

Once you have your golden sandy beach design the way like, apply a top coat to seal in your design and help it to last during your topical vacation or if you are just dreaming of a tropical vacation like me. 

Hope all of you enjoyed this tropical golden sand nail design and hope everyone is having a good summer.

See you next time for more nail fun!