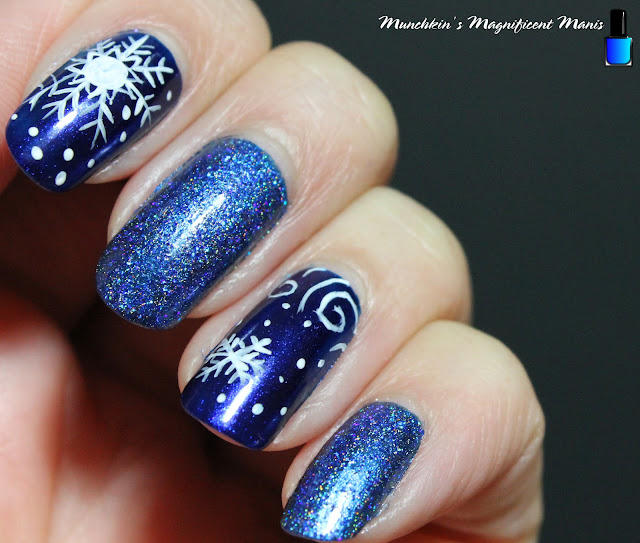
Hello everyone! Hope everyone is having a good start to the new year. Today on the blog we will be creating a winter snowflake design.
Here are the polish and nail art tools used to create this winter nail design:
Base and top coat- - CND Stickey Base Coat and Revlon Extra Life No Chip top coat.
Polish- Pretty& Polished- Sea Spray, Zoya- Twinkling- Jen, Zoya- Estelle, and Fun Lacquer- How Deep is your Holo- Simplynailogical.
Acrylic paint- white
Nail art brushes- a thin stripper and detail brush.
Other- water to clean off your nail art brush.
Apply a base coat.
Let that dry.
Polish-
Thumb- a holographic blue (Pretty& Polished- Sea Spray)
index and ring finger- a royal blue (Zoya- Jen)
Middle and pinky finger nail- Base color, a shimmery blue (Zoya- Estelle) and over top a holographic blue glitter (Fun Lacquer- How Deep is your Holo.)
Let that dry.
For this design we will just be create it on the thumb, index and ring finger nails, the middle and pinky nail just leave them as is with the blue glitter.
First we will start off with the design on the ring finger nail. First we will create two swirls near the cuticle with three curved lines. First start off by making the first swirl near the right hand corner, then a curved line on the other side along with a shorter line, then make one more curved line on the left hand side.
Now on to the snowflake, first make a star shape near the tip of the nail, then on each line make smaller lines for your snowflake.
Lastly make a few small dots with your brush for smaller snowflakes.
Next we will make the snowflake on the index nail. First make a circle, near the cuticle on the upper left hand side and fill that in with white paint. Then make very small triangles all around that circle. Then make eight lines coming from the circle and then on all of the larger lines make a few smaller lines.
Lastly make a few smaller dots with your brush for some smaller snowflakes.
Lastly we will make the design on the thumb nail, some branches with snow on them. First take your thin stripper brush with white paint on it and starting at the tip of the nail make a long line and then make very small lines going down that line on both sides, like you would make a palm tree leaf. Then do this all the way around the nail, making sure to leave space around each branch.
Then once again take your brush and make small dots for small snowflakes.
Once you have your winter snowflake nail design the way you like apply a topcoat to seal in your design and to help it to last.
Hope all of you enjoyed this winter nail design and if it is cold and snowy where you are at try to stay warm!
See you next time for more nail fun!


