Pages

Thursday, February 20, 2020

Full Moon- Night Sky Nail Design

Hello everyone! Today on the blog I have a night sky/ full moon design for all of you, I created this on my nails a few weeks ago and just now have gotten around to typing up a post, this design is suppose to go along with the Starry Night Sky design that I all ready created back in January. 
 
 Full Moon- Night Sky Nail Design
 Full Moon- Night Sky Nail Design

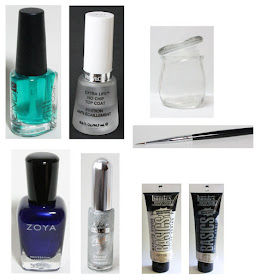
Here are the polishes and nail art tools use to create this night sky nail design:

 
Base and top coat- CND Stickey Base Coat and  Revlon Extra Life No Chip top coat. 

Nail Polishes- Zoya- Twinkling- Jen and Kiss nail art striper- Silver.

Arcylic paint- White and black to make grey. 

Nail art brushes- thin detail brush.

Other- Q- tips for clouds. 

 Full Moon- Night Sky Nail Design  
 Full Moon- Night Sky Nail Design
 Full Moon- Night Sky Nail Design

 Apply your base coat, let that dry.

Polish all of your nails with a shimmery blue (I used Zoya Jen.)

Let that dry as well.

 Full Moon- Night Sky Nail Design
 Full Moon- Night Sky Nail Design
  Full Moon- Night Sky Nail Design

For the nail art first we will be creating clouds with a Q- tip/ cotton swab, this helps to make the clouds look fluffy. Take your Q- tip and dip it into just a little watered down white paint, then dab it on to the nail to make it look like clouds, do this on random parts of the nail (I tried to focus the clouds near the tip, sides and cuticles), and make sure to leave some blue showing for the night sky. 

For the stars take your sliver stripping polish, and just dab some dots on the nail for some smaller stars. Then add a few larger dots as well for some big stars, on the larger dots add two lines to add more detail. For the larger stars I just add a few on the nails, one on the middle finger nail and three on the thumb nail.

  Full Moon- Night Sky Nail Design
  Full Moon- Night Sky Nail Design
 Full Moon- Night Sky Nail Design

 Full Moon- Night Sky Nail Design
 Full Moon- Night Sky Nail Design
 Full Moon- Night Sky Nail Design

Lastly we will make the moon in the sky on the ring finger. First take your detail brush with white paint on it, make a circle kind of near the cuticle. Then take some grey paint and make a few lines on the moon a kind of blend them in with the white so they show up a little bit. 

 Full Moon- Night Sky Nail Design  
 Full Moon- Night Sky Nail Design
 Full Moon- Night Sky Nail Design

Once your night sky is finished apply a top coat to seal in your design and to help it last. 

Also if you liked this design don't forget to check out  Starry Night Sky design as well. 

Hope all of you enjoined this full moon/ night sky nail design!

See you next time for more nail fun!

Tuesday, February 11, 2020

Luv you- Valentine's Day Nail Design

Hello everyone! Happy almost Valentine's Day! For Valentine's Day this year we will be creating of course a heart design, along with some swirls too, and of course we have to have some glitter.

Happy Valentine's Day Nail Design 
Happy Valentine's Day Nail Design

Here are the polishes and nail art tools used to create this nail design:


Base and top coat- CND Stickey Base Coat and Revlon Extra Life No Chip top coat. 

Nail polishes- China Glaze mini- Sesame Street- Giggling All The Way, and Glitter Daze- Let's have a Waikiki.

Acrylic paints- White, red, and black.

Nail art brushes- Thin detail brush and thin stripper brush.

A cup of water to clean off your nail art brushes.

Happy Valentine's Day Nail Design  
Happy Valentine's Day Nail Design 
Happy Valentine's Day Nail Design

Apply base coat, then let that dry.

Polish- 
Thumb, index, middle, pinky- Shimmer pink polish.
Ring finger- Pink glitter polish. 

Let that dry.

Happy Valentine's Day Nail Design
 Happy Valentine's Day Nail Design

Starting with the thumb nail, first make a large heart near the left side of your nail.

Then make some random swirls coming from the heart, I did three from the top and one from the bottom. Then from those swirls create more. (I know that is a weird way to describe how to do that part, but I was not to sure how to describe that part.) 

Then from those swirls make a few hearts, I made four in different spots.

Happy Valentine's Day Nail Design
 Happy Valentine's Day Nail Design
 Happy Valentine's Day Nail Design

For the index and middle finger nail designs, these two are the same just on opposite sides.

On the index nail make a heart on the right side of the nail, then make a swirl on both sides, on the top of the heart make three curved lines at the top, then make a few dots a well. You can also outline the heart as well.

For the middle finger nail repeat the same steps just on the left side.

Happy Valentine's Day Nail Design
 Happy Valentine's Day Nail Design
 Happy Valentine's Day Nail Design

 Happy Valentine's Day Nail Design
 Happy Valentine's Day Nail Design
 Happy Valentine's Day Nail Design

Lastly the heart design on the pinky finger nail. Once again make a large heart in the middle of the nail and then make some swirls at the top and bottom. You can also outline the heart if you would like or not. 

Happy Valentine's Day Nail Design

Once you have your heart nail design the way you like, apply a top coat to seal in your design and to help it last through your Valentine's day date or just for fun.

Hope all of you have a nice Valentine's Day and hope all of you enjoy this design!

See you next time for more nail fun!