Pages

Friday, January 29, 2016

Waddle Waddle- Penguin

Hello everyone! Where I live, as soon as January came it got very cold and snowy, so I thought what better way to beat the winter blue then to create a cute simple penguin/ winter nail design. 

Penguin and Winter nail design 
 Penguin and winter nail design 


The nail polish and tools used for this design will be right next to the images as we go.


The skill level for this penguin and winter design is:

 
   Beginner Basic 

This design is simple and great for somewhat beginners. The design is mainly on the thumb with a penguin and a snowflake on the ring finger nail, and then just solid color. The only part that might be a little bit hard is creating the penguin.  


Bur it's cold outside, let's go inside and create some cute nail art!

 
 Base coat used: Nicole OPI-  3in1- base, top, & strengthener

1. As always start off with a base coat to protect your nails.  

 
Polishes used: Sally Hansen- Hard as Nails- Black Heart, Zoya- Estelle, 
and Finger paints- Tiffany Imposter.

2.  Once your base coat has dried, paint your thumb nail black for the penguin, your index, middle, and pinky nail a metallic blue which will stay as is, and then your ring finger a light blue for the snow. Also for an add touch on the ring finger nail you can apply a glitter over the light blue.

 
 White acrylic paint and a small thin nail art brush

3. First we will start off with the snowflake on the ring finger nail, we will just make one large snowflake and small dots later for small snowflakes. To make the large snowflake take your thin nail art brush dipped into white paint and make a star shape. 

  
4. To add more detail to your snowflake just add small arrow like shapes on the larger lines, just like the photo above. Also make sure to add the small arrow like shapes all around the snowflake. 

 White acrylic paint and a small thin nail art brush

5. Next we will create the cute penguin. First we need to make the white part of the body. Once again take your thin nail art brush dipped into white paint and make an M shape near the cuticle, then kind of outline the shape of the nail, making sure to leave some black all around. Once you have the shape you fill in the body with white, you may have to go over it a few times to be opaque enough. 

  
Black acrylic paint and a small nail art brush

6. Once your penguins body has dried, we will make his facial features. With your thin nail art brush dipped into black paint make two small dots to know where to start to make the eyes, then make them a little bit bigger. 

 
 Yellow and red paint to make orange. 

7. After we finish the eyes we will make the beak. If you don't have orange paint, then you will need to make some orange, which is simple, just mix a little bit of red and yellow together then you have some orange. Once you have your orange, take your thin nail art brush and make a upside down triangle shape, and fill that in.


8. For a final touch we will add a scarf to our penguin. Take the same metallic blue that you used on the other nails and make a long line around your penguin, and then two small lines coming down on one of the sides.    

Penguin and Winter nail design  Final Penguin and Winter nail design

9. For the penguin you can always stop at the last step or add some small feet. If so take the orange paint you made and make a curved line and then three small lines for the feet. 


China glaze- white on white and a medium dotting tool

10. Also for a small touch on the ring finger nail you can add small dots for small snowflakes. With a medium dotting tool dipped into white polish, dot a few dots around the larger snowflake.  

Once your cute penguin and winter nail design has dried apply a top coat to seal in and protect your design. As always I used Revlon Extra Life No Chip top coat.  

Hope all of you enjoyed this cute nail design!

See you next time for more nail fun!   

Friday, January 22, 2016

Hello Hello Kitty- Nail Art Tutorial

Hello again everyone! Hope all of you enjoyed the OPI Hello Kitty review! If you didn't check out that review yet you can check it out after this tutorial. 

OPI Hello Kitty Collection 
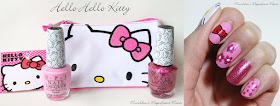
  Hello Kitty Duo pack coin in my purse set, final nail design. 

The nail polish and tools used for this Hello Kitty design will be right next to the images as we go. For this design we will be using two of the polishes from the OPI Hello Kitty collection, along with some other polishes.

The skill level for this Hello Kitty design is:


Beginner to Intermediate 

This design for the most part is simple with basic dots and flowers created with dots. The only part that is more intermediate is Hello Kitty and the bow, due to the outlining this can make the design a little bit harder. 


Let's start this Hello Kitty design!


 Zoya Naked Manicure Base coat

1. Start off with a base coat. I tried the Zoya Naked Base coat, as stated in other post I am unsure if you really are suppose to use this with colored polish, but why not give it a try.


 Polishes used: China glaze- white on white, OPI- Hello Kitty- Look at My Bow!, 
and OPI- Hello Kitty- Starry- Eyed for Dear Daniel.

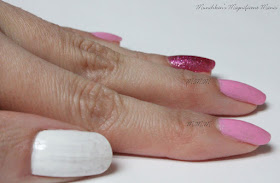
2. Once your base coat has dried paint your thumb white, your index, middle, and pinky nail with Look at my Bow!, and the ring finger nail with Starry- Eyed for Dear Daniel (this nail will be an accent nail and just stay as is.)

 
3. We will first start off with the easy part, dots on the pinky nail. Take your large dotting tool dipped into Starry- Eyed for Dear Daniel and dot random dots on the nail. 

Dots: China glaze- white on white

4. Next we will be creating three simple flowers on the middle finger nail. Once again take your extra large dotting tool dipped into white polish and make three dots on the nail.

 
Extra large and large dotting tools 

5. Then take your large dotting tool dipped into Starry- Eyed for Dear Daniel and make one dot at the top of the white dot, two dots on the side, and two on the bottom, to make a flower. Repeat this as many times as you would like.

Zoya- Renee- Redbook trio, and thin nail art brush.

6. After we have finished the flowers, on the index nail we will create Hello Kitty's bow that she wears. Take your thin nail art brush dipped into red nail polish or red acrylic paint and make a circle in the middle of the nail, then two bow shapes on the sides.

 
   black acrylic paint, and Sinful Color-Let's Meet.

7. As we let the bow dry we will start on Hello Kitty herself on the thumb nail. First we will make her eyes, take your clean thin nail art brush dipped into black and make two small dots to know where to start her eyes, then make two black ovals. Now for her nose, take your small nail art brush dipped into yellow nail polish or paint and make a yellow oval under the eyes.

    
8. After we finish her cute nose we will make her whiskers. Once again take your clean thin nail brush dipped into black acrylic paint and make three lines on each side of her face.

 
9. To finish Hello Kitty we will make her bow, just  a smaller version of the larger bow that we did on the index nail. Just like before take your thin nail dipped into red polish or paint, and make a circle in the middle of the nail, then two bow shapes on the sides. 

Hello Kitty design 
 Final Hello Kitty design

10. For the final details we will outline the two bows. Take your thin clean nail art brush dipped into black acrylic paint and carefully outline the two bows, then make to ovals on the sides of the bow.  

Once your cute Hello Kitty design has dried apply a top coat to seal in your design and protect your design as well. As always I used Revlon Extra Life No Chip top coat.

Hope all of you enjoyed both review and tutorial of the OPI Hello Kitty collection, well two of the polishes from the collection!

See you next time for more bright and fun nail tutorials! 

Hello Hello Kitty- OPI Review

Hello everyone! Today on the M.M.M blog we have a two for one, a review and tutorial! If keep up to date with all the new nail polish collections out there, then you know that OPI just recently released a new collection, the Hello Kitty collection. If you are anything like me then this collection made you feel excited, just because it is Hello Kitty. 

Hello Kitty Duo pack coin in my purse set
 Hello Kitty Duo pack coin in my purse set in the box. My set was a little crushed.

First off we will start with a mini review. As you can see I didn't buy the whole collection just the duo box set with two of the polishes. This collection has 12 polishes with one special edition polish. As you may have guessed this collection has a lot of pinks in it, along with a few other colors such as yellow, blue, and a black. I personally felt like this collection didn't have very many unique looking colors, many of the colors can be found in other collections or brands. That is why I decided to get the duo set, with one of the polishes Starry Eyed For Dear Daniel (the glitter pink) seem like it was one of the most unique, and maybe one other. 

If you are interested in seeing the other colors here is a link to Ulta's website: 

 Hello Kitty Duo pack coin in my purse set.
 Hello Kitty Duo pack coin in my purse set.

As for the two polishes in the set, here is the first one.
 
OPI Hello Kitty Collection, Look at My Bow!
Look at My Bow! is described as a sweet- girl pink, or a light bubble gum pink. This is a creme polish that was opaque for me in three coats. This polish went on a little streaky for me, it may have been because I used the Zoya Naked Base coat. Other wise this might have gone on fine in two coats.

OPI Hello Kitty Collection, Starry- Eyed For Dear Daniel   
Next is Starry- Eyed For Dear Daniel is described as a pink super glitter. This is a pink miro- glitter polish that was opaque in three coats, it was a little shear on the first coat but easily bulidable. This was one of the few colors that I thought was unique, along with the color Charmmy & Sugar (another glitter) which I didn't purchase.  

This Duo also came with a cute coin purse (show in the photo above) it is very small but cute. I just use it to hold tissue paper, not coins.

I got my duo at my local Sally beauty's for $16.99

Over all this collection is kind of meh, due to the lack of uniqueness of colors. The main reason why I was excited about this collection was the nostalgic feeling it gave me with Hello Kitty. I have liked Hello Kitty for a long time, ever since I was little and thought that would be a cool collection.

Their also are some other Hello Kitty set that OPI came out with, here are the links below:

OPI Say Hello To Pretty Pedi Kit $16.99 at Sally Beauty


Hope all of you enjoyed this mini review, I decided to break this post into two, other wise it would have been to long. 

Also don't forget to check out the Hello Kitty tutorial next!  
 

Friday, January 15, 2016

May the Force Be With You- Star Wars Design

Hello everyone! From the title of this post you can already tell what this weeks design will be, if you are a Star Wars fan then this design I know you have been waiting for. I know you maybe thinking Star Wars has been out for a few weeks now, why did you wait to do this design? Well I had planned to do this design the week the movie came out, then I got sick and had to put it off, but I figured this is a very popular movie and it would be okay to do the design still. 

  Star Wars Nail Design Star Wars Nail Design, which side do you choose the Dark or the Light side?

The nail polish and tools used for this Star Wars design will be right next to the images as we go.

The skill level for this Star Wars nail design is:

 
  Intermediate 

This design has parts that are both easy and difficult. As far as the easy parts, the galaxy is the easy part, with just sponging on three colors, then adding glitter, and two X's for stars. The part that is a little bit harder is the Star Wars text on the thumb nail, and maybe the light saber and storm troopers.

Let's decide if we want to go to the Light or Dark side, or just start this Star Wars nail design!

  
 Base coat used Nicole OPI-  3in1- base, top, & strengthener
1. Start off with a thin layer of base coat to protect your nails from the dark side or dark nail polish. 

  
Nail polishes used Sally Hansen- Hard as Nails- Black Heart 
and China glaze- white on white  

2. Paint all of your nails black, except your index finger nail, paint that nail white.

  
White acrylic paint and a thin nail art brush
 
3. First we will start off with the Star Wars title on the thumb nail. For the title I just look up online to see what the text look like to try and paint it on my nail. First we will write Star, take your thin nail art brush dipped into white paint and starting with the letter S and write Star.

   
4. Once you have painted Star, we will be paint Wars under that. Once again with your thin nail art brush dipped into white paint, starting with the W write Wars.

 
Sponge cut into 3 small pieces, and China glaze- white on white.

5. Now we will do the fun and pretty part (at least I thought so) the galaxy. Take a makeup sponge cut into small pieces (I cut three small pieces) and paint your sponge with white polish, then dab the sponge down the center of the nail or just random spots on your nails like the photo above.

 
 Zoya Dream and Aurora 

6. Next we will sponge on blue and purple. I thought the perfect blue and purple polish to use for a galaxy, would be Zoya's Dream and Aurora. We will first start off with the blue, take your other small piece of makeup sponge and paint that blue, then dab over/ near the white. Then take another small piece of sponge and paint that purple, then right next to the blue dab on the purple. You can leave some of the white showing if you would like.    

 
Cover Girl- Boundless color- Disco dazzle, sorry this polish is kind 
of old but you should be able to find one that is similar.

7. Now for the stars, this is very simple all you need is a sliver glitter with small and large glitter pieces in it, and paint it right over the galaxy you just made. Also for more stars you can add two white starts with a white nail art stripper, just add two X's near the top and bottom of the nail or wherever you would like. 

     
 White acrylic pant and a thin nail art brush

8. To add more of a Star Wars feel to this design we will be making two light-sabers on the ring finger nail. First we need to make the outline of the light- sabers, with white paint to make them stand out over the dark background. Take your thin nail art brush dipped into white paint make an X and go over it a few times to make the light-sabers thicker. Then make a two small lines for the handle of the light-saber

 
           Black acrylic paint 

9. As we wait for the light- saber outline to dry, we will create the stormtrooper on the index nail. Take your clean thin nail art brush dipped into black paint, and make a thick black line near the cuticle, then make two eye under that thick black line.

     
10. To finish your stormtrooper, make two lines in a triangle shape for the mouth, then two lines and a small triangle under the mouth on the tip of the nails. 

Star Wars Nail Design    Final Star Wars nail design on the left hand

 
 Polishes used for light-sabers Finger paints- Cubism Crimson
 and Sinful Color- Midnight blue 


11. Now back to the light- sabers, we need to fill them in. Take your clean thin nail art brush dipped into red nail polish and paint over one of the light- sabers, then clean off your brush and dip your brush into blue nail polish and paint over the other light- saber. Also you need to add some grey to your light- sabers handle. Take you clean thin nail art brush dipped into grey paint (mix white and black paint) and go over the white part of the handle.
     
 Star Wars Nail Design
Star Wars Nail Design 
Which side did you pick the Light or Dark side?  

Once your Star Wars nail design has dried, apply a top coat to seal in your design, as usually I used Revlon Extra Life No Chip top coat.

 Star Wars Nail Design, galaxy nails  
 Star Wars Nail Design on the right hand

If you are having a little bit of trouble with the Star Wars letters/ tilte on the thumb nail, here is another option. Just add the galaxy on your thumb nail, that is what I did on my dominate hand, the right hand.

Hope all of you enjoyed this Star Wars nail design, and sorry I did not have this post done when the movie came out. But if you have not seen it yet or if you want to see it again you can wear this design to show your love of Star Wars. 

May the force be with you!

See you next time for more nail fun